RoofRack
New member
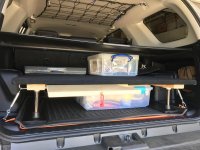
This is version 3 of an SUV Cargo Storage deck that I’m calling a Drawerless Drawer System, and I think I’m done for now.
Here's the build video with full process. At the end I address the critical measurements. Keep reading below for more build details and measurements for a 3rd gen 4runner.
https://www.youtube.com/watch?v=dY3AVpzBAwo&t=4s
Image Gallery:


The first version was a deck platform above the cooler. That worked fairly well when loaded, but for daily driving having the deck that high wasn’t convenient.

Second version I made as my first welding project. It was ugly, but the low deck and slide-out table made it a much better design.

Single Sheet of Ply Wood
This build can be done with a single sheet of plywood with two squares and one shelf board left over that will be suitable for other projects.
Home Depot Panel Saw
Start by having someone at Home Depot cut down your 4 x 8 sheet of 3/4 plywood on the panel saw. The measurements aren’t super critical, and the panel saw is good enough. This is a cargo deck after all, not heirloom furniture. The measurements I used were for a 36″ x 48″ top with 12 inch sides. Your measurements might need to be different, adjust accordingly.
* 2 pieces @ 36″ x 48″
* 2 pieces @ 12″ x 48″
Chop Saw
I cut down the sides to 36 inches with my chop saw. I had to flip them over as the saw wasn’t able to do 12 inch in one pass. Using a stop block makes this a lot easier.
* 2 pieces @ 12″ x 36″
Skill Saw
The only other cut is to cut down the slide-out table to fit inside the uprights. The measurement I used was 37.5 to fit within the wheel wells which are 39″ apart. I measured the off -et on the frame of my circular saw and set up a straight edge to act as a fence to make this cut straight. It wasn’t perfect, but again, this is a cargo deck for a 19 year old 4Runner…
* 1 piece @ 36″ x 37.5″
Finishing
I recommend using a water proofing finish on this. I will spill water on it, the cooler will leak. The dog may be wet when she gets in.
For the slide out table I didn’t want to use water seal, so I got some bees-wax butcher block conditioner that is food safe and applied that. I will re-apply that periodically to keep it protected. I put it on the sides and the finger holes to help keep it from swelling itself shut if it does get wet. I left the underside of the table and the deck unfinished to aid in drying if it ever does get saturated.
Build List:
Everbilt 1-1/2 in. x 36 in. Aluminum Angle with 1/8 in. Thick: https://www.homedepot.com/p/Everbil...inum-Angle-with-1-8-in-Thick-801407/204273991
Everbilt 3/4 in. x 4 ft. x 8 ft. Sanded Plywood (Actual: 0.703 in. x 48 in. x 96 in.) https://www.homedepot.com/p/3-4-in-...ual-0-703-in-x-48-in-x-96-in-690053/100478798
Everbilt 9/16 in. Stainless Steel Rope Loop https://www.homedepot.com/p/Everbilt-9-16-in-Stainless-Steel-Rope-Loop-42634/205887675
Everbilt 1/2 in. x 6 in. Heavy Duty Beige Felt Strips (9-Pack) https://www.homedepot.com/p/Everbil...Duty-Beige-Felt-Strips-9-Pack-49954/300194064
Husky Light Duty Anchor Points (4-Pack) https://www.homedepot.com/p/Husky-Light-Duty-Anchor-Points-4-Pack-54522/206967313
Howard BBC012 Butcher Block Conditioner, 12-Ounce
Thompsons Water Seal 24111 1.2-Gallon Clear Low VOC Water Sealer for Exterior Use
Tools:
Kreg Jig K5 Pocket-Hole System
Kreg KHCRA Automaxx Right Angle Clamp
Kreg SML-C125-500 1-1/4-Inch #8 Coarse Pocket Hole Screws with Washer-Head, 500-Pack
Gear:
WOLF PACK - BY FRONT RUNNER https://www.frontrunneroutfitters.com/en/us/storage-systems/front-runner-wolf-pack.html
STRATCHITS - BY FRONT RUNNER https://www.frontrunneroutfitters.com/en/us/front-runner-stratchits-pair.html
Here's the build video with full process. At the end I address the critical measurements. Keep reading below for more build details and measurements for a 3rd gen 4runner.
https://www.youtube.com/watch?v=dY3AVpzBAwo&t=4s
Image Gallery:
The first version was a deck platform above the cooler. That worked fairly well when loaded, but for daily driving having the deck that high wasn’t convenient.
Second version I made as my first welding project. It was ugly, but the low deck and slide-out table made it a much better design.
Single Sheet of Ply Wood
This build can be done with a single sheet of plywood with two squares and one shelf board left over that will be suitable for other projects.
Home Depot Panel Saw
Start by having someone at Home Depot cut down your 4 x 8 sheet of 3/4 plywood on the panel saw. The measurements aren’t super critical, and the panel saw is good enough. This is a cargo deck after all, not heirloom furniture. The measurements I used were for a 36″ x 48″ top with 12 inch sides. Your measurements might need to be different, adjust accordingly.
* 2 pieces @ 36″ x 48″
* 2 pieces @ 12″ x 48″
Chop Saw
I cut down the sides to 36 inches with my chop saw. I had to flip them over as the saw wasn’t able to do 12 inch in one pass. Using a stop block makes this a lot easier.
* 2 pieces @ 12″ x 36″
Skill Saw
The only other cut is to cut down the slide-out table to fit inside the uprights. The measurement I used was 37.5 to fit within the wheel wells which are 39″ apart. I measured the off -et on the frame of my circular saw and set up a straight edge to act as a fence to make this cut straight. It wasn’t perfect, but again, this is a cargo deck for a 19 year old 4Runner…
* 1 piece @ 36″ x 37.5″
Finishing
I recommend using a water proofing finish on this. I will spill water on it, the cooler will leak. The dog may be wet when she gets in.
For the slide out table I didn’t want to use water seal, so I got some bees-wax butcher block conditioner that is food safe and applied that. I will re-apply that periodically to keep it protected. I put it on the sides and the finger holes to help keep it from swelling itself shut if it does get wet. I left the underside of the table and the deck unfinished to aid in drying if it ever does get saturated.
Build List:
Everbilt 1-1/2 in. x 36 in. Aluminum Angle with 1/8 in. Thick: https://www.homedepot.com/p/Everbil...inum-Angle-with-1-8-in-Thick-801407/204273991
Everbilt 3/4 in. x 4 ft. x 8 ft. Sanded Plywood (Actual: 0.703 in. x 48 in. x 96 in.) https://www.homedepot.com/p/3-4-in-...ual-0-703-in-x-48-in-x-96-in-690053/100478798
Everbilt 9/16 in. Stainless Steel Rope Loop https://www.homedepot.com/p/Everbilt-9-16-in-Stainless-Steel-Rope-Loop-42634/205887675
Everbilt 1/2 in. x 6 in. Heavy Duty Beige Felt Strips (9-Pack) https://www.homedepot.com/p/Everbil...Duty-Beige-Felt-Strips-9-Pack-49954/300194064
Husky Light Duty Anchor Points (4-Pack) https://www.homedepot.com/p/Husky-Light-Duty-Anchor-Points-4-Pack-54522/206967313
Howard BBC012 Butcher Block Conditioner, 12-Ounce
Thompsons Water Seal 24111 1.2-Gallon Clear Low VOC Water Sealer for Exterior Use
Tools:
Kreg Jig K5 Pocket-Hole System
Kreg KHCRA Automaxx Right Angle Clamp
Kreg SML-C125-500 1-1/4-Inch #8 Coarse Pocket Hole Screws with Washer-Head, 500-Pack
Gear:
WOLF PACK - BY FRONT RUNNER https://www.frontrunneroutfitters.com/en/us/storage-systems/front-runner-wolf-pack.html
STRATCHITS - BY FRONT RUNNER https://www.frontrunneroutfitters.com/en/us/front-runner-stratchits-pair.html