ShooterMcGavin
New member
[MENTION=120071]mtbtim[/MENTION] and [MENTION=102606]infamousRNR[/MENTION] put together a great video, detailing all of the steps to take apart and repair the valve cover gaskets. I used their video to access the valve covers and then realized the extent of residue within the intake manifold. I decided to take the intake manifold off and scrub the passageways. This isn't a complete How-To, but I hope I can provide some insight that I discovered, in order to help others. I did it alone, so I could only take still shots.
To anyone else who has done this or with experience in this area, feel free to add your advice as well. I am far from the expert.
Follow the video by [MENTION=120071]mtbtim[/MENTION] and [MENTION=102606]infamousRNR[/MENTION] to take the upper and lower plenums off. Cover the intake manifold intake channels and then clean the top of the engine thoroughly, on both sides of the intake manifold and the heads (I didn't do this but it would have been very helpful). After that, take the valve covers off. That was the procedure I took, but it might be possible to remove the intake manifold without removing the valve covers; I don't know.
To [MENTION=120071]mtbtim[/MENTION] and [MENTION=102606]infamousRNR[/MENTION], if you would rather that I don't link directly to your Youtube video, please PM me and I will remove the link.
Valve Cover Gaskets How-To
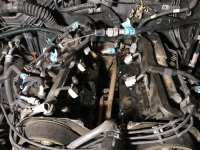
With the valve covers removed, your 5VZ-FE will look something like this.

Drain the coolant by loosening the petcock at the bottom of the radiator. Don't fully remove the plug.

Remove the 6 bolts holding the fuel rails onto the intake manifold. Each bolt will have a black spacer under it.

Unplug the connections to the injectors.

After the fuel rail bolts have been removed, the fuel rails can be pulled upwards and separated from the injectors. The fuel rails will be held on by the friction of the O-rings on the top of the injectors. *Note* When the fuel rails separate from the injectors, gasoline will leak out of the fuel rail. Make sure to take the necessary precautions regarding ventilation, open flames, etc.
When the fuel rails have been separated from the injectors, the injectors can be pulled from the intake manifold. Pull and use a slight twisting motion, and they should come out easily.

Make sure the coolant is drained. Remove the hose clamp and separate the top radiator hose from the fitting on the intake manifold.

The plastic timing belt cover is held on by 6 bolts. Only 5 of them need to be removed for this job. The hardest one to reach is the lower bolt on the passenger side and that one can remain. With all other bolts removed, the cover can be pulled out of the way with enough space to pull the intake manifold out. This is also a great time to inspect the timing belt. Here, I am not ready to pull the intake manifold off, just showing that the plastic can be bent out of the way easily.

The intake manifold is being held to the heads with 8 bolts. These bolts are easily recognized by the torx head within the hex bolt.

After the 8 bolts are removed, the intake still has 4 nuts on studs holding the manifold on, one at each corner. Here, you can see the extension on the front passenger side nut. The other front bolt can be seen below and slightly to the right of the driver side fuel rail. Each nut will have a washer under it.
Also, in the below photo, a bracket is being held onto the intake manifold with 2 bolts. That bracket can be seen just below the driver side fuel rail and it needs to be removed.

In this photo, the ratchet extension is on the rear driver side nut.

In the center of this photo, you can see the passenger side stud with some rust on the base. That is the final of the 4 nuts.

One last nut holds the intake manifold in place. It is really hard to see in this photo, because of all the dirt. It is a nut that secures the fuel line onto the intake manifold, on the rear driver side of the manifold. I'm trying to point to it here.

In the below photo, you can see the stud where the fuel line nut was removed. To the left of my finger, you can see a vacuum fitting where I removed a vacuum line. Also seen in this photo, is a coolant hose in the center rear of the intake manifold. It is really tough to get pliers on that hose clamp. Follow the steps below, before removing it.

Set the shiny plastic loom in front of the firewall up and out of the way. Move the driver side injector wiring further to the driver side. After that vacuum line is removed from the rear of the intake manifold (mentioned above), you should be able to move both of the fuel rails over towards the driver side, above the driver side valves. At this point, the intake manifold can be lifted off the studs which hold it in place. It may take a little effort to break it free of the gaskets. Pull up on the rear stud in the manifold and the front coolant fitting. Once the manifold is moved away from the firewall, you can get pliers onto the hose clamp for the coolant line at the rear of the manifold. Take that clamp and hose off, and the intake manifold should be free to be removed.
Done


I hope this was descriptive enough to help some people out there. Let me know if there are any questions or places where I need to clarify.
To anyone else who has done this or with experience in this area, feel free to add your advice as well. I am far from the expert.
Follow the video by [MENTION=120071]mtbtim[/MENTION] and [MENTION=102606]infamousRNR[/MENTION] to take the upper and lower plenums off. Cover the intake manifold intake channels and then clean the top of the engine thoroughly, on both sides of the intake manifold and the heads (I didn't do this but it would have been very helpful). After that, take the valve covers off. That was the procedure I took, but it might be possible to remove the intake manifold without removing the valve covers; I don't know.
To [MENTION=120071]mtbtim[/MENTION] and [MENTION=102606]infamousRNR[/MENTION], if you would rather that I don't link directly to your Youtube video, please PM me and I will remove the link.
Valve Cover Gaskets How-To
With the valve covers removed, your 5VZ-FE will look something like this.

Drain the coolant by loosening the petcock at the bottom of the radiator. Don't fully remove the plug.

Remove the 6 bolts holding the fuel rails onto the intake manifold. Each bolt will have a black spacer under it.

Unplug the connections to the injectors.

After the fuel rail bolts have been removed, the fuel rails can be pulled upwards and separated from the injectors. The fuel rails will be held on by the friction of the O-rings on the top of the injectors. *Note* When the fuel rails separate from the injectors, gasoline will leak out of the fuel rail. Make sure to take the necessary precautions regarding ventilation, open flames, etc.
When the fuel rails have been separated from the injectors, the injectors can be pulled from the intake manifold. Pull and use a slight twisting motion, and they should come out easily.

Make sure the coolant is drained. Remove the hose clamp and separate the top radiator hose from the fitting on the intake manifold.

The plastic timing belt cover is held on by 6 bolts. Only 5 of them need to be removed for this job. The hardest one to reach is the lower bolt on the passenger side and that one can remain. With all other bolts removed, the cover can be pulled out of the way with enough space to pull the intake manifold out. This is also a great time to inspect the timing belt. Here, I am not ready to pull the intake manifold off, just showing that the plastic can be bent out of the way easily.

The intake manifold is being held to the heads with 8 bolts. These bolts are easily recognized by the torx head within the hex bolt.

After the 8 bolts are removed, the intake still has 4 nuts on studs holding the manifold on, one at each corner. Here, you can see the extension on the front passenger side nut. The other front bolt can be seen below and slightly to the right of the driver side fuel rail. Each nut will have a washer under it.
Also, in the below photo, a bracket is being held onto the intake manifold with 2 bolts. That bracket can be seen just below the driver side fuel rail and it needs to be removed.

In this photo, the ratchet extension is on the rear driver side nut.

In the center of this photo, you can see the passenger side stud with some rust on the base. That is the final of the 4 nuts.

One last nut holds the intake manifold in place. It is really hard to see in this photo, because of all the dirt. It is a nut that secures the fuel line onto the intake manifold, on the rear driver side of the manifold. I'm trying to point to it here.

In the below photo, you can see the stud where the fuel line nut was removed. To the left of my finger, you can see a vacuum fitting where I removed a vacuum line. Also seen in this photo, is a coolant hose in the center rear of the intake manifold. It is really tough to get pliers on that hose clamp. Follow the steps below, before removing it.

Set the shiny plastic loom in front of the firewall up and out of the way. Move the driver side injector wiring further to the driver side. After that vacuum line is removed from the rear of the intake manifold (mentioned above), you should be able to move both of the fuel rails over towards the driver side, above the driver side valves. At this point, the intake manifold can be lifted off the studs which hold it in place. It may take a little effort to break it free of the gaskets. Pull up on the rear stud in the manifold and the front coolant fitting. Once the manifold is moved away from the firewall, you can get pliers onto the hose clamp for the coolant line at the rear of the manifold. Take that clamp and hose off, and the intake manifold should be free to be removed.
Done


I hope this was descriptive enough to help some people out there. Let me know if there are any questions or places where I need to clarify.
Last edited: