Adventures of 4RnR Grl (and build)

Removing 2nd row seats

I've had the back seats out a lot more than I've had them in. Once you do it a few times you get the time down to about an hour, either to put them in or take them out. I need to take mine out again so I can go camping next weekend.
The back of the larger side is heavy. You're stronger than me if you put it in the attic while standing on a ladder. I usually find a place in the garage for them, set them on wood blocks and cover them up with a tarp.
 
I've had the back seats out a lot more than I've had them in. Once you do it a few times you get the time down to about an hour, either to put them in or take them out. I need to take mine out again so I can go camping next weekend.
The back of the larger side is heavy. You're stronger than me if you put it in the attic while standing on a ladder. I usually find a place in the garage for them, set them on wood blocks and cover them up with a tarp.

Oh yeah that thing is heavy! I actually had hubby get up on the ladder to push it up to me in the attic. I wish we had garage room. We've actually talked about moving again because the toys are taking up too much space!
 
Today I built a floor. Still needs anchors and some tie downs but it'll do for now. [emoji4]
f1c3983051363f40ff355cde582b73e3.jpg
 
That is beautiful!!! :thumb:

Thank You! I'm waiting on the compressor mount from Slee to arrive to get the rest of the components mounted (hoping there's a bit of extra room since I only have the single chamber compressor); then, I can start on the wiring up process. Maybe by July I'll have it all done! :moping:

I'm also hoping to have a fridge by the end of this month too!
 
The compressor bracket arrived from Slee today. I made a mounting place from more of the Starboard for some of the other battery components that I'll probably catch heat for.

My friend is coming Thursday to help me get started on the electrical and hopefully get the compressor wired up. We'll see. This whole working full time is taking away from work on my truck. It's B.S.
e37d0fb999fe307c6ee452874f810f1b.jpg
9a6c3f9414250dc574b64bcae2f2032c.jpg
c7df27ba0d31b5c3b149a5b3c6fd9c79.jpg
 
So another small update. I've finally come to the realization that my truck will never go back to stock. Up until now I could have, but with my new found freedom comes more work. Also... it's much more fun to hack up your interior when you don't have to worry about trying to save things.

I needed a good place to mount switches. I found a post saying the OTRATTW switch banks would not fit the early 5th gens in the cubby locations. Well, my dremeling skills prove otherwise. Two of the switches won't be used yet, but soon.... I found orange illuminated switches to match my interior lights.

75937dadc872790f54a3703c144a6746.jpg
7e6d3007c60ba66977c98b906cdca8e5.jpg
ea6ab6c6ffc14a25979f41a49a4f974a.jpg
582789f121638b8cb0f872cff152f781.jpg
e58b6a133a3335e7aa2a487e64be21a7.jpg
86586caa95b8423615127bd6f8386a46.jpg
 
Last edited:
So another small update. I've finally come to the realization that my truck will never go back to stock. Up until now I could have, but with my new found freedom comes more work. Also... it's much more fun to hack up your interior when you don't have to worry about trying to save things.

I needed a good place to mount switches. I found a post saying the OTTRAW switch banks would not fit the early 5th gens in the cubby locations. Well, my dremeling skills prove otherwise. Two of the switches won't be used yet, but soon.... I found orange illuminated switches to match my interior lights.

75937dadc872790f54a3703c144a6746.jpg
7e6d3007c60ba66977c98b906cdca8e5.jpg
ea6ab6c6ffc14a25979f41a49a4f974a.jpg
582789f121638b8cb0f872cff152f781.jpg
e58b6a133a3335e7aa2a487e64be21a7.jpg
86586caa95b8423615127bd6f8386a46.jpg

I swear you've got a set of nads down there...:fear::clap2:
 
So another small update. I've finally come to the realization that my truck will never go back to stock. Up until now I could have, but with my new found freedom comes more work. Also... it's much more fun to hack up your interior when you don't have to worry about trying to save things.

I needed a good place to mount switches. I found a post saying the OTRATTW switch banks would not fit the early 5th gens in the cubby locations. Well, my dremeling skills prove otherwise. Two of the switches won't be used yet, but soon.... I found orange illuminated switches to match my interior lights.

I love it, now you've given me some ideas if I pull the cb out of my center console what I might do with the gaping hole! (Want to move to ham)
 
I love it, now you've given me some ideas if I pull the cb out of my center console what I might do with the gaping hole! (Want to move to ham)

I love the fact that the words "gaping hole" are now in her thread. Jhalko is my hero.:hail:


In other news- how's the compressor wiring coming along Corey?:lalala:
 
[MENTION=91899]Jhalko[/MENTION] [MENTION=65614]Antman[/MENTION] It seems the two of you need a date.

So... I had to visit the Antman garage today for some more discussion about the cargo box and to show off my ARB compressor..... that wasn't working. Of course Jeff had it figured out in under an hour.

I went home and forced myself to sweat in the garage until about a half hour ago when a storm rolled through... I had my truck halfway in the garage with all the windows down and the dash and console completely torn apart. I think I beat my own record time, getting it back together before the sky let loose.

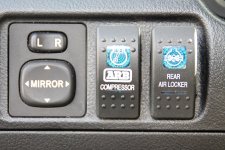
Anyway.... I didn't like the compressor switch in my new switch bank. It didn't match. I also need to tighten the new bank up. I took apart the dash and changed some switches around on the left side. I also thought this location would be more convenient. I ordered one Toyota switch to fit in the Toyota bank for the compressor.... Yeah why not stretch this project out another week.

I did get all the ARB wiring nder the hood covered with split loom and zip tied in its final location. I also had an air leak which I hope is now resolved by changing things around a bit and using some Teflon tape.

I also got my die-hard battery put into the stock location.

Things are happening.... just slowly.

6d69918576961a5460f00e1d7d60b998.jpg
 
[MENTION=91899]Jhalko[/MENTION] [MENTION=65614]Antman[/MENTION] It seems the two of you need a date.

So... I had to visit the Antman garage today for some more discussion about the cargo box and to show off my ARB compressor..... that wasn't working. Of course Jeff had it figured out in under an hour.

I went home and forced myself to sweat in the garage until about a half hour ago when a storm rolled through... I had my truck halfway in the garage with all the windows down and the dash and console completely torn apart. I think I beat my own record time, getting it back together before the sky let loose.

Anyway.... I didn't like the compressor switch in my new switch bank. It didn't match. I also need to tighten the new bank up. I took apart the dash and changed some switches around on the left side. I also thought this location would be more convenient. I ordered one Toyota switch to fit in the Toyota bank for the compressor.... Yeah why not stretch this project out another week.

I did get all the ARB wiring nder the hood covered with split loom and zip tied in its final location. I also had an air leak which I hope is now resolved by changing things around a bit and using some Teflon tape.

I also got my die-hard battery put into the stock location.

Things are happening.... just slowly.
6d69918576961a5460f00e1d7d60b998.jpg

You can fit that ARB switch in that dash location with some dremel work. I have my battery switch there ( same kind). Just FYI
 
It did take me awhile to get used to the ARB blue lights at night. I like the location though, it's up out of the way and the compressor doesn't get switched on accidentally.
 

Members online

Forum statistics

Threads
278,317
Messages
3,554,129
Members
248,016
Latest member
Advally Service

Trending content

Back
Top