Aftermarket Fog/Driving Light Kit?

Shooter33

New member
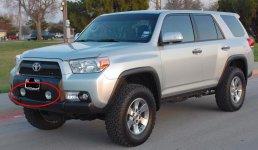
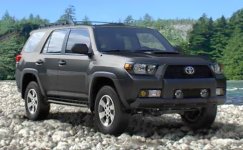
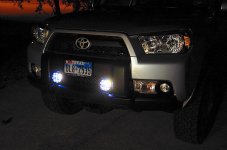
I've seen many posts of owners' pics of their 4R's lately that show some aftermarket fog or driving lights installed in the grill section just below where the front license plate mounts to the bumper.

Is there a kit out there for this, or are you guys just buying a set of lights and rigging your own mounts for them?

Just curious as I would like to add another set of lights to my SR5. Any suggestions would be greatly appreciated.
 
Register to hide this ad
No, I was actually thinking of something like this. I've seen them in front of the grill as well as behind. Not sure which I like better, but I was curious if anyone is making special brackets for mounting these lights, or is it a DIY project? I wonder how the grill would affect the light beam when mounting the light behind it?
 

Attachments

  • 4R Driving Lights.JPG
    4R Driving Lights.JPG
    89 KB · Views: 13,233
No, I was actually thinking of something like this. I've seen them in front of the grill as well as behind. Not sure which I like better, but I was curious if anyone is making special brackets for mounting these lights, or is it a DIY project? I wonder how the grill would affect the light beam when mounting the light behind it?
It's a DIY project at this point. My front license plat is going to reside in that spot until I decide on aftermarket options.
 
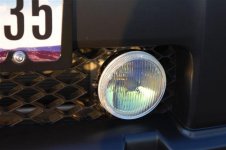
Most aftermarket lights are all custom work.I was going to to a write up on this but did'nt have time.They are PIAA 510 Crystal Ion Fog lights.
Drilling ,cutting and wiring, then flip the switch.
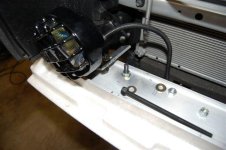
I drilled down thru the bumper and used 5/16 all thread with locking nuts and some 1/4" thick T7075 aluminum brackets I made. Cut the holes in the grill with a template I made that is a little bigger then the light covers. Wired it up to a fog switch from a 3rd Gen. and there was light.
Here are a couple of pics.
 

Attachments

  • 2.jpg
    2.jpg
    40.6 KB · Views: 6,700
  • 3.jpg
    3.jpg
    30.8 KB · Views: 6,233
  • 4.jpg
    4.jpg
    33.1 KB · Views: 6,065
  • 1.jpg
    1.jpg
    36.4 KB · Views: 6,199
  • Picture 079.jpg
    Picture 079.jpg
    64.3 KB · Views: 6,883
Nice work Harper. I was patiently waiting for that little writeup after seeing them in your pics of the TE bumpers. Guess I get to remove the bumper of my brand new truck, when it gets here :(
 
Harper, I hope you dont mind but I might bite on this one and copy. It just looks so clean for aftermarket lights.
No , I don't mind at all. I'll help you all I can. Those are PIAA 510 Crystal Ion Fog lights which is a 4 inch diameter light,fits perfect. I painted the PIAA part black, it was white.They also make the 510 in a driving light.

The fuses in the 5ths are something new to me and had me stumped for awhile since wiring diagrams are not out yet .They are called low profile mini fuses and nobody sells taps for them. So I soldered the hot wire for the switch on to an extra 15A fuse and plugged it into an open spot in the fuse box and went that route.I suggest a separate extra fuse box and Painless makes good ones.

Since then I bought a Painless fuse box that I'm putting in this weekend to supply all the circuits, rewire these lights to and for the other mods I have planned. Like air compressor , winch and more driving lights on top.
 
No , I don't mind at all. I'll help you all I can. Those are PIAA 510 Crystal Ion Fog lights which is a 4 inch diameter light,fits perfect. I painted the PIAA part black, it was white.They also make the 510 in a driving light.

The fuses in the 5ths are something new to me and had me stumped for awhile since wiring diagrams are not out yet .They are called low profile mini fuses and nobody sells taps for them. So I soldered the hot wire for the switch on to an extra 15A fuse and plugged it into an open spot in the fuse box and went that route.I suggest a separate extra fuse box and Painless makes good ones.

Since then I bought a Painless fuse box that I'm putting in this weekend to supply all the circuits, rewire these lights to and for the other mods I have planned. Like air compressor , winch and more driving lights on top.

Excellent idea. We are in your debt, for that and all the other great info you've posted! :D
 
7Harper-

Did the switch you installed come with the lights or did you order that separately?
Do you have any photos showing the interior dash or knee panel removed?
For the knee panel below the steering wheel - is it best to just grip and rip from the bottom up?

I do roadside construction work and I'm planning to install hidden LED stobes in the tail and head light assemblies, but I haven't found a switch yet that I like.

For me ideally, I'd use two push button switches in the center console where the seat heaters are normally but I haven't pulled the center console up yet. I'm assuming it comes out similar to my 2005 Tacoma.

The other mod I'm considering is putting a 12vdc port on the rear of the center console for the passenger row.

 
The fuses in the 5ths are something new to me and had me stumped for awhile since wiring diagrams are not out yet .They are called low profile mini fuses and nobody sells taps for them. So I soldered the hot wire for the switch on to an extra 15A fuse and plugged it into an open spot in the fuse box and went that route.I suggest a separate extra fuse box and Painless makes good ones.

Since then I bought a Painless fuse box that I'm putting in this weekend to supply all the circuits, rewire these lights to and for the other mods I have planned. Like air compressor , winch and more driving lights on top.

I have no experience with painless fuse blocks, but I have used the Blue Sea ones which can be found at West Marine:

Blue Sea Fuse Block

And a factory style Toyota light switch can be found here:

Toyota Switch
 
7Harper-

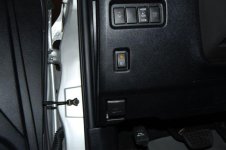
Did the switch you installed come with the lights or did you order that separately? Factory 3rd gen rocker switch pn 00550-35976 and it was like $20 shipped from ebay.I had to custom fit it into the dash as it was a little bigger then the hole. I use a "hot knife", which I take a cheap soldering iron and sharpen it to a knife edge with a file. With practise it cuts thru plastic like butter but can be very dangerous and don't breath the plastic fumes TOYOTA FOG LIGHT SWITCH TACOMA 4RUNNER T100 MR2 : eBay Motors (item 180477904662 end time Apr-05-10 15:29:38 PDT) .
You can buy it from a dealer for less buy they were backordered at my dealer.The new push button ones from the FJ's are around $70-80.
Do you have any photos showing the interior dash or knee panel removed?
For the knee panel below the steering wheel - is it best to just grip and rip from the bottom up? I did'nt take the dash or knee panel off. I worked from underneath

I do roadside construction work and I'm planning to install hidden LED stobes in the tail and head light assemblies, but I haven't found a switch yet that I like.

For me ideally, I'd use two push button switches in the center console where the seat heaters are normally but I haven't pulled the center console up yet. I'm assuming it comes out similar to my 2005 Tacoma.

The other mod I'm considering is putting a 12vdc port on the rear of the center console for the passenger row.
The trim around the gear shifter has to come off first and just give it a good hard tug straight up as it is held in by plastic tabs. Then you see the bolts for the center console although I did'nt take it out.
 
Most aftermarket lights are all custom work.I was going to to a write up on this but did'nt have time.They are PIAA 510 Crystal Ion Fog lights.
Drilling ,cutting and wiring, then flip the switch.
I drilled down thru the bumper and used 5/16 all thread with locking nuts and some 1/4" thick T7075 aluminum brackets I made. Cut the holes in the grill with a template I made that is a little bigger then the light covers. Wired it up to a fog switch from a 3rd Gen. and there was light.
Here are a couple of pics.

Hey I was looking to install these same Piaa's in my '11 Limited. What did you use to cut the plastic around the lights? I know you mentioned you were going to do a writeup but haven't gotten around to it, so any other other advice when installing these? Did the 3rd gen fog switch fit right in, or did you have to modify the opening? Does the FJ fog switch fit as well? Thanks in advance!!
 
Just realized I never posted this here, it was just over at the other site.

PIAA 510 ATP installed - Toyota 120 Platforms Forum

I used a Dremel with the "roto zip" bit to make the rough cut for the opening, then went back with the cutting wheel bit and cleaned it up. I wish I would have made the openings a little bigger so I could get the rock guards off easier, but it still works.

The switch fit OK, I had to Dremel out the opening a little bit since the switch was a bit taller, but in the end I really like how it looks. I dont really like the other "ARB rocker" style switches.
 
Hey I was looking to install these same Piaa's in my '11 Limited. What did you use to cut the plastic around the lights? I know you mentioned you were going to do a writeup but haven't gotten around to it, so any other other advice when installing these? Did the 3rd gen fog switch fit right in, or did you have to modify the opening? Does the FJ fog switch fit as well? Thanks in advance!!

I used the old soldering iron trick to cut the plastic in the grill and then cleaned up the edges with a small rotary tool .They actually make professional "hot knifes" for cutting plastic too. Hot Knife / Groover for Cutting Rubber,Plastic and Foams
I just took a cheap soldering iron, the kind with the replaceable tip, and sharpened it with a fine file into a knife edge. Cuts thru most plastic like butter and been using it for years.You just don't want to be breathing the fumes .

As far as the 3rd Gen fog switch, it was a wee little bit bigger and again trimmed with the soldering iron/knife. I believe the FJ switch is a direct fit is way overpriced. I recently bought a bunch of Carling Contura II switches and hav'nt put them in yet. Jim at OTRATTW is great seller and highly recommended on all the forums.He is THEE switch guy to go to. OTRATTW
 
Thanks guys! I guess my last question is if the front bumper has to come off when you drill for the lights or if it can be some how left on? I realize it would probably be more of a PITA to leave it on, but I would feel more comfortable not messing with it haha. Thanks so much again!
 
Thanks guys! I guess my last question is if the front bumper has to come off when you drill for the lights or if it can be some how left on? I realize it would probably be more of a PITA to leave it on, but I would feel more comfortable not messing with it haha. Thanks so much again!
Never took mine off. Froggy's Driving Lamps Your method of attaching the lamps to the bumper will be a large factor in the PITA equation. My lamps are mounted to brackets that are pop-riveted to the aft surface of the bumper and were easily installed from below. Photos are available if needed.
 
Thanks Froggy! I checked out your thread and your lights look great! I was in the market to do the piaa 510 fogs though. That requires to cut the lower plastic (which I could do with without removing anything) and I was also wondering though if the whole install could be done without taking off the bumper. Hmmmm...
 

Members online

Forum statistics

Threads
278,316
Messages
3,554,114
Members
248,016
Latest member
Advally Service

Trending content

Back
Top