Aiming Headlights on 4th Gen 4runner

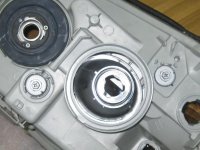
I figured it out on my own. Feel stupid now. There are access holes in the black trim above the headlights. You unlock the tabs on bolts "B" and then stick a long philips screwdriver in those access holes. Lock the tabs when you're done. Wish I hadn't broken one of them now.
 
Would you mind posting a picture or location on a diagram of where the adjustment is located please?
 
Click on the .pdf in post #32 above ^^^. It shows where adjustment bolt A and B are located. B has a plastic cover on it. You push on the cover to unlock it, then stick the long philips screwdriver into the access hole in the trim above the headlight to adjust. Lock the cover when finished. The screwdriver also adjusts bolt A but that one has no cover to unlock.

I will say though...I've cranked and cranked on these bolts and I'm not seeing much movement from the beam from the headlights at all. I'm afraid to turn them too much...don't want to have to take the headlight out of the vehicle to reattach the bolts if I run them all the way out accidentally.
 
I installed gods and a daystar 2.5 and need to aim my headlights down . I understand the lower bolt is for vertical, but how much do I turn it, it doesn't seem to be moving them
 
I will say though...I've cranked and cranked on these bolts and I'm not seeing much movement from the beam from the headlights at all.

The further you are from the wall the more dramatic the movement will seem on the adjustment. You're probably too close. At 25ft...you will notice the movement of the beams.
 
edmondgtp, there are 2 adjustment screws on 06 headlights,

I turned the top adjustment both ways and it did nothing.
 

Attachments

  • image.jpg
    image.jpg
    117.5 KB · Views: 6,140
u sure u didnt striped the plastic inside while turning the screw? try the tug on the bolb back and rotate the screwdriver and see if that catches.
 
you also need to turn it a lot to see any difference, especially at close distance.

For vertical, counter clockwise = UP
For horizontal, counter clockwise = IN

I must've screwed it out of place because it never moved with a lot of turns in both ways.
 
you also need to turn it a lot to see any difference, especially at close distance.

For vertical, counter clockwise = UP
For horizontal, counter clockwise = IN

would this work on the drop in spec d headlight assy?..my beam pattern/cut off isnt sharp and i feel my low beams are pointing too low to the ground
 
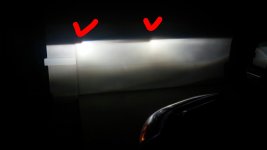
I know how to adjust but not understanding where I. the wall the ridges should be. Where do i make these ridges i marked with red point at

2016-03-23_19.22.54.jpg
 

Attachments

  • 2016-03-23_19.22.54.jpg
    2016-03-23_19.22.54.jpg
    126.2 KB · Views: 4,957
Anyone here figure out why the adjusters arent adjusting anything? For me, both side and both vert and horiz dont do anything. I see some diagrams have some sort of lock but mine dont have this. The vertical gear adjuster is open while the horizontal next to the bulb simply has a small cover on a plastic piece over the adjusting gear. Am i missing something. Ive turned and turned and tried moving further back just to see if i could notice any movement from there and still nothing. Any extra help would be much appreciated. Maybe ill run over to toyota and see if a mechanic has any ideas.
 
I know how to adjust but not understanding where I. the wall the ridges should be. Where do i make these ridges i marked with red point at

View attachment 196987

make sure the lower cutoff step is 2.5 to 3 inch lower than the height of the projectors, if you are lifted i suggest using 3 inch. let say projector height is 40, so you line up the wall at 37 and match the lower step at that height.
 
I needed phillips #2, used from the back, to adjust heigth (new replacement assembly)

I needed to adjust the vertical screw of a newly-installed aftermarket headlight assembly for a lower focal point (image against the garage), and it a lot of turns before the focal point began to move downwards at all. Don't be surprised by that lack of "instant responsiveness", just keep twisting the fitting with more turns.

I did notice the screwdriver "access slots" leading into the circular adjustment housings, but I was unable to make either a phillips head or smaller flathead actually rotate the slots in those housings. If I had applied much stronger pressure into slots, it might have worked: But I was afrain of damaging the slots or even the entire mount, by pushing too hard.

I abandoned that approach, instead using a phillips #2 bit from the rear (into the center of the circular adjustment housing).

On the driver's side, between the installed battery and the lower 'height adjuster screw A", there is not a lot of room for a normal screwdriver to fit. (Not even a "stubby".) But I did have enough room for thin 1/4" socket wrench, loaded with both a 1/4" hex socket adapter and a standard #2 phillips head.

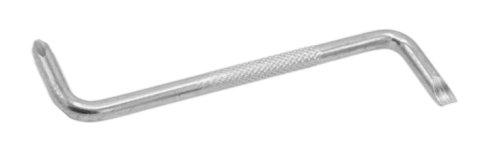
A 90-degree angled screwdriver (combination or phillips only) would also do a good job), but I couldn't find one one in my garage. (They're cheap, see image.)

I did not need to adjust side-to-side, but the same tool would allow you to do that very easily.

My 4runner is the 07' 'sport' model. My driver's side assembly original was allowing some water intrusion and the lens had gone "dull" beyond the point of being repairable (using 'paint-on' smoothing products and the high-grit sandpaper they include).

My 2024-purchased cheap amazon-sold replacement includes both adjustment screws. Here: Amazon.com/dp/B0BKGH7SMC I don't know if other aftermarket assemblies for gen-4 "limited" or "sr5" models might leaving out the horizontal adjustment.

 

Attachments

  • 90-degree-screwdriver.jpg
    90-degree-screwdriver.jpg
    13.3 KB · Views: 376

Members online

Forum statistics

Threads
278,309
Messages
3,554,075
Members
248,016
Latest member
Advally Service

Trending content

Back
Top