

You are using an out of date browser. It may not display this or other websites correctly.
You should upgrade or use an alternative browser.
You should upgrade or use an alternative browser.
Airlift 1000 installation
- Thread starter foyaboya
- Start date


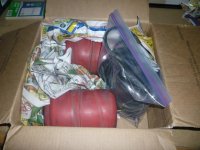
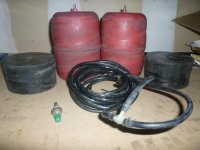
Register to hide this ad

awpsome
New member
sweet man!
MY BAD i didnt realize it looked that dirty.. i wiped it down, i should have done better..
at least you'll know that after you install and 1 month later you look underneath it'll be dirty again. HAHA
let me know if you need any help installing..
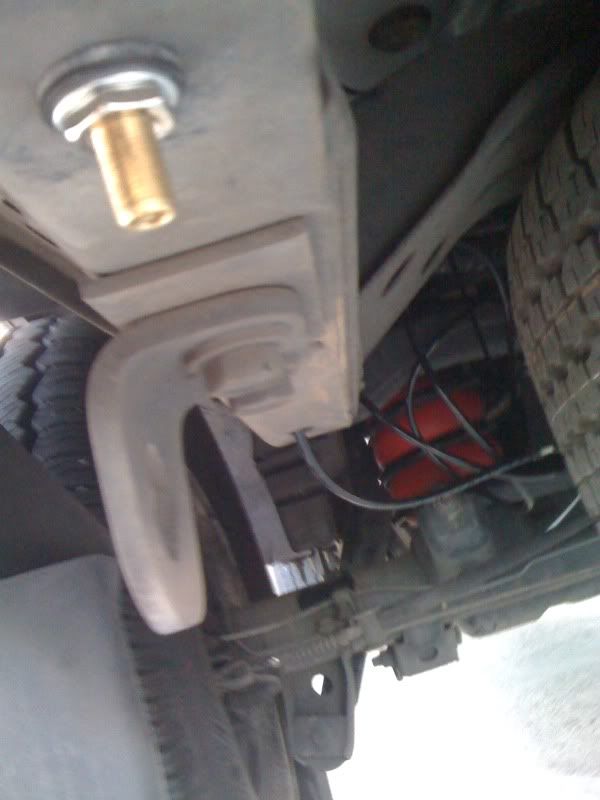
heres a photo that shows where i mounted the air fill adapter. and ran the hose through the frame and out a hole towards in the inner part of the truck.
MY BAD i didnt realize it looked that dirty.. i wiped it down, i should have done better..
at least you'll know that after you install and 1 month later you look underneath it'll be dirty again. HAHA
let me know if you need any help installing..
heres a photo that shows where i mounted the air fill adapter. and ran the hose through the frame and out a hole towards in the inner part of the truck.

foyaboya
New member
Attempt at a write up! first time go easy on me!
My first attempt at a write up...but first since the box was from Hawaii I like to check out some of the newspaper items to see anything interesting...
Any explanation from Awpsome on these items would be appreciated! LOL
What does this taste like??? Hula dressing, a grassy skirt swaying comes to mind! LOL

What exactly are these and when/what do you eat them with??? Soda Crackers...

Funny how different parts of the US/world have different foods!
ok onto the write up...I will post how i did it and then post pics and link from the manual I found.
First do the common sense stuff...Chock the tires jack up the vehicle, use jack stands, always be safe! I disconnected the rear shocks and unbolted the brake line mounts right around the differential and also unbolted the E-Brake mount. The instructions say to disconnect the pan hard bar but i forgot to but was able to do it without anyway. Here is a pic with the rear coils out and the components in...
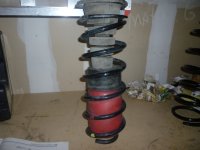
obviously you can see there is way to much going on there, so consulting the manual i have the option 3, based on your 4Runner you have to take different approaches. Refer to the linked manual if yours looks different than mine. I think mine was the more difficult option. So I trimmed down the cone to look like this...
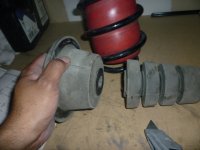
This is part 1 working on next part...
My first attempt at a write up...but first since the box was from Hawaii I like to check out some of the newspaper items to see anything interesting...
Any explanation from Awpsome on these items would be appreciated! LOL
What does this taste like??? Hula dressing, a grassy skirt swaying comes to mind! LOL
What exactly are these and when/what do you eat them with??? Soda Crackers...
Funny how different parts of the US/world have different foods!
ok onto the write up...I will post how i did it and then post pics and link from the manual I found.
First do the common sense stuff...Chock the tires jack up the vehicle, use jack stands, always be safe! I disconnected the rear shocks and unbolted the brake line mounts right around the differential and also unbolted the E-Brake mount. The instructions say to disconnect the pan hard bar but i forgot to but was able to do it without anyway. Here is a pic with the rear coils out and the components in...
obviously you can see there is way to much going on there, so consulting the manual i have the option 3, based on your 4Runner you have to take different approaches. Refer to the linked manual if yours looks different than mine. I think mine was the more difficult option. So I trimmed down the cone to look like this...
This is part 1 working on next part...
Attachments




foyaboya
New member
Airlift 1000 Installation part 2
a helpful tip, use caution cause the knife has a tendency to slip out and if your finger is in the wrong place...ouch! I used my tire iron to bend the cone to get better access to the inner layer...
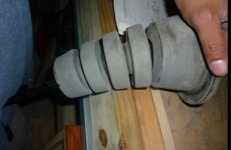
and the trimmed cone in...
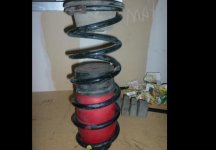
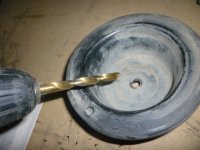
Since the clamps for the air hoses stick out drill out the two holes one on the cone the other on the spring mount on bottom...
long story short stick to the instructions because I installed the setup just like the pic above, but found that the airhose was binding and there was too much with the puck airbag and the trimmed cone. Refering to the instrutions I figured out on my rig I only needed the bag and the trimmed cone minus the puck. If your rig does not have the cone only the spring use the puck. Also if your rig does not have a cone full or trimmed rout the air hose up through the spring, but mine has to use the cone don't us the puck inplace of the cone because the coil spring will not seat correctly on the frame mount...I had to rout the air hose down through the lower spring mount, widening the hole for the air hose clamp...Here is a pic installed
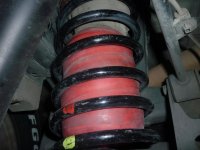
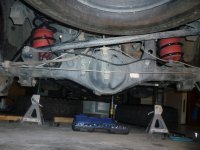
Here is a shot of the lower portion of the bag showing why it's important to drill out the lower hole to allow the nipple to travel freely during suspension articulaiton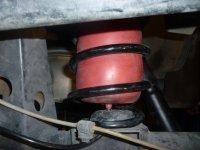
Here is a shot of the driver side looking up, showing the slack I left to allow for articulation.
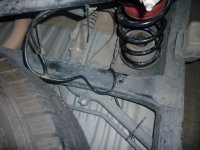
So I found a few good spots to mount the air nipple right behind the driver's side mud flap if you don't have any then you got plenty of mounting spots here...
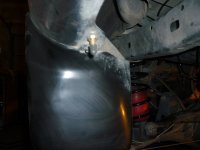
so I'm limited to 8 pics per post so I'm continuing to part 3...
a helpful tip, use caution cause the knife has a tendency to slip out and if your finger is in the wrong place...ouch! I used my tire iron to bend the cone to get better access to the inner layer...
and the trimmed cone in...
Since the clamps for the air hoses stick out drill out the two holes one on the cone the other on the spring mount on bottom...
long story short stick to the instructions because I installed the setup just like the pic above, but found that the airhose was binding and there was too much with the puck airbag and the trimmed cone. Refering to the instrutions I figured out on my rig I only needed the bag and the trimmed cone minus the puck. If your rig does not have the cone only the spring use the puck. Also if your rig does not have a cone full or trimmed rout the air hose up through the spring, but mine has to use the cone don't us the puck inplace of the cone because the coil spring will not seat correctly on the frame mount...I had to rout the air hose down through the lower spring mount, widening the hole for the air hose clamp...Here is a pic installed
Here is a shot of the lower portion of the bag showing why it's important to drill out the lower hole to allow the nipple to travel freely during suspension articulaiton
Here is a shot of the driver side looking up, showing the slack I left to allow for articulation.
So I found a few good spots to mount the air nipple right behind the driver's side mud flap if you don't have any then you got plenty of mounting spots here...
so I'm limited to 8 pics per post so I'm continuing to part 3...
Attachments
-
 Screen shot 2011-05-22 at 10.49.55 AM.jpg22.1 KB · Views: 6,890
 -
 Screen shot 2011-05-22 at 10.52.02 AM.jpg18.2 KB · Views: 6,918
 -
 P1040429.jpg74.6 KB · Views: 6,937
 -
 P1040447.jpg70.6 KB · Views: 10,695
 -
 P1040430.jpg85.1 KB · Views: 7,330
 -
 P1040431.jpg62.9 KB · Views: 6,935
 -
 P1040435.jpg77.9 KB · Views: 6,937
 -
 P1040440.JPG113 KB · Views: 6,849
foyaboya
New member
Airlift 1000 installation part 3
Ok so here are some screenshots from the instructions I thought are important. I've provided the link to the instructions for more specific instructions.
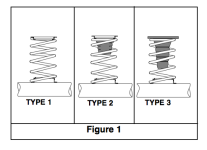
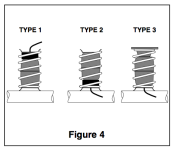
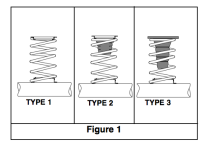
Here are the 3 types of set up's on our 3rd Gen's
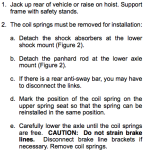
Here is step 1 and 2. I forgot to mention I did have to disconnect the swaybar. I chose to diconnect the brackets instead cause when I did the endlinks the first time it took forever to rachet off the nuts, but then I had a hard time reconnecting the brackets...so it's our call but the swaybar does need to be disconnected either way
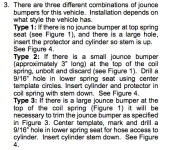
Mine was type 3 for reference. I think Awpsome was type 1...
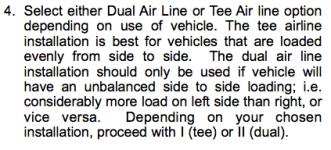
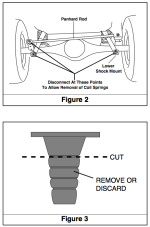
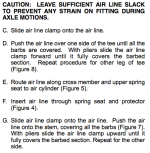
Don't forget to leave slack!
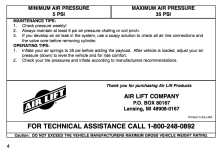
And finally Air Pressure Recommendations:
OK people I'm about done. Here is the link to the instructions to see the right way to do it LOL...
http://www.catalograck.com/imgVD/AIL/MN-408_60743.pdf
Too wrap it up this took me about 2 hours to complete, I didn't count having to redo it since I had the pucks in and the air hose going up. Awpsome used the pucks but did not have the cones originally so it's your call. Any corrections of questions I will address or answer as soon as I can. Thanks for such a great forum, it has answered lot's of question's and made me want to spend lot's more money!
Oh and this is from my wife, the ride with the airbags has gone up to a 7 10 being Cadillac! This is after replacing shocks, struts, tires, swaybar/endlink bushings, it was the icing on the cake! I am running the bags at 7 psi planning on turning it up to 20 when towing. Also I plan to trim the excess hose and clean up the routing adding plenty of tie straps. Please also make sure you keep the air hose 8 inches away from the exhaust.
Ok so here are some screenshots from the instructions I thought are important. I've provided the link to the instructions for more specific instructions.
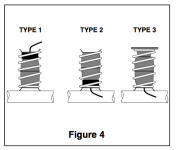
Here are the 3 types of set up's on our 3rd Gen's
Here is step 1 and 2. I forgot to mention I did have to disconnect the swaybar. I chose to diconnect the brackets instead cause when I did the endlinks the first time it took forever to rachet off the nuts, but then I had a hard time reconnecting the brackets...so it's our call but the swaybar does need to be disconnected either way
Mine was type 3 for reference. I think Awpsome was type 1...
Don't forget to leave slack!
And finally Air Pressure Recommendations:
OK people I'm about done. Here is the link to the instructions to see the right way to do it LOL...
http://www.catalograck.com/imgVD/AIL/MN-408_60743.pdf
Too wrap it up this took me about 2 hours to complete, I didn't count having to redo it since I had the pucks in and the air hose going up. Awpsome used the pucks but did not have the cones originally so it's your call. Any corrections of questions I will address or answer as soon as I can. Thanks for such a great forum, it has answered lot's of question's and made me want to spend lot's more money!
Oh and this is from my wife, the ride with the airbags has gone up to a 7 10 being Cadillac! This is after replacing shocks, struts, tires, swaybar/endlink bushings, it was the icing on the cake! I am running the bags at 7 psi planning on turning it up to 20 when towing. Also I plan to trim the excess hose and clean up the routing adding plenty of tie straps. Please also make sure you keep the air hose 8 inches away from the exhaust.
Attachments
-
 3 Types.png32.9 KB · Views: 6,948
 -
 Step 1 and 2.png63.1 KB · Views: 6,769
 -
 step 3.png74 KB · Views: 6,774
 -
 Figure 2 and 3.png63 KB · Views: 6,890
 -
 3 types air hose routing.png33.2 KB · Views: 7,164
 -
 Step 4.png35.4 KB · Views: 6,661
 -
 Leave Slack.png68.6 KB · Views: 6,794
 -
 Air Pressure Reccomendations.png117.2 KB · Views: 6,850
foyaboya
New member
To Puck or not to Puck
Dous,
according to the instructions if you had cones in there before it is suggested not to use them only if your rig came with the shorter version of cone. I think the difference between the coned versions (type 2 & 3) is on type 3 the cone is also the top insulator for the spring. Someone have any info on type 2 and 3 top insulator specifically type 2. They show not even using the existing cone and putting the puck on bottom for type 2. If you never had cones then use the pucks on top of the airbag just like Awpsome did.
I am planning on trying to use the pucks when I install the land cruiser rear coils. Anyone have these bags with the LC Coils? folks say they don't get the LC Coils for towing purposes, but loose the flex and ride of the LC's and they opt for the OME 890's i think...but if you use these bags with the LC's I wonder if you can get the best flex with a good towing rig as well? Someone chime in if you got these bags with LC coils.
Dous,
according to the instructions if you had cones in there before it is suggested not to use them only if your rig came with the shorter version of cone. I think the difference between the coned versions (type 2 & 3) is on type 3 the cone is also the top insulator for the spring. Someone have any info on type 2 and 3 top insulator specifically type 2. They show not even using the existing cone and putting the puck on bottom for type 2. If you never had cones then use the pucks on top of the airbag just like Awpsome did.
Just curious where did you put those round blocks? I never used mine, I was under the assumption that with our suspension set up they were not used.
I am planning on trying to use the pucks when I install the land cruiser rear coils. Anyone have these bags with the LC Coils? folks say they don't get the LC Coils for towing purposes, but loose the flex and ride of the LC's and they opt for the OME 890's i think...but if you use these bags with the LC's I wonder if you can get the best flex with a good towing rig as well? Someone chime in if you got these bags with LC coils.
Attachments



johnny c
New member
I just installed the same bags on my 99 limited, they work great. I hooked up my boat that usually squats the rear end and with 20 or so psi in the bags it sat even and towed great. Install wasnt too bad, I mounted my fill valve under the rear bumper for easy fill up. I plan on putting a compressor in soon so I can adjust from inside the cab! Great product in my opinion.
awpsome
New member
Damn dude! Very very very nice write up!
Perfect for anyone who might want to install as well.
I'm glad you could figure it out especially with us having two different type of coils.
And I'm also happy that your wife approves of it as well that's always a plus
And about the Hawaiian dressing. To be honest, I don't even know what that is.
Hahaha but soda crackers are for any occasion.
Usually the best to put on your soup!
Or when your sick, that and Gatorade are easy to eat haha!
It's interesting to hear as well you guys don't have soda crackers?
Good to hear it works out well! Enjoy it!
Aloha!
Perfect for anyone who might want to install as well.
I'm glad you could figure it out especially with us having two different type of coils.
And I'm also happy that your wife approves of it as well
that's always a plus And about the Hawaiian dressing. To be honest, I don't even know what that is.
Hahaha but soda crackers are for any occasion.
Usually the best to put on your soup!
Or when your sick, that and Gatorade are easy to eat haha!
It's interesting to hear as well you guys don't have soda crackers?
Good to hear it works out well! Enjoy it!
Aloha!

twitchee2
Member
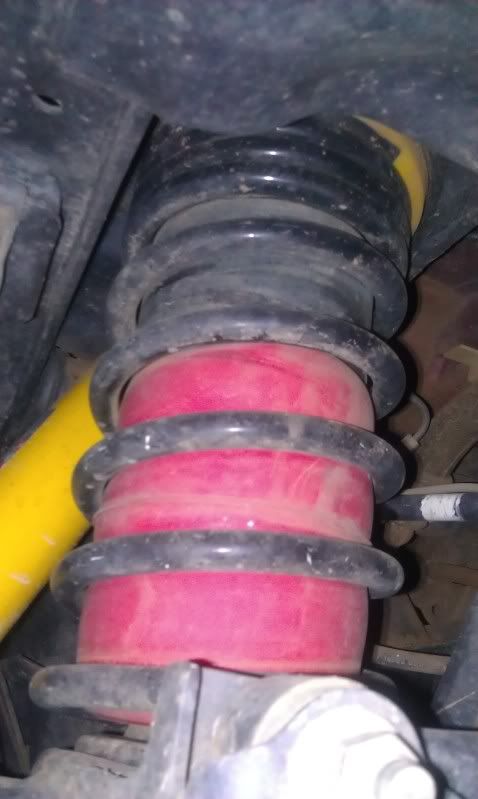
Its hard to see but here mine with the lift
From top down
Stock cone cut down
10mm spacer
2.5in puck
air bags
the air lines go up and they are each filled separately.
I love this system. it works great for when im moving or towing. when they are full, the ride is stiffer but not unbearable at all.
From top down
Stock cone cut down
10mm spacer
2.5in puck
air bags
the air lines go up and they are each filled separately.
I love this system. it works great for when im moving or towing. when they are full, the ride is stiffer but not unbearable at all.
foyaboya
New member
I just installed the same bags on my 99 limited, they work great. I hooked up my boat that usually squats the rear end and with 20 or so psi in the bags it sat even and towed great. Install wasnt too bad, I mounted my fill valve under the rear bumper for easy fill up. I plan on putting a compressor in soon so I can adjust from inside the cab! Great product in my opinion.
Johnny c,
I too want to add a compressor eventually, check out the airlift website they got some sick demo video's of some cars with airlifts installed. Almost like hydraulics...here is a video on youtube:
YouTube - Scion tC & Volkswagen MKV bagged on Air Lift air suspension.
What pressure do you run at for normal driving?
Damn dude! Very very very nice write up!
Perfect for anyone who might want to install as well.
I'm glad you could figure it out especially with us having two different type of coils.
And I'm also happy that your wife approves of it as well
And about the Hawaiian dressing. To be honest, I don't even know what that is.
Hahaha but soda crackers are for any occasion.
Usually the best to put on your soup!
Or when your sick, that and Gatorade are easy to eat haha!
It's interesting to hear as well you guys don't have soda crackers?
Good to hear it works out well! Enjoy it!
Aloha!
Awpsome,
Thanks that means a lot. I tried to do the best job I could on the write up. I am very happy with the airbags thanks for selling them to me.
I think it's a better world when the women in out lives are happy! :thumb3:
Food is great, always hearing of something I never had before!
Its hard to see but here mine with the lift
From top down
Stock cone cut down
10mm spacer
2.5in puck
air bags
the air lines go up and they are each filled separately.
I love this system. it works great for when im moving or towing. when they are full, the ride is stiffer but not unbearable at all.
Cool those springs you have are very close to the same heighth as the LC Coils right? I am glad to see the airbags are still applicable in a lifted situation!
Just curious what pressure do you run your airbags at for daily driving?
Thanks,
johnny c
New member
I've found that 7-10 psi was good for unloaded driving, more so 7. I put 22 in when I hooked up my boat and that seemed good. It takes a little fiddling, but you will find your best ride! I carry a little 12v compressor with me (good for small stuff) and use that to adjust when I need to.
Air lift 1000 update
Old thread, but I wanted to write this for people who are thinking about buying the air lift for their 3rd gen runner... Just installed a set of these in my 1998 sr5 4x4 and it literally took me 45min, I don't know what all the talk about this being difficult is for... I did not remove the springs for my install, and I was easily able to cut the bump stops within the sprigs on both sides. I'll give a little run down of how I did this after reading a ton and just going for it
1. Jack up rear axle until tires clear the ground (place two jacks under axle left and right and remove tires)
2. From the trailer hitch jack up center of hitch until springs and body extend to their longest oscillation (you'll start to Jack up the car off of the jacks under the axle so you know you've gone far enough so let it back down a smidge so the weight is even on the jacks
3. Oh, forgot remove spare tire obviously before any of this lol
4. Take a sip of water your gonna sweat for this next part
5. If you have a sawzal grab your foot long saw attachment and cut each layer off starting from the bottom layer (it will literally shake your face off cause the bump stops want to move with the saw blade) remove each layer through springs
6. I cut the first layer with a normal old school hand saw which actually worked pretty great for the first two layers... On the passenger side is slightly more difficult to access but just find the right angle. It's definetily doable.
7. There is 4 total layers your removing ( I originally removed only three to see if the air bags wouldn't touch but ending up having to remove all of them)
8. Fold the air bags (YouTube folding air lift bags) and stuff em in there with the nipple ending DOWN make sure you already have 5/16 in diameter holes in the spring seats for the nipple and air line to run which you should.
9. I used foot long heat shrink marine tubing for the first section of tubing from the nipple of the air bag so it is protected from abrasion,
10. Connect the air lines to the nipples, run the air lines free from exhaust and enough slack for movement...you're smart enough to figure this out.
11. I personally choose to face the air bags down because the axle is a solid base and the air line will not move in theory during normal bouncing versus directing the nipple and airline up.
12. I ran separate air lines for each bag (the kit does come with two valves) and on each side of my bumper was conveniently pre drilled holes (or maybe someone else drilled these I'm the second owner)
13. Lower the car and make sure there is a small gap between the air bag and the bump stops you want this gap for normal driving for good suspension ride. These bags are designed to not RAISE up and down, but INFLATE outwards on the spring coils so don't be alarmed. I did not use the giving spacers.
14. Inflate bags to 10 psi and check for leaks. My springs were replaced in the recall in 2002 and were not sagging at all, except for a 3/4in lower lean to the left side... These air bags solved this drivers side lean for me. And raised the rear to factory height
Install at your own risk, I'm not responsible for your lack of common sense.
Now go driving! I probably missed something but ask me a question more than happy to respond
Old thread, but I wanted to write this for people who are thinking about buying the air lift for their 3rd gen runner... Just installed a set of these in my 1998 sr5 4x4 and it literally took me 45min, I don't know what all the talk about this being difficult is for... I did not remove the springs for my install, and I was easily able to cut the bump stops within the sprigs on both sides. I'll give a little run down of how I did this after reading a ton and just going for it
1. Jack up rear axle until tires clear the ground (place two jacks under axle left and right and remove tires)
2. From the trailer hitch jack up center of hitch until springs and body extend to their longest oscillation (you'll start to Jack up the car off of the jacks under the axle so you know you've gone far enough so let it back down a smidge so the weight is even on the jacks
3. Oh, forgot remove spare tire obviously before any of this lol
4. Take a sip of water your gonna sweat for this next part
5. If you have a sawzal grab your foot long saw attachment and cut each layer off starting from the bottom layer (it will literally shake your face off cause the bump stops want to move with the saw blade) remove each layer through springs
6. I cut the first layer with a normal old school hand saw which actually worked pretty great for the first two layers... On the passenger side is slightly more difficult to access but just find the right angle. It's definetily doable.
7. There is 4 total layers your removing ( I originally removed only three to see if the air bags wouldn't touch but ending up having to remove all of them)
8. Fold the air bags (YouTube folding air lift bags) and stuff em in there with the nipple ending DOWN make sure you already have 5/16 in diameter holes in the spring seats for the nipple and air line to run which you should.
9. I used foot long heat shrink marine tubing for the first section of tubing from the nipple of the air bag so it is protected from abrasion,
10. Connect the air lines to the nipples, run the air lines free from exhaust and enough slack for movement...you're smart enough to figure this out.
11. I personally choose to face the air bags down because the axle is a solid base and the air line will not move in theory during normal bouncing versus directing the nipple and airline up.
12. I ran separate air lines for each bag (the kit does come with two valves) and on each side of my bumper was conveniently pre drilled holes (or maybe someone else drilled these I'm the second owner)
13. Lower the car and make sure there is a small gap between the air bag and the bump stops you want this gap for normal driving for good suspension ride. These bags are designed to not RAISE up and down, but INFLATE outwards on the spring coils so don't be alarmed. I did not use the giving spacers.
14. Inflate bags to 10 psi and check for leaks. My springs were replaced in the recall in 2002 and were not sagging at all, except for a 3/4in lower lean to the left side... These air bags solved this drivers side lean for me. And raised the rear to factory height
Install at your own risk, I'm not responsible for your lack of common sense.
Now go driving! I probably missed something but ask me a question more than happy to respond
Thanks
Good write up.
Installed these on a landcruiser and was hoping I did not have to drill the bottom holes. Appears my Sport has the large cones, so down it goes.
Even having too drill, these are great for any loads.
Not sure why anyone would run 2 lines rather than T. If one bag leaks they stay the same or both loose all air, running seperate would really unballance the load. I broke 2 in the Landcruiser and warranty is great ($10).
Good write up.
Installed these on a landcruiser and was hoping I did not have to drill the bottom holes. Appears my Sport has the large cones, so down it goes.
Even having too drill, these are great for any loads.
Not sure why anyone would run 2 lines rather than T. If one bag leaks they stay the same or both loose all air, running seperate would really unballance the load. I broke 2 in the Landcruiser and warranty is great ($10).
Should my bags have this much space between spring seats? I did the cone cutoff and did not use the 2.5 inch supplied puck. I do have OME 2890 springs.
Its hard to see but here mine with the lift
From top down
Stock cone cut down
10mm spacer
2.5in puck
air bags
the air lines go up and they are each filled separately.
I love this system. it works great for when im moving or towing. when they are full, the ride is stiffer but not unbearable at all.
Attachments
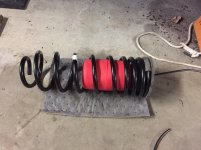
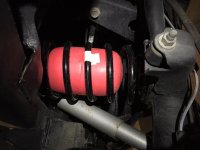
I asked AirLift and they said these bags work by filling between the coils. By the way these bags have 20 psi in them.
My original email...
Hello,
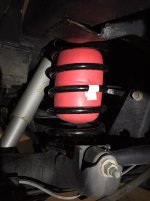
I just installed my air bags and followed the instruction manual. One step told me to cut the bump stop on the truck which I did and now when I installed the airbags in the new OME ARB 2890 Old Man Emu Coil Springs there is a large 2 inch gap between the bottom and top of the airbag. Did I do something wrong during the installation? Was I supposed to not cut the bump stop or should I have added the large rubber discs inside the coils? I believe that my original Toyota springs are shorter than the OME 2890 and may be the reason for this. I guess I'm trying to understand if the airbags should be touching at the top and bottom of the spring perches with 5-20 psi. I have a couple pictures I took on the installation that I can share with Air Lift on this to help troubleshoot.
Thank you,
Richard
Their response... Does this even make sense?
Hello,
The bags are made to expand outward and fill the gaps between the coils. So when loaded the coil can not compress keeping the vehicle at ride height. The bags will not expand up and down so a gap between the bag and the spring mount will not effect the way the system works.
My original email...
Hello,
I just installed my air bags and followed the instruction manual. One step told me to cut the bump stop on the truck which I did and now when I installed the airbags in the new OME ARB 2890 Old Man Emu Coil Springs there is a large 2 inch gap between the bottom and top of the airbag. Did I do something wrong during the installation? Was I supposed to not cut the bump stop or should I have added the large rubber discs inside the coils? I believe that my original Toyota springs are shorter than the OME 2890 and may be the reason for this. I guess I'm trying to understand if the airbags should be touching at the top and bottom of the spring perches with 5-20 psi. I have a couple pictures I took on the installation that I can share with Air Lift on this to help troubleshoot.
Thank you,
Richard
Their response... Does this even make sense?
Hello,
The bags are made to expand outward and fill the gaps between the coils. So when loaded the coil can not compress keeping the vehicle at ride height. The bags will not expand up and down so a gap between the bag and the spring mount will not effect the way the system works.
Should my bags have this much space between spring seats? I did the cone cutoff and did not use the 2.5 inch supplied puck. I do have OME 2890 springs.
Attachments
Last edited:


J.A.
Senior Member
Not sure why anyone would run 2 lines rather than T. If one bag leaks they stay the same or both loose all air, running seperate would really unballance the load. I broke 2 in the Landcruiser and warranty is great ($10).
I actually re-did mine so as to be able to have the two independent lines. Well, now i have the ability to run it both ways, 2 lines (dual path) or teed (single path). Dual path major benefit is so that there is no air transfer side to side which makes for better cornering performance and less sway and body roll. This is a huge benefit...and when carrying a load, which for me can be up to 1,750 lbs., I always prefer to run this way.
2007 Toyota 4Runner Air Lift
Similar threads
- Replies
- 1
- Views
- 10K


