Anyone Know How To Remove Side Vents in Dash?

BamaDrewski

New member
I have been trying to figure out how to remove the side vents (Not the center console vents!) in the dash. (The far left and far right). I have no idea if these can come out and be put back in. I want to clean them up and also vacuum out the air vent channels while I am at it.

Has anyone on here successfully taken them out and reinstalled them? If so, I would appreciate any instructions you could provide.
 
Register to hide this ad
I have been trying to figure out how to remove the side vents (Not the center console vents!) in the dash. (The far left and far right). I have no idea if these can come out and be put back in. I want to clean them up and also vacuum out the air vent channels while I am at it.

Has anyone on here successfully taken them out and reinstalled them? If so, I would appreciate any instructions you could provide.

The drivers side I have not done. I've noticed it is different than the passenger side though.

The passenger side I broke once ( super manly strength that no plastic can withstand ) and I swapped it out with a junk yard one. If I recall, I just carefully put a flat head screwdriver between the vent and the dash and sort of compress the vent so that the plastic pin in the middle is moved towards the vent and you are able to just pull it out. That plastic pin or nub is what the vent pivots up & down on. Just be gentle and it should pop out.
 
The drivers side I have not done. I've noticed it is different than the passenger side though.

The passenger side I broke once ( super manly strength that no plastic can withstand ) and I swapped it out with a junk yard one. If I recall, I just carefully put a flat head screwdriver between the vent and the dash and sort of compress the vent so that the plastic pin in the middle is moved towards the vent and you are able to just pull it out. That plastic pin or nub is what the vent pivots up & down on. Just be gentle and it should pop out.

Thanks for the response man. I have tried what you mentioned with no luck. Anyone else on here able to help me out?
 
Thanks for the response man. I have tried what you mentioned with no luck. Anyone else on here able to help me out?

Try doing this on either side of the vent. I take mine out at least once a year to throw them in the dishwasher or sink to clean them. but that also gives me the excuse to clean out the vents themselves. Just be sure to be firm and controlled in your movements, but very gentle. They all do come out, the only one i haven't ever tried is the one under the steering wheel.
 
Just a thought but maybe run the heater for a while before you do this, just might make the plastic more pliable and not shatter/crack.
 
Try doing this on either side of the vent. I take mine out at least once a year to throw them in the dishwasher or sink to clean them. but that also gives me the excuse to clean out the vents themselves. Just be sure to be firm and controlled in your movements, but very gentle. They all do come out, the only one i haven't ever tried is the one under the steering wheel.

You mention "Try doing this on either side of the vent...." What is the "this" you are referring to? Hate to feel so dumb but I am not sure what you are referring to. Thanks man!
 
Sorry to revive an old thread but I’m trying to find some info on removing the vents on the driver side and passenger side. I can’t seem to find any info on it. How did you remove them?
 
No idea if this works on T4R’s, BUT... on other foreign cars I’ve owned, a plastic card hotel key, slid in between the space in the dash and the vent has released the little plastic tab that usually holds the vent in place. On my Miata, which had round vents, you had to insert the card and then move it around in a circular motion. Maybe for T4R’s you need one card for each side?

Also, threading dental floss through and back to give you pulling “levers” might...might give you some extra pulling power. Just a thought. Good luck.
 
Helped a friend replace dash and cluster on a 2000 t4r from one that he found at a salvage yard and the side vents seemed to be permenantly fixed with plastic swivels. May be you can pop them out with heat gentle persuasion but even then old plastic could be a challenge . the driver side has no trim around but the passenger does.
I don't know if this would help
https://www.yotatech.com/forums/f116/removing-vents-192569/
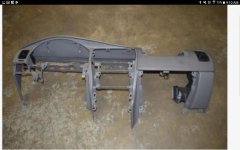
here is a pic of the vent and the molded panel just to give you an idea
Screenshot_2018-05-06-09-10-53.jpg
 

Attachments

  • Screenshot_2018-05-06-09-10-53.jpg
    Screenshot_2018-05-06-09-10-53.jpg
    72.3 KB · Views: 6,161
Last edited:
So I learned that the right passenger vent is easier to install on a 96 4runner than the left driver's side.

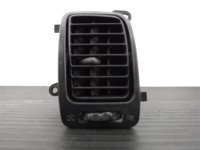
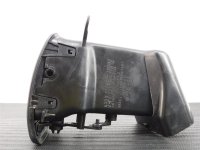
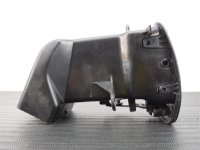
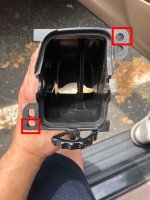
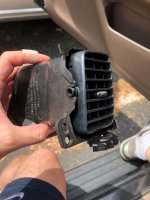
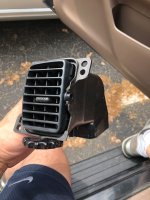
To install the right vent you need to remove the black plastic cover trim. To remove it you get a very thin flat head screwdriver and push it between the plastic trim and the actual vent housing. This is done on the 4 corners on the inside of the plastic trim. You have to break the old vent and remove it so you can see what your working with. When you break the old vent make sure you don't get any pieces that fall down into the vent system. Here's a few photos of the actual assembly pulled out of the car. You can see how the trim connects to the housing at the 4 corners on the top and bottom. Stick the flat head screwdriver in those corners to remove the cover. It should pop up. Be very careful when doing so as with plastic you don't want to force it. Also it's better to do this on a warmer day as on a cold day the plastic will not have much flexibility and can possible crack easier.

The left driver side is a more difficult. I believe I will need to pull out the actual vent housing as unfortunately there is no plastic trim that covers the vent on that side. I don't want to have to take apart the entire dashboard to get to it. Don't know why they made it like this on the drivers side. Maybe space issues when they originally designed it?

I'll report back once I have replaced it.

Helped a friend replace dash and cluster on a 2000 t4r from one that he found at a salvage yard and the side vents seemed to be permenantly fixed with plastic swivels. May be you can pop them out with heat gentle persuasion but even then old plastic could be a challenge . the driver side has no trim around but the passenger does.
I don't know if this would help
https://www.yotatech.com/forums/f116/removing-vents-192569/
here is a pic of the vent and the molded panel just to give you an idea
View attachment 296231
 

Attachments

  • Front_Vent.jpg
    Front_Vent.jpg
    45.7 KB · Views: 6,314
  • Right_Side_Vent.jpg
    Right_Side_Vent.jpg
    88.3 KB · Views: 5,967
  • Left_Side_Vent.jpg
    Left_Side_Vent.jpg
    70.5 KB · Views: 6,042
Last edited:
So I learned that the right passenger vent is easier to install on a 96 4runner than the left driver's side.

To install the right vent you need to remove the black plastic trim. To remove it you get a very thin flat head screwdriver and push it inside and press it between the gap where the trim connects to the dash. I had an easier time by breaking the old vent and removing it so I could see what I was working with. If you do brake the old vent make sure you don't get any pieces that fall down into the vent system. Here's a few photos of the actual assembly pulled out of the car. You can see how the trim connects to the housing at 4 places. Stick the flat head screwdriver in those places to remove.

The left driver side is a more difficult. I believe I will need to pull out the actual housing as unfortunately there is no plastic trim that covers the vent on that side. I don't want to have to take apart the entire dashboard to get to it. Don't know why they made like this here. Maybe a space issue when they originally designed it.

I'll report back once I have replaced it.

that would be great cause I don't think there is a write up of how to replace the side vents.
 
For the center vents: focus the vents down as air is pointed to the floor and pry it off from the center by inserting a flat screw driver. Only one side of each vent has the sliding groove, so if one side won't budge, try the other side of the vent. Should come right off. Don't lose the rubber washer/grommet inside there. Without the washer, the vent won't stay in place.

Passenger side is really a pain (must access from the inside dash). Same goes for the driver side.
 
Ok, so I was able to replace the driver's side vent. It was more complicated as I pretty much had to take apart everything on the drivers side dash.

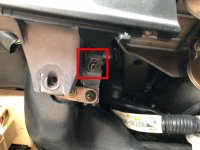
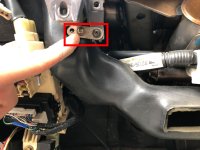
The driver's side vent housing is attached by two screws on the inside of the dash. Few tips, make sure you have a stubby screwdriver as a normal sized screwdriver will not help in getting it out. Also you want to make sure it is magnetic so you don't drop the screws in the dash when putting them back or start them by hand if you can.

My car is a 96 4runner so it may vary with 3rd Gens. On with the show:

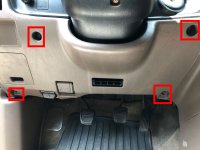
1. Remove the 2x screws to the hood release latch and the 2x screws to the fuel door latch on the trim panel below the steering column. Once the screws are removed you need to pull the latches and push/slide them backward to get them out.

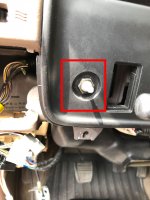
2. Remove the 4x bolts to the trim panel below the steering column. They are #10 metric bolts. It should come lose and now you can pull the panel off. You will need to unclip the controls on the top left side of the trim panel. I only had a clutch cancel switch. The plugin connector should slide out very easily.

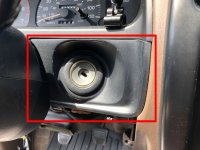
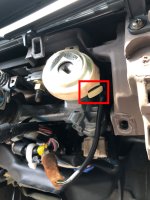
3. Pull off the trim panel to the ignition. After you pull the panel off I also removed the housing covering the ignition so I didn't burn the bulb while the door was open. Pull the white tab "key" out and the housing should come off the ignition.

4. Pull the knob that controls the interior dimmer switch. You need a #12 metric socket to remove the dimmer switch from the black trim panel.

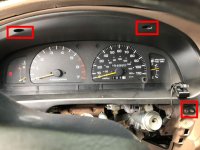
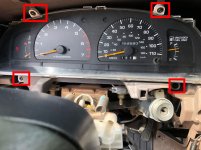
5. Remove the 4x screws holding the black trim surrounding the dashboard cluster. 2x are on the top 1x on the right of the steering column and 1x on the left below the steering column. The trim should be free to take out. You may need to tilt your steering column down to remove.
 

Attachments

  • 0.jpg
    0.jpg
    115.2 KB · Views: 5,882
  • 4.jpg
    4.jpg
    127.6 KB · Views: 5,829
  • 5.jpg
    5.jpg
    131.7 KB · Views: 6,175
  • 6.jpg
    6.jpg
    130.2 KB · Views: 5,820
  • 7.jpg
    7.jpg
    124.7 KB · Views: 6,583
  • 8.jpg
    8.jpg
    133.2 KB · Views: 5,727
  • 9.jpg
    9.jpg
    131.7 KB · Views: 5,724
  • 10.jpg
    10.jpg
    108.4 KB · Views: 5,709
Last edited:
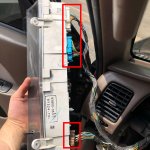
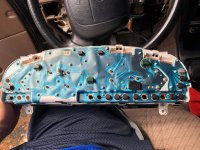
7. At this point you should see your dashboard cluster. Remove the 4x screws holding the cluster into the dashboard. After you remove the screws you should be able to pull the cluster out. The cluster has three connectors in the back. I had to cut a zip tie that was holding one of the connectors to be able to fully pull it out. Once it's out remove the connectors. This may also be a good time to replace some bulbs if you have any burn out.

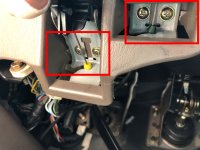
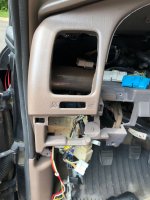
8. Below the steering column is a vent system that should be removed. It held in place by 2x screws. Remove the these screws and you should then be able to pull the vent system out. The left side of this vent system is attached to the driver's side vent housing.

9. The housing should now be accessible. Use your stubby screwdriver on the 2x screws holding the driver vent housing in place. 1x on the top right and 1x on the bottom left. You will need to really bend to get to the bottom left one. I've taken photos of the housing removed form the dashboard.

10. Pull out the old vent and pop in the new one.

11. Put everything back to together in reverse. ALSO MAKE SURE TO CLOSE YOUR HOOD AND FUEL DOOR. I almost forgot to close my hood when I was done!
 

Attachments

  • 11.jpg
    11.jpg
    116.4 KB · Views: 5,815
  • 12.jpg
    12.jpg
    128 KB · Views: 5,729
  • 13.jpg
    13.jpg
    144.1 KB · Views: 5,552
  • 14.jpg
    14.jpg
    121.9 KB · Views: 5,736
  • 15.jpg
    15.jpg
    126.6 KB · Views: 5,651
  • 16.jpg
    16.jpg
    116 KB · Views: 6,296
  • 17.jpg
    17.jpg
    123.4 KB · Views: 6,276
  • 18.jpg
    18.jpg
    129.3 KB · Views: 5,898
Last edited:

Members online

No members online now.

Forum statistics

Threads
278,315
Messages
3,554,104
Members
248,016
Latest member
Advally Service

Trending content

Back
Top