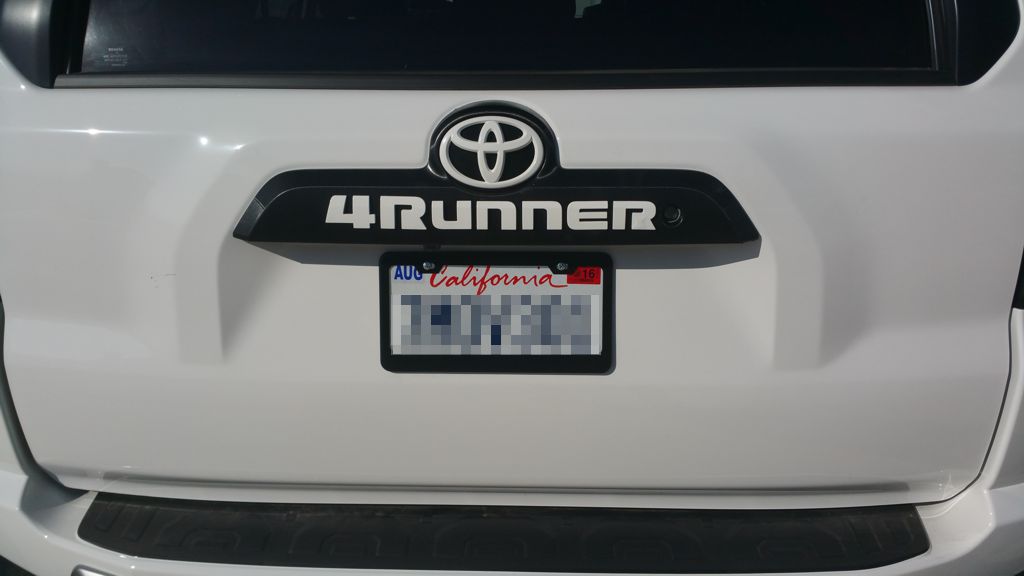
Anyone remove the 4runner emblem on a 5th generation?

Like the carbon fiber

Looks great. I vote no lettering or blackened lettering. Duplicolor has a nice gunmetal spray paint for chrome. Gives it the black chrome look. Too many coats and you lose the chrome effect but if you get it right, looks really sharp. As for glueing the letters back on, there is a glue specifically for the job. I have not tried it before. In the past I've cleaned the surface really good with alcohol and used silicone glue. Mines lasted 6 years and was solid when I sold the car.
 
Snooperstyle,

Thanks. I too think it looks great without the lettering.

Did you remove the rear garnish in order to apply the vinyl or did you apply the vinyl with the garnish still on the vehicle?

Thanks again.
 
I would use 3m painters tape. You know, the blue stuff. Set your letters the way you want them. Then take the 3m sticky tape to perm attach one letter at a time. You will have to play with it initially, but the blue tape makes it easy to place and remove. With some patience, it will come out nice.
 
Last edited:
Also, if you can get ahold of another T4R, you could make a template using the second vehicle and then use the template to place the letters on your garnish.
 
Looks great. I vote no lettering or blackened lettering. Duplicolor has a nice gunmetal spray paint for chrome. Gives it the black chrome look. Too many coats and you lose the chrome effect but if you get it right, looks really sharp. As for glueing the letters back on, there is a glue specifically for the job. I have not tried it before. In the past I've cleaned the surface really good with alcohol and used silicone glue. Mines lasted 6 years and was solid when I sold the car.

Got TWO compliments on the carbon fiber touches today when I went to lunch. The fog light surrounds look sweet! I just went ahead and put the regular letters back on the rear garnish and I like it. I ended up using a glue that they sell at Advance Auto Parts specifically for this application. It was kind of like rubber cement. I had to be real careful not to let any get on the carbon fiber since it is not smooth texture and hard to wipe it off. The key was to be patient and not overapply. There was a little bit left of the old stuff too which helped with the "cushioning" of the letters on there.

Snooperstyle,
Did you remove the rear garnish in order to apply the vinyl or did you apply the vinyl with the garnish still on the vehicle?
Yes. And unconnected and disassembled the LP lights, the up/down/lock button (Limited models only), and the lock mechanism and removed it in order to wrap it. WARNING: don't shut the rear lift gate after you disconnect the latch mechanism wire. I did that, and in order to open again I had to crawl into the car and reconnect the lift gate latch wire from inside. I also broke off the little square plastic thingy behind the emblem when I was trying to take it all off. I never put it back...not really even sure what it does. The vinyl was hard to get around the curves on the top side because of the indentation and tight corners, and also because I had to remove the seal that comes on it. I ended up reusing the seal, but it might not work very well now due to the vinyl bending around there. The rest of it was pretty easy with patience...but this vinyl stuff is not perfect by any means.

I would use 3m painters tape. You know, the blue stuff. Set you letters the way you want them. Then take the 3m sticky tape to perm attach one letter at a time. You will have to play with it initially, but the blue tape makes it easy to place and remove. With some patience, it will come out nice.
Ended up just putting one piece of white masking tape across the bottom of where the letters should be and eyeballing it. If you look real close, the letters do have a small node that matches up to the small holes in the garnish, so that helped tremendously. The glue I used dried very quickly so I made sure each letter was dead straight lined up on that tape line before moving to the next one.

The reason I chose not to use 3m double sided tape is because I did not want to cut it with a razor around those intricate letters.
 
I know this post is old but does anyone have pics of the indentions you are talking about behind the letters. Id like to remove them cause it's a pain the clean around them.
Thanks
 
I know this post is old but does anyone have pics of the indentions you are talking about behind the letters. Id like to remove them cause it's a pain the clean around them.
Thanks

You can see them in the first picture above. They are much more pronounced in chrome than they are in the above picture.
 
I know this post is old but does anyone have pics of the indentions you are talking about behind the letters. Id like to remove them cause it's a pain the clean around them.
Thanks

From this post by [MENTION=61739]sirhamlet[/MENTION] http://www.toyota-4runner.org/5th-gen-t4rs/109944-vinyl-rear-garnish.html#post1022992

60647d1332816764-vinyl-rear-garnish-img_0604.jpg
 
Man thanks for the quick response. That's not to bad at all. I may fill them in and paint it smooth with just the Toyota emblem left. I'll have to look at how to take that piece off so I can paint it.
Thanks
 
How is the emblem assembly attached?

Hi, I know this is an older thread, but can anyone comment on how the overall emblem assembly is connected? Mine was partially detached in an unfortunate garage door incident.

It almost seems that it is just a press-fit with several white plastic tabs, but I'm afraid to pull it out further to get a better look and end up snapping something.

I've been searching around the forum so if there is a repair manual section that I have missed, then I apologize. Any direction or help is greatly appreciated.
 
Has anyone tried using a heat gun to remove the letters? A careful use of a heat gun is great for removing a lot of adhesives.
 
Sweet baby Jesus an old thread. I guess I can't be mad at you for searching.

Most people anymore bypass the whole removal thing and just paint them with plastidip. Removing the paint in between the letters is super easy.
 
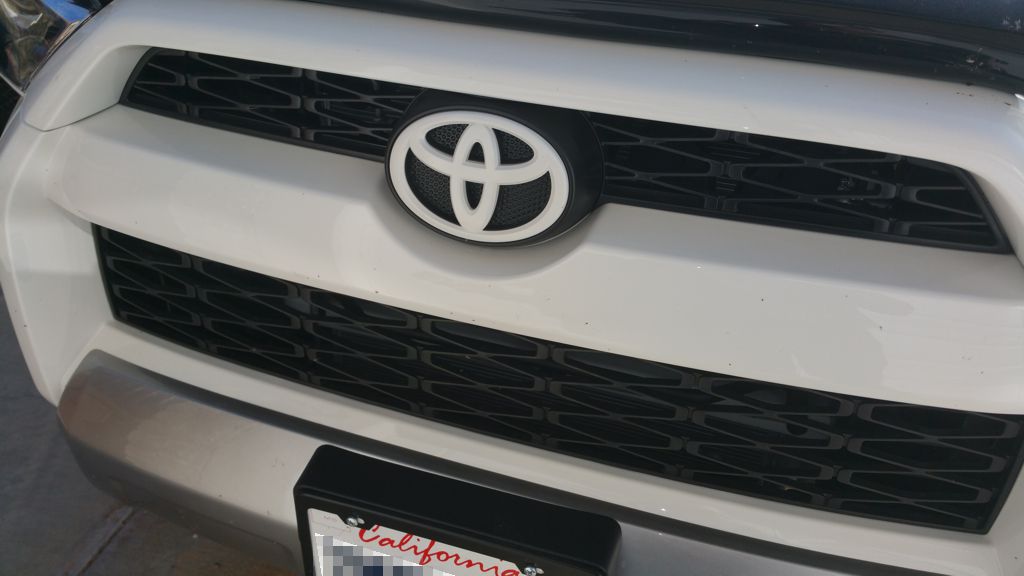
I thought I would update this since I just finished with mine. I first attempted to go the easy route and use white plasti dip. It came out looking like crap. The dip on the chrome came off easier than the dip on the dimples behind the front logo. It was also almost impossible in the space between the top of the logo. I spent a lot of time trying to clean it up but in the end I removed the top half of the front grill and the whole back hatch cover.

I also didn’t like how much the plasti dip was so far off from the Toyota Super White.

The front grill isn’t hard to remove at all. It’s all push clips that are very easy to remove. There is a 10mm bolt and a few Phillips screws as well. The only hard part is the four push down clips to separate the top from the bottom grill. One clip was too tight to push down with my fingers but a large screwdriver fixed that.

Once you have the top half removed it’s easy to remove the Toyota emblem and clean up the dimpled backing.

4runner_029.jpg


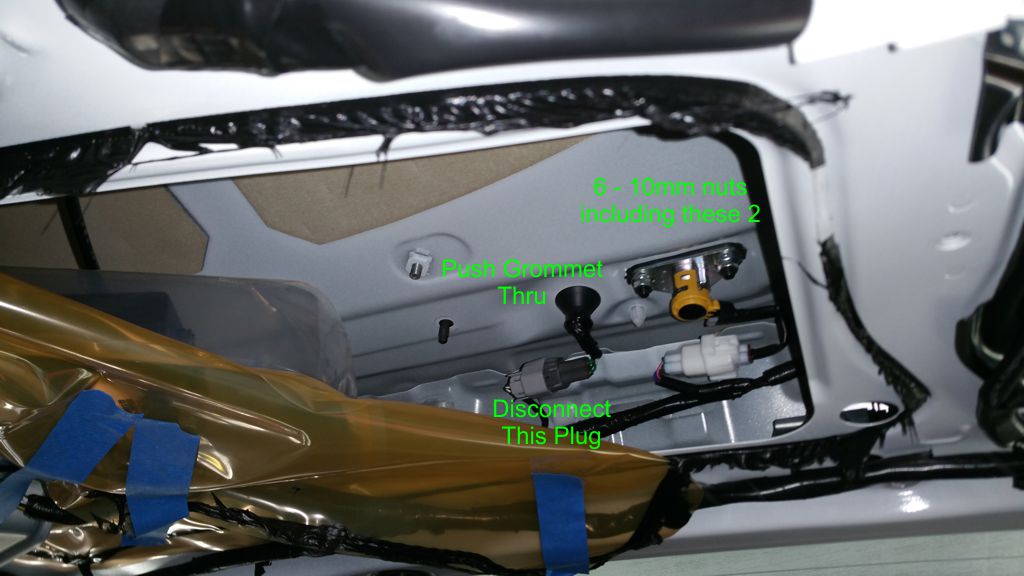
For the back hatch cover you start by removing the two rear door lights. Pry them out from the driver’s side and unplug. Then remove the 4” square access cover and pry out the small cover for the pull down handle. Remove the 10mm bolt holding the pull down handle. Then pry off the rear door inner panel from the bottom to the top. Pull back the yellow plastic as far as possible to gain access to the rear hatch assembly. I taped it out of the way. There are 6 10mm nuts to remove and 5 plastic push in clamps. 4 can be pushed out with pliers and one in the center of the Toyota emblem that needs some force from outside but will eventually give way.

All the letters on the hatch cover and the emblem are stuck on with sticky tape. I very lightly used a combo of a heat gun and metal pry bars for panel removal to pop off the letters and emblem. Once off I carefully removed all that remained on the letters and emblem by hand. On the hatch cover I used lacquer thinner and goof off. This did remove the paint that is on the plastic. This ruined the look of it so I had to decide between paint or vinyl.

Since there is brushed metal on my dash I decided to go with it. I was influenced by Snooperstyle’s carbon fiber wrap. The one difference is the brushed metal vinyl shows every imperfection. On my first try is clearly showed where every trace of glue was left behind. I pulled it off and wet sanded the back of the hatch cover and tried again. I overheated a couple places with my heat gun and could still see places where I thought I had it pretty well sanded but the vinyl showed otherwise.

For my third attempt I took my time to sand it very well. I cleaned it with denatured alcohol and was very careful not to pull to hard or to overheat they vinyl. It finally came out to my expectation.

For all the chrome, I took a 5 gallon bucket with 2” of water in it into the house and took my time with 320 grit wet/dry sand paper and made sure every edge of every part was scuffed up enough to take the primer and paint. I did this while watching TV so it would not seem so bad.

After every part looked good I primed with Krylon Auto primer then used Plasticote color matching paint. I gave all enough coats from different angles to look great.

I gave the paint time to dry well then used blue paint tape to make a bottom guide. Using a google reference I also made 90* side markings. I cut a length to ¼” for spacing. I cut the double side tape to fit inside the letters after my first try to cut it at the edges failed bad. I started at the last R and worked my way back. I moved the spacer between setting each letter.
In the end I am very pleased at how it came out.

4runner_027.jpg


4runner_028.jpg


My next thing to do will cover the silver bumper covers with matching 3M black brushed metal vinyl to match the hatch cover.

 
Last edited:
I thought I would update this since I just finished with mine. I first attempted to go the easy route and use white plasti dip. It came out looking like crap. The dip on the chrome came off easier than the dip on the dimples behind the front logo. It was also almost impossible in the space between the top of the logo. I spent a lot of time trying to clean it up but in the end I removed the top half of the front grill and the whole back hatch cover.

I also didn’t like how much the plasti dip was so far off from the Toyota Super White.

The front grill isn’t hard to remove at all. It’s all push clips that are very easy to remove. There is a 10mm bolt and a few Phillips screws as well. The only hard part is the four push down clips to separate the top from the bottom grill. One clip was too tight to push down with my fingers but a large screwdriver fixed that.

Once you have the top half removed it’s easy to remove the Toyota emblem and clean up the dimpled backing.

For the back hatch cover you start by removing the two rear door lights. Pry them out from the driver’s side and unplug. Then remove the 4” square access cover and pry out the small cover for the pull down handle. Remove the 10mm bolt holding the pull down handle. Then pry off the rear door inner panel from the bottom to the top. Pull back the yellow plastic as far as possible to gain access to the rear hatch assembly. I taped it out of the way. There are 6 10mm nuts to remove and 5 plastic push in clamps. 4 can be pushed out with pliers and one in the center of the Toyota emblem that needs some force from outside but will eventually give way.

All the letters on the hatch cover and the emblem are stuck on with sticky tape. I very lightly used a combo of a heat gun and metal pry bars for panel removal to pop off the letters and emblem. Once off I carefully removed all that remained on the letters and emblem by hand. On the hatch cover I used lacquer thinner and goof off. This did remove the paint that is on the plastic. This ruined the look of it so I had to decide between paint or vinyl.

Since there is brushed metal on my dash I decided to go with it. I was influenced by Snooperstyle’s carbon fiber wrap. The one difference is the brushed metal vinyl shows every imperfection. On my first try is clearly showed where every trace of glue was left behind. I pulled it off and wet sanded the back of the hatch cover and tried again. I overheated a couple places with my heat gun and could still see places where I thought I had it pretty well sanded but the vinyl showed otherwise.

For my third attempt I took my time to sand it very well. I cleaned it with denatured alcohol and was very careful not to pull to hard or to overheat they vinyl. It finally came out to my expectation.

For all the chrome, I took a 5 gallon bucket with 2” of water in it into the house and took my time with 320 grit wet/dry sand paper and made sure every edge of every part was scuffed up enough to take the primer and paint. I did this while watching TV so it would not seem so bad.

After every part looked good I primed with Krylon Auto primer then used Plasticote color matching paint. I gave all enough coats from different angles to look great.

I gave the paint time to dry well then used blue paint tape to make a bottom guide. Using a google reference I also made 90* side markings. I cut a length to ¼” for spacing. I cut the double side tape to fit inside the letters after my first try to cut it at the edges failed bad. I started at the last R and worked my way back. I moved the spacer between setting each letter.
In the end I am very pleased at how it came out.

4runner_027.jpg


4runner_028.jpg


My next thing to do will cover the silver bumper covers with matching 3M black brushed metal vinyl to match the hatch cover.
Nice job!
 
I thought I would update this since I just finished with mine. I first attempted to go the easy route and use white plasti dip. It came out looking like crap. The dip on the chrome came off easier than the dip on the dimples behind the front logo. It was also almost impossible in the space between the top of the logo. I spent a lot of time trying to clean it up but in the end I removed the top half of the front grill and the whole back hatch cover.

I also didn’t like how much the plasti dip was so far off from the Toyota Super White.

The front grill isn’t hard to remove at all. It’s all push clips that are very easy to remove. There is a 10mm bolt and a few Phillips screws as well. The only hard part is the four push down clips to separate the top from the bottom grill. One clip was too tight to push down with my fingers but a large screwdriver fixed that.

Once you have the top half removed it’s easy to remove the Toyota emblem and clean up the dimpled backing.

4runner_029.jpg


For the back hatch cover you start by removing the two rear door lights. Pry them out from the driver’s side and unplug. Then remove the 4” square access cover and pry out the small cover for the pull down handle. Remove the 10mm bolt holding the pull down handle. Then pry off the rear door inner panel from the bottom to the top. Pull back the yellow plastic as far as possible to gain access to the rear hatch assembly. I taped it out of the way. There are 6 10mm nuts to remove and 5 plastic push in clamps. 4 can be pushed out with pliers and one in the center of the Toyota emblem that needs some force from outside but will eventually give way.

All the letters on the hatch cover and the emblem are stuck on with sticky tape. I very lightly used a combo of a heat gun and metal pry bars for panel removal to pop off the letters and emblem. Once off I carefully removed all that remained on the letters and emblem by hand. On the hatch cover I used lacquer thinner and goof off. This did remove the paint that is on the plastic. This ruined the look of it so I had to decide between paint or vinyl.

Since there is brushed metal on my dash I decided to go with it. I was influenced by Snooperstyle’s carbon fiber wrap. The one difference is the brushed metal vinyl shows every imperfection. On my first try is clearly showed where every trace of glue was left behind. I pulled it off and wet sanded the back of the hatch cover and tried again. I overheated a couple places with my heat gun and could still see places where I thought I had it pretty well sanded but the vinyl showed otherwise.

For my third attempt I took my time to sand it very well. I cleaned it with denatured alcohol and was very careful not to pull to hard or to overheat they vinyl. It finally came out to my expectation.

For all the chrome, I took a 5 gallon bucket with 2” of water in it into the house and took my time with 320 grit wet/dry sand paper and made sure every edge of every part was scuffed up enough to take the primer and paint. I did this while watching TV so it would not seem so bad.

After every part looked good I primed with Krylon Auto primer then used Plasticote color matching paint. I gave all enough coats from different angles to look great.

I gave the paint time to dry well then used blue paint tape to make a bottom guide. Using a google reference I also made 90* side markings. I cut a length to ¼” for spacing. I cut the double side tape to fit inside the letters after my first try to cut it at the edges failed bad. I started at the last R and worked my way back. I moved the spacer between setting each letter.
In the end I am very pleased at how it came out.

4runner_027.jpg


4runner_028.jpg


My next thing to do will cover the silver bumper covers with matching 3M black brushed metal vinyl to match the hatch cover.


I know this is super old and I am bumping the thread, but it looks like you had to remove the rear hatch panel to remove the 4runner and toyota badge? From what I can tell they are stickers...are they actually bolted on?
 
I know this is super old and I am bumping the thread, but it looks like you had to remove the rear hatch panel to remove the 4runner and toyota badge? From what I can tell they are stickers...are they actually bolted on?

the symbol and letters are just stuck on, no bolts.
 
I know this is super old and I am bumping the thread, but it looks like you had to remove the rear hatch panel to remove the 4runner and toyota badge? From what I can tell they are stickers...are they actually bolted on?

The bezel is bolted on. The letters and Toyota symbol are held on using 3M tape or equivalent.
 

Members online

Forum statistics

Threads
278,313
Messages
3,554,090
Members
248,016
Latest member
Advally Service

Trending content

Back
Top