Badmeat's 2003 V8 Limited Build - RSTRNR

Badmeat

New member
After a couple months with no 4Runner (first time in over 5 years), I've finally landed on a 4th gen to pickup as a second vehicle. I sold my 2015 Pro and picked up a 2019 Tundra Pro for the increased towing capacity. The purpose of the 4Runner will be a second vehicle to keep miles off of the Tundra (currently pacing to do 20-25k/year) and also have something to do some light/medium off-roading. I'm only a couple hours from Red River Gorge so that's a plus.

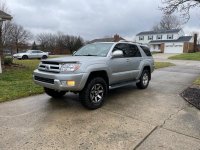
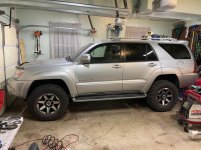
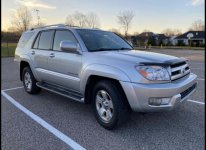
The rig:

The 2003 is going to need some TLC. It has about 220k on the clock and the following issues will need addressed:

-Exhaust replaced/supported, as it's hanging down and there's no piping behind the muffler
-Cracked exhaust manifold. This seems to be common on the 4.7 and it's either a live-with-it situation or set aside a couple days to replace it.
-Seeping valve cover gaskets. I've been told this may be resolved with tightening the valve covers. If not, they will be replaced.
-Drivers window binds when door is shut below 1/2 way. This may be a tracking problem or some adjustment needs made.
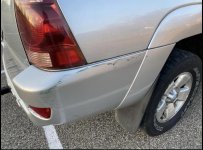
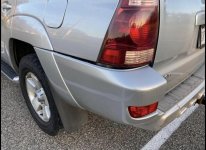
-Rear bumper disconnected on drivers side where it meets the body. Passenger side scuffed.

Other than that, just some general cleaning and servicing of fluids will be done. I'll also scale the frame and coat it with wool wax, after the sliders are installed.

Plans for the rig:

-OME lift with 886 front springs and Toytec Superflex coils (will swap rear springs/shocks if I add a rear bumper in the future). From what I've read the 886 is recommended for the V8 model when running a winch/bumper
-Victory 4x4 Blitz front winch bumper
-8-10,000 lb winch (undecided, but considering the Engo SR10s [owned one in the past])
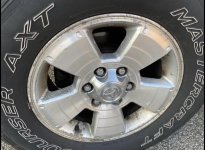
-285/70/17 A/T tires. I have been very happy with Terra Grapplers in the past but may try the new Toyo Open Country tires. I also understand that spacers or different wheels will likely be needed to fit these, as well as UCA's. The jury is still out on E-load tires, as I'm going to likely be driving this 10k+ miles/year and don't want something loud on-road or stupid heavy
-Sliders. A good friend of mine had an issue with his Jegs sliders for his 3rd gen and they send him another set. Basically, they were missing the mounting plates. They let him keep the first set so I'm getting some on the cheap. A mutual friend of ours welded them up and referred him to a local powdercoater that did them on the cheap.

I'll update with pics once the purchase is completed tomorrow.
 

Attachments
  • 0C66BD34-7F51-4FC0-B562-8ADF0C956AE1.jpg
    0C66BD34-7F51-4FC0-B562-8ADF0C956AE1.jpg
    125.5 KB · Views: 1,251
  • 3C51E95D-E0D7-4888-B056-1D8FFE4ADB31.jpg
    3C51E95D-E0D7-4888-B056-1D8FFE4ADB31.jpg
    116.6 KB · Views: 1,061
  • 62DEDFAD-3987-4DA9-A207-9C2CD738DE62.jpg
    62DEDFAD-3987-4DA9-A207-9C2CD738DE62.jpg
    121.5 KB · Views: 958
  • 1F601C84-9D6B-44E7-A530-EF474E911F6C.jpg
    1F601C84-9D6B-44E7-A530-EF474E911F6C.jpg
    114.3 KB · Views: 1,047
Last edited:
Register to hide this ad
-Cracked manifold: Depending on the severity and your climate (rust) you can remove, weld together, and re-install to save money. I did that and it cost me a felpro gasket and about 6-8 hours. It's a tedious 1 man job but not overly technical.

-Valve Cover leaks: Be careful not to over torque those small bolts. You can do more damage than good. Best it to replace correctly the first time. Alternatively you could try high mileage oil which may help the seals swell back up better.
 
-Cracked manifold: Depending on the severity and your climate (rust) you can remove, weld together, and re-install to save money. I did that and it cost me a felpro gasket and about 6-8 hours. It's a tedious 1 man job but not overly technical.

-Valve Cover leaks: Be careful not to over torque those small bolts. You can do more damage than good. Best it to replace correctly the first time. Alternatively you could try high mileage oil which may help the seals swell back up better.
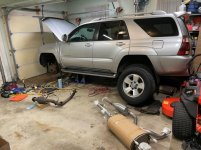
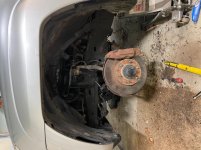
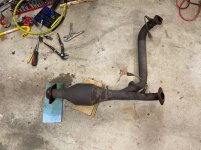
The valve cover gaskets have shrunk over time. Some of the bolts were literally finger tight. They’ll be replaced if leaking continues. I’ve embarked on the manifold replacement tonight. I have an OEM replacement lined up for $Free-fitty.

What I’ve determined after getting the top 4 out and the Y-pipe off.....rust sucks. It’s slow progress, and lots of heat and penetrating oil is needed. So far I’ve only snapped one exhaust bolt but was able to extract it. I’ll be tackling the remaining 4 manifold bolts on Sunday.

Also, I’ve added a photo to the OP
 
I’ve had a lot going on this week. After picking up the 4Runner Monday, I dove right in. Rear diff fluid change, transfer case fluid change, greased the driveshaft zerk fittings, and front diff fluid to come soon (I had to cut the front skid off to access it, as it was bent near the front passenger mounting bolt). The one philosophy that I fortunately have taken to heart is heat, penetrating oil, and patience. I’ve only broken one bolt so far (aside from the two license plate bolts) and heat/PB blaster have been my two best friends.

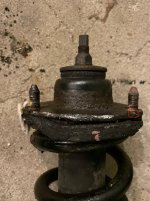
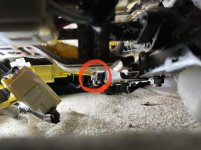
Tonight a couple friends came over (one owns a 2001 4Runner lightly built, the other a 2008 Tacoma pretty heavily built) to assist with the exhaust manifold replacement. Although I was on the struggle bus on my back working on rusted exhaust bolts, one of my cohorts were able to get 4 of the manifold studs out (the nuts pulled the studs, as expected). Something else we decided to do was remove the strut assembly as I’m replacing them with an 887/5100 combo (not a lot of 4th gen data available but I’ll play test subject. Dobinsons makes a similar offering that’s what I’m looking for but this setup is on the cheap, used). The tophat had literally fused to the strut “bucket” and after 30+ minutes of persuasion, it finally separated. I would like everyone to note the red circle (attached). This is the area that I would recommend using a hardened chisel and hammer on. The one thing that I learned tonight is that it takes a lot of persuasion all around the tophat before you hit two taps on that area to break it loose. Please don’t ever hit that spot first or it may separate too easily, without enough struggle.

If the passenger side gives me the same trouble, I may lose sanity. Fortunately, I have the cheat code now.

At the end of the day, we had enough choice beverages to keep the mood relaxed and laid back tonight. There are 4 nuts/studs to get out and the manifold is free. I’ll update in a couple days with good news (hopefully).

Side note- I installed new garage lighting Wednesday which was a helpful addition to the project. I will again add that nearly 220k mile 2003 exhaust bolts earn a lot of four letter words when being “removed”.
 

Attachments

  • 3C7F2BDD-60EC-4AF4-AAEB-ADABF484530E.jpg
    3C7F2BDD-60EC-4AF4-AAEB-ADABF484530E.jpg
    136.4 KB · Views: 1,187
  • F86EE68A-CFCC-4A74-BFE7-0B18B9550F88.jpg
    F86EE68A-CFCC-4A74-BFE7-0B18B9550F88.jpg
    135.6 KB · Views: 1,129
  • C7C57A85-DFD9-4AB0-B207-F833C1D71BB3.jpg
    C7C57A85-DFD9-4AB0-B207-F833C1D71BB3.jpg
    137.1 KB · Views: 1,118
  • 10CC2C04-ABB0-41A9-BB20-6A0B3C64BA7E.jpg
    10CC2C04-ABB0-41A9-BB20-6A0B3C64BA7E.jpg
    130.5 KB · Views: 1,166
Looks exactly like mine! Looking forward to following along and seeing how our builds are similar/different.
 
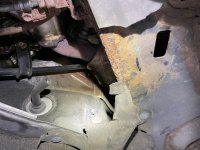
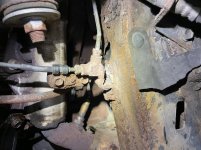
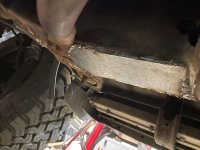
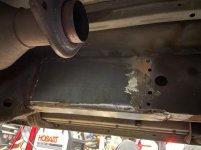
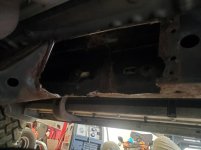
I have an '03 Ltd. too, every project is a battle with rusted bolts, etc. Did my top hats a few months ago and they needed some persuasion like yours! Take a look at your frame below front passenger door. The a/c condensation tube exits the firewall in engine compartment on that side right above frame and on mine the condensate ran down the frame and stopped under door where it dripped on ground but also rusted sizeable hole in bottom of frame. relocate the drain with a elbow and hose and clamps to get condensate away from frame. Was a $1000 frame patch for me!
 
I have an '03 Ltd. too, every project is a battle with rusted bolts, etc. Did my top hats a few months ago and they needed some persuasion like yours! Take a look at your frame below front passenger door. The a/c condensation tube exits the firewall in engine compartment on that side right above frame and on mine the condensate ran down the frame and stopped under door where it dripped on ground but also rusted sizeable hole in bottom of frame. relocate the drain with a elbow and hose and clamps to get condensate away from frame. Was a $1000 frame patch for me!
My frame will definitely be getting some reinforcement. It’s a little soft on that side.

Update:

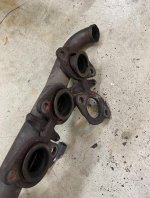
Manifold has been removed with no broken bolts! Can anyone guess where it was leaking?

Also, both strut assemblies are out as well. I’ll be driving down to Louisville Friday to get the replacement manifold and my suspension should be in this week as well. More updates soon.
 

Attachments

  • 0503AEE5-5FD0-44BC-B1D1-26BA8E21AC65.jpg
    0503AEE5-5FD0-44BC-B1D1-26BA8E21AC65.jpg
    139.6 KB · Views: 1,109
Last edited:
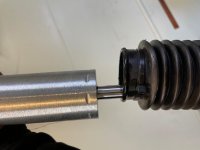
Update:

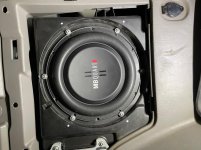
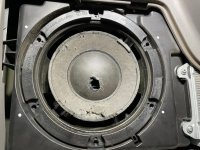
I replaced the factory sub today. It has obviously seen better days (see attachment). The new one sounds good and should sound better once I get the headunit replaced and am able to tune the frequencies better and adjust the crossovers.

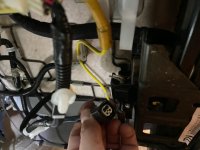
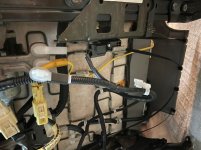
I was able to solve the airbag light issue. It appears that the drivers seat was replaced at some point and the old connector with cut wires was never removed and the harness plugged in (see pics). This was a nice ten minute fix that cost me free-fitty and now my dash is light-free.

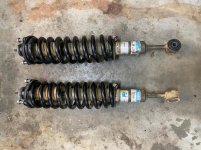
Also, the suspension showed up. 5100s with OME 887 for the front, Toytec Superflex for the back. The fronts are used from a good friend with an 08 Taco. He now has a badass Fox setup with remote resi all around and had these in the garage. Now featuring new KYB top hats and bushings.

Next up is some frame patching to take place this weekend where there are some soft spots on the passenger side. The condensation drain tube for the a/c drips directly on the frame right at the rear of the front wheel well (as rdruss mentioned in an earlier post) and the engineer that designed that should be demoted. I’ve extended/re-routed it so that the frame should stop experiencing constant moisture.
 

Attachments

  • 8E752670-AA0B-4099-802F-99797BFD8A39.jpg
    8E752670-AA0B-4099-802F-99797BFD8A39.jpg
    134.2 KB · Views: 1,335
  • FD2A2542-8A86-426C-8883-71E408C99AF1.jpg
    FD2A2542-8A86-426C-8883-71E408C99AF1.jpg
    138.8 KB · Views: 1,217
  • 7395178D-F4DF-4DB3-A717-EF1B514F5FF4.jpg
    7395178D-F4DF-4DB3-A717-EF1B514F5FF4.jpg
    127.1 KB · Views: 1,045
  • A496996C-194B-4A1C-909A-20C1B564189F.jpg
    A496996C-194B-4A1C-909A-20C1B564189F.jpg
    119.3 KB · Views: 1,064
  • 8AC97551-52D4-4206-BCC9-4B821BAB3D68.jpg
    8AC97551-52D4-4206-BCC9-4B821BAB3D68.jpg
    126 KB · Views: 1,062
  • 3264D783-FF34-4AFE-AF83-5A520632E234.jpg
    3264D783-FF34-4AFE-AF83-5A520632E234.jpg
    131.7 KB · Views: 1,217
  • 70B23DA3-651D-4652-AA73-C5C8F19CEE28.jpg
    70B23DA3-651D-4652-AA73-C5C8F19CEE28.jpg
    136.3 KB · Views: 1,055
  • 5228FEED-3F3A-4340-A13F-3706DA7CBF34.jpg
    5228FEED-3F3A-4340-A13F-3706DA7CBF34.jpg
    137.2 KB · Views: 1,021
Last edited:
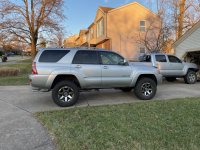
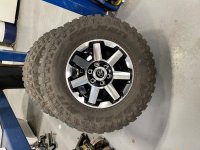
Not a bad setup for sub-$1,000. I was able to scoop up some like new TRD OR wheels for $350 and some very lightly used Wildpeak MTs for $600 off of a Jeep Gladiator.

This weekend there’s going to be a lot going on. I’m hoping to get the replacement exhaust manifold and front suspension installed, as well as the passenger frame patched/reinforced.
 

Attachments

  • CEE3C331-1FB7-4A42-AC03-6D1A1C83CC06.jpg
    CEE3C331-1FB7-4A42-AC03-6D1A1C83CC06.jpg
    136 KB · Views: 983
Damn, you really dove in head first! Subbed for updates.

Sent from my SM-G986U using Tapatalk
Full send. The quicker this is done, the quicker the miles I'm putting on my Tundra slow down.

I'm planning to go with another Kenwood Wireless Apple Carplay unit for this, as the DDX 8706S that I've had for the last 18 months has spoiled me. First, we need to sure up the frame and get this thing drive-able.

I also forgot to add that I ordered am Aisin timing belt/water pump kit from Rock Auto. Not a bad deal at $160.

The only maintenance items at that point left are an oil change and transmission fluid change (all diffs have had a fluid change and the drivetrain lubed up).
 
I got the exhaust manifold in last night but there’s not much to see, so no photos. I’ll be installing the Y-pipe, and hooking up the o2 sensors so that I can switch directions that it’s facing, so that means at least the front suspension and wheels/tires will be done today in addition to the frame repair.

Pics to come later.
 
I’m exhausted but here’s a quick photo dump.

Today the frame was patched. Installed was:
-Front/rear lift
-Exhaust to the secondary cat
- Replacement taillight & rear bumper (free)
-Passenger door card (better shape than mine, free)
-Wheels & tires

It doesn’t seem like a lot when I type it out but when everything is rusty, it takes so much longer. Both rear shocks sheared off the studs on top. I’m pretty sure I’ll need a new propane torch when this project is over.
 

Attachments

  • 6E8541EE-9503-4CDE-9760-D750BF724C64.jpg
    6E8541EE-9503-4CDE-9760-D750BF724C64.jpg
    121.7 KB · Views: 961
  • A1F17261-F8DA-4C6C-AB6A-E397F36EBC17.jpg
    A1F17261-F8DA-4C6C-AB6A-E397F36EBC17.jpg
    127.4 KB · Views: 1,009
  • D3FF06B3-7024-4731-B4BC-838B991D56CF.jpg
    D3FF06B3-7024-4731-B4BC-838B991D56CF.jpg
    138.4 KB · Views: 1,013
  • D4A09555-50D0-449D-999D-70F3CBCB21AA.jpg
    D4A09555-50D0-449D-999D-70F3CBCB21AA.jpg
    134.7 KB · Views: 976
  • 702128CF-D2FD-4BD8-8D8F-F2969988A22C.jpg
    702128CF-D2FD-4BD8-8D8F-F2969988A22C.jpg
    57.8 KB · Views: 955
Last edited:
I too, have a '03 V8 LTD and if I didn't know better I would think I was looking at my frame repair when I look at your pictures, had same exact rust problem from the a/c condensate vent line.
What exhaust manifold did you get?
New wheels and tires look very good!
 
I too, have a '03 V8 LTD and if I didn't know better I would think I was looking at my frame repair when I look at your pictures, had same exact rust problem from the a/c condensate vent line.
What exhaust manifold did you get?
New wheels and tires look very good!
I went with a free-to-me OE manifold off of another 2003. I'll be bolting up the rest of the exhaust today to confirm it's leak-free. However, I have Y-pipe installed and am 99% confident there's no leaks, based on how it sounded yesterday.
 
Talk about some excellent customer service by Toytec.

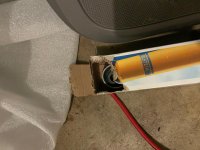
I was a little bummed yesterday when I pulled one of the Bilstein 5100 rear shocks out and it was leaking fluid from the seal. After closer inspection I noticed that the box was damaged, so it may have happened during shipment. I called and spoke with David this morning. He assured me he would get one shipped out today. I called back just now for an update and they’re overnighting a new one with a return label to send back the faulty shock.

10/10 customer service.
 

Attachments

  • E365A555-0209-4B24-83DB-8A4936C89C40.jpg
    E365A555-0209-4B24-83DB-8A4936C89C40.jpg
    134.4 KB · Views: 681
  • 115A569F-F82F-4D04-9CF2-82523266AD89.jpg
    115A569F-F82F-4D04-9CF2-82523266AD89.jpg
    120.2 KB · Views: 663
Sweet thread. Question: Do you think it would be worth while or would it make sense to replace the starter when you replace the water pump and timing belt?

I'll be due for a timing belt/water pump change next year and am trying to figure out if it would make sense to have an OEM starter put in.
 
Sweet thread. Question: Do you think it would be worth while or would it make sense to replace the starter when you replace the water pump and timing belt?

I'll be due for a timing belt/water pump change next year and am trying to figure out if it would make sense to have an OEM starter put in.

I honestly haven’t given it a thought. I guess I need to read up on starter accessibility.
 
Today was quite productive. After a solid 6-7 hours in the garage I was able to get the exhaust installed, rear shock installed (thanks again Toytec for overnighting my replacement), running boards removed, rear diff breather mod, headlights aimed properly, front swaybar reinstalled with new end links, and my clearance issue with the driver side window and door check bar corrected.

Tomorrow I will get the front end aligned and the trans/engine oil changed.

Here’s how she sits currently (bonus background cameo of my best man’s 2008 Tacoma with a badass Fox suspension):
 

Attachments

  • 94849F1E-FCB4-4C9B-A66A-75FC69068558.jpg
    94849F1E-FCB4-4C9B-A66A-75FC69068558.jpg
    139.2 KB · Views: 642
Last edited:
Damn, you're up and crankin' fast! Recently picked up an '08 V8 for exactly the same reason... After my ex took an '06 Sport I bought new, my only rig has been an '06 F-150. Picked this 4R up to reduce annual mileage on my Ford, have a back-up ride, and to give me the chance to have significant down time on the Ford to replace warped rotors, worn suspension, and rusted exhaust... Oh, and to repair the rear driver's bed panel that "someone" creased with his Polaris loaded with mule deer. Ooops.

This'll be the first subscription thread for me, 'cause your quick progress is an inspiration and because you provide ample photos showing the good, the bad and the ugly with good descriptions. As a rookie at auto work, it helps to see as well as read. Well done.
 
Last edited:

Members online

Forum statistics

Threads
278,316
Messages
3,554,120
Members
248,016
Latest member
Advally Service

Trending content

Back
Top