Badmeat's 2003 V8 Limited Build - RSTRNR

Damn, two months in and you're crankin'! Recently picked up an '08 V8 for exactly the same reason... After my ex took an '06 Sport I bought new, my only rig has been an '06 F-150. Picked this 4R up to reduce annual mileage on my Ford, have a back-up ride, and to give me the chance to have significant down time on the Ford to replace warped rotors, worn suspension, and rusted exhaust... Oh, and to repair the rear driver's bed panel that "someone" creased with his Polaris loaded with mule deer. Ooops.

This'll be the first subscription thread for me, 'cause your quick progress is an inspiration and because you provide ample photos showing the good, the bad and the ugly with good descriptions. As a rookie at auto work, it helps to see as well as read. Well done.

Thanks and I really appreciate it (it’s actually about two weeks in). After 15 days of ownership I’m glad that I have most of the work completed that I set out to do. There’s still some maintenance items (timing belt/water pump, needle scaling the frame, and wool wax coating it) that need done, and I also have sliders in the garage awaiting welding and need to pull out the rest of the XREAS system, but I’m happy with what I have done so far. I’ve been exhausted several days of this process but I’m nearing the end of the tunnel and its drivable, so I’m happy.
 
Last edited:
Wednesday I got a front end alignment, and changed the oil and transmission fluid. Today the front axles got re-booted and I did the stretch mod to the inner boots (I used this video as a guide which was very helpful https://www.youtube.com/watch?v=vcCT4UgFUTw&feature=youtu.be).

I used the OEM Toyota boot kits which came with everything needed. If I had to do this again I would guess it would take me between 90 minute and 2 hours per side to complete. It took a little longer since it was my first time doing it and I walked through the first boot with the video. I would recommend getting clamps similar to these: Amazon.com: Stainless Steel Universal Adjustable AXLE CV Joint Boot Crimp Clamp Kit,24PCS(12pcs Small+ 12pcs Large): Home Improvement instead of using the fold-over style OE clamp. One of the original boots had simply slipped off while on the vehicle with the clamp fully in tact, likely due to not enough clamping pressure by the fold-over style.

I didn’t take many pictures because the video above shows everything. I’m hoping the stretch mod will allow the CV boots to last longer, which upon install it seems to keep the boot ribs from touching each other.
 

Attachments

  • E9023BDD-F103-4789-AA95-B09C99143766.jpg
    E9023BDD-F103-4789-AA95-B09C99143766.jpg
    138 KB · Views: 584
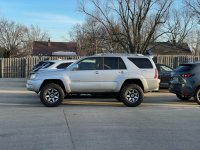
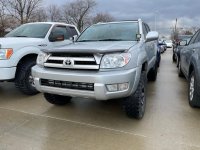
Suspension update.

I’m liking the way it sits now. Once I first installed the suspension I was considering a front spacer due to the rear being much higher than the front, but it seems to be settling nicely.
 

Attachments

  • 9605EA7B-E311-447B-9626-303C5BA7CCDA.jpg
    9605EA7B-E311-447B-9626-303C5BA7CCDA.jpg
    137.7 KB · Views: 554
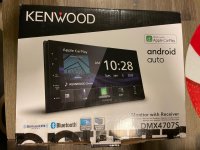
Tonight Apple CarPlay went in so that I don’t have to listen to the horrible disc jockeys and ads on FM radio. I went with this particular unit because it was cheap (“scratch & dent” at Crutchfield for $350 shipped with all install equipment), it has a capacitive touchscreen (vs the resistive/mushy screen), and I am a fan of the Kenwood DDX8706S unit in my Tundra. As long as Kenwood/JVC continue making good quality units, that’s what I’ll continue to run.

The install went pretty smoothly although adjusting the mounting brackets was a bit tedious but it’s dialed in now. Also, because I was in a rush, I installed everything before realizing I didn’t plug in and route the mic. 10 minutes later it was installed and good to go.
 

Attachments

  • 3D087846-D898-43B2-B349-4D16F1425F66.jpg
    3D087846-D898-43B2-B349-4D16F1425F66.jpg
    131.3 KB · Views: 507
  • 55604059-2B88-462D-B681-D91A4A9E34EB.jpg
    55604059-2B88-462D-B681-D91A4A9E34EB.jpg
    142.3 KB · Views: 509
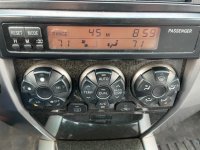
Sometimes it’s the little things. Today my bulbs came in for the HVAC display. Literally a two minute job with a flathead and Phillips screwdriver that makes it much easier to see what’s going on, especially at night.

Link to write up with part numbers
 

Attachments

  • 30FEE711-51D2-4B4A-8F4A-7294D210160D.jpg
    30FEE711-51D2-4B4A-8F4A-7294D210160D.jpg
    134.3 KB · Views: 520
I placed my order today for ditch light brackets and ditch lights. A friend with a Tacoma has a 32" curved light bar not being used that may be installed into my lower grille when I install and wire the ditch lights.

I also need to coordinate getting my sliders fabbed up. I may be making my first trip next weekend with the new rig, so I doubt I'll have time to get the sliders fabbed, coated, and installed in time. The trail selection will be pretty light so I don't go banging rocker panels.
 
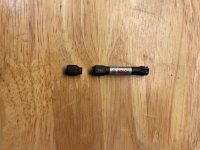
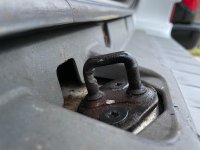
Productive day. I was able to somehow get the T40 torx bolts out of the rear hatch striker. They were so seized that I snapped a Bosch impact rated bit trying to get them out. Fortunately the bit was still usable, and due to its now shortened length, was less flexible and delivered every bit of torque through my 1/2” drive ratchet. The striker is now flipped 180 degrees so now that the hatch can latch onto a fresh, non-grooved surface, the hatch does rattle while driving.

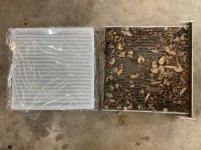
Next up was the cabin air filter. Just look at the pics, they’ll do the talking.

I finally pulled out the XREAS system. Quick work with an angle grinder and 12mm socket. Everything came out pretty easily without struggle. No pics of that because it’s already in the trash.

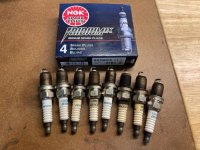
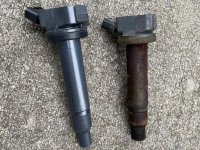
Spark plugs. My god were they crusty. I couldn’t begin to guess how old, but they’re OLD. New NGK iridium plugs are in and I’m going to keep an eye on one of the coils, as it looked a little suspect. It’s not arcing to the head but might start somewhat soon. I’ll probably change that out soon just as a preventative measure.

Onto the pics...
 

Attachments

  • 33EB5A06-7CCD-4AC5-828F-28F3E111BD8B.jpg
    33EB5A06-7CCD-4AC5-828F-28F3E111BD8B.jpg
    132.8 KB · Views: 422
  • A63AED29-EC5A-4D14-9B93-7D04B3B1A44B.jpg
    A63AED29-EC5A-4D14-9B93-7D04B3B1A44B.jpg
    124.7 KB · Views: 420
  • 86C65046-FF03-403A-9379-57C3AB210D23.jpg
    86C65046-FF03-403A-9379-57C3AB210D23.jpg
    138.2 KB · Views: 448
  • 203B1166-847F-4965-9E2E-865E41ADA84A.jpg
    203B1166-847F-4965-9E2E-865E41ADA84A.jpg
    138 KB · Views: 482
-Cracked manifold: Depending on the severity and your climate (rust) you can remove, weld together, and re-install to save money. I did that and it cost me a felpro gasket and about 6-8 hours. It's a tedious 1 man job but not overly technical.

-Valve Cover leaks: Be careful not to over torque those small bolts. You can do more damage than good. Best it to replace correctly the first time. Alternatively you could try high mileage oil which may help the seals swell back up better.

I gots a 2005 V6 4runner (150,000 miles) since new here in Nassau Bahamas. All short trips of 5 miles. No 100 miles ever.

Never had to touch the engine or tranny - except for fluids (1 time for tranny at 100,500 by dealer. Brakes one time - by good mechanics at shop with 6 lifts. Original WP and alternator. Paint looks like yours in the picture - new.

How does Toyota paint their cars so they never rust out? Sold a 10 year old JIMMY because it rusted out so bad. Back hatch would hardly close. Afraid to touch it as it might break off.

Think I might go another 150,000 miles with this 4runner. Thought about buying a new one, but why? Paint on mine is pristine. Starts and runs like new car. Have replaced a few starters. Here in Nassau a car gets started three times as often per day as the same car in Miami (with 400,000 miles).:pop2:

Garaged now.

Bought my daughter a new Camry for graduation and acceptance into Florida State. She now landed a good job with the biggest Wall Street broker and drive it to work in Denver. Going on 6 years old. I wonder how long a Toyota can run trouble free. :amen:

Quality is Toyota. Honda engines too. European and American cars are done IMO.

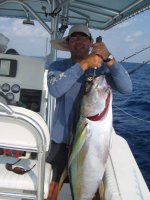
Three Yamaha 4 strokes on back of my old 42 foot Performance. A good day for YFT. Sushi. Bob the builder of the Performance 15 years ago died two months ago. Built the best 40 footer in South Florida. About ten in the Caribbean. All fiberglass - no wood. Hulls were indestructible. Many times I'd hit a wave and the "boom"; It would make me think the hull would crack and leak. Never happened.

We drift and chuck. You could troll for two days and not get a strike! YFT can't throw or pull a #9 circle hook. Why take the chance and lose a $400 fish with a smaller hook?

Sold my Performance 42 after 15 years of pounding through Bahamian seas and two sets of (3) outboards on the stern. Bob rigged the boat, and there was never a problem.
 

Attachments

  • Jimmy YFT 85 pounds .jpg
    Jimmy YFT 85 pounds .jpg
    70.3 KB · Views: 453
Last edited:
The replacement ignition coil arrived today. I still can’t quite believe that the crack runs the full length of the coil and it was still operating fine.
 

Attachments

  • B32BA840-6B30-420C-848E-13A8EE8A1690.jpg
    B32BA840-6B30-420C-848E-13A8EE8A1690.jpg
    147.4 KB · Views: 401
Productive day. I was able to somehow get the T40 torx bolts out of the rear hatch striker. They were so seized that I snapped a Bosch impact rated bit trying to get them out. Fortunately the bit was still usable, and due to its now shortened length, was less flexible and delivered every bit of torque through my 1/2” drive ratchet. The striker is now flipped 180 degrees so now that the hatch can latch onto a fresh, non-grooved surface, the hatch does rattle while driving.

Almost like the bit was designed that way. Good thing it was!
 
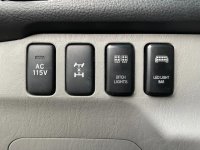
My ditch lights and brackets arrived this week. I was also able to pick up a 32” light bar with Tacoma brackets from a friend that were able to be easily modified to work on the 4Runner.

The pods are Kawell brand and the bar is Mic Tuning from Amazon. I ran off brand on all of my 4Runners in the past and had no issue with moisture. The brackets and switches are from Cali Raised. I was able to tap the switches into the dimmer so they vary brightness accordingly. I’ll try to get some night photos of the light spread but I’m very pleased with the result.

I’ll have the sliders fabbed up on the 26th, then they’re off to powder coating. I truly need to quit procrastinating the timing belt and needle scaling/wool waxing the frame but I’m not looking forward to either of those jobs.
 

Attachments

  • 6887A089-B26F-4947-B7CE-F88D9C139CF7.jpg
    6887A089-B26F-4947-B7CE-F88D9C139CF7.jpg
    136.6 KB · Views: 410
  • 0DEB2DDC-9465-48C3-9EA1-159A08B6E771.jpg
    0DEB2DDC-9465-48C3-9EA1-159A08B6E771.jpg
    138.4 KB · Views: 354
Last edited:
Yesterday the timing belt/water pump job was started.....I say started because it's not quite back together.

I used this video as a walk through - Toyota 4.7 Timing Belt Part 1 (updated) - YouTube

Everything went smoothly until reassembly. I was able to get everything apart pretty easily, although the lower alternator bolt was a pain due to the location of the a/c hard lines. I set the timing and checked interference by rotating the engine manually for two rotations and all was well.

Everything was fine until I reached the lower alternator bolt. It was a pain to access due to the hard lines and difficult to get started. Once it was threaded completely into the hole, I didn't understand why it wouldn't torque up. Once I got to the cooling fan bracket and the bolt wouldn't reach the threads, it hit me. I'd switched the bolts by mistake. The lower alternator bolt wouldn't torque up because it had threaded beyond the threads and onto the shoulder of the bolt. It was an absolute pain to get back out, but I did, and the threads of the alternator bracket remained unscathed, but the bolt....not so much. If anyone can learn from me, DO NOT DO THIS. It easily added 60-90 minutes to the job and prevented me from completing it...kinda.

So now I'm waiting for a new thermostat (might as well since I'm in there, and I would have put off completion to get one anyway) and 14mm long bolt for the cooling fan bracket (M10x1.25, 115mm length). I picked up some Toyota coolant, Gates idler pulley (the bearing was a little suspect on the tensioner), Type IV trans fluid (a little was lost when disconnecting the radiator, and Gates serpentine belt. All that's left is to put the bolt into the fan assembly bracket, install the t-stat, idler pulley, serpentine belt, radiator, fan/shroud, burp the coolant system, and top off the trans fluid.

More updates this week, but no pics because, well, there's hundreds out there already.
 
The timing belt/water pump job was finished up last week and she drives great. Note to self- make sure all vacuum lines are on before starting it and trying to figure out an erratic idle.

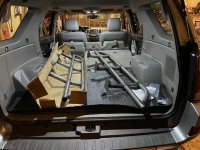
I’ve since ordered inner and outer tie rod ends as I’m getting a lot of noise from the passenger outer end. That’ll be a job for next week, but I have some progress that was made today. I finally got around to getting my sliders fabbed up. It took a couple hours with a friend of mind at his shop and they turned out nice. I’ll be dropping them off for powder tomorrow then hopefully installing them this weekend or next week. I was also able to (semi) install my Apex Overland front recovery points but need to drill a hole in my lower crossmember for one of the four bolts on each side (it was replaced at some point prior to my ownership. Fortunately with a much thicker metal).

I’ve also decided that I’m going to be cutting my seized spare tire cable and going with a hitch mounted spare system rather than putting the spare back under the vehicle. Increased ground clearance and less chance of slicing a hole in my spare on a rock. The maiden voyage is planned for February 18-21, so I have some work to get done before then. More updates coming soon.

Edit: I also upgraded all interior lights to LED, as well as headlights and fog lights. Spare me the lighting police, as I have them aimed responsibly and in the words of someone I drove behind in a Honda Fit “you can probably aim them up higher. They aren’t blinding like most modern trucks/SUVs”
 

Attachments

  • 8B0F10CB-1E10-4E83-8E74-26FCC2F0629E.jpg
    8B0F10CB-1E10-4E83-8E74-26FCC2F0629E.jpg
    133.8 KB · Views: 290
Last edited:

Members online

Forum statistics

Threads
278,316
Messages
3,554,120
Members
248,016
Latest member
Advally Service

Trending content

Back
Top