Bandit Runner's Build Thread

A couple of miscellaneous scenery pics:
qF4C9MY.jpg


kKbWnfz.jpg


ZKARugN.jpg


lV9Gg5e.jpg


Here's a crazy right angle tree we came across in the woods:
T1yny5y.jpg
 
Last edited:
Miscellaneous truck pics from the trip:
UuvfBMY.jpg


9ZIDX7I.jpg


1eWkFyX.jpg


S1MkXGR.jpg


E66UTbD.jpg


Hls5odD.jpg


giwEb1W.jpg


And this is what a weeks worth of fun looks like:
gXV75rK.jpg


X7GwI8E.jpg


It took my 3 days to clean the truck up, inside and out. But it was worth it.
 
Last edited:
I always enjoy checking out your build thread! Top notch work!

That's a lot of gear you hauled (3 kayaks, 3 bikes, firewood, etc.)

*Good times with the family is what it's all about- :nicethread:

Thanks man! The firewood, we cut once we got there. We didn't haul it up there, but it was still quite a load with the kayaks, bikes and all our camping gear.
 
One night while camping we were driving around looking for deer and other animals. At about 1:00am, we decided to stop in the middle of a desolate dirt road and take pics of all my lights.

35 watt HID projector TRS retrofit headlights, low beam:
Veskfb0.jpg


35 watt HID projector TRS retrofit headlights, high beam:
T4yGGCo.jpg


Pair of Rigid Industries Dually D2 amber fog lights inside front bumper:
SMZqyER.jpg


Pair of Ebay 60 watt round LED long distance offroad lights and pair of Rigid Industries SR-Q spotlights on top of front bumper:
aLFl3tW.jpg


Pair of Rigid Industries SR-Q spotlights and pair of Ebay 24 watt 3x3” cube ditch lights (there is more light at about 45 degrees outward from the truck that doesn’t show up in the picture):
t0rDHIn.jpg


Pair of Rigid Industries 6” single row spot lights on roof rack:
aSnNtZx.jpg


All front lights on:
LHcxnoZ.jpg


Rock lights (18 total):
MvEijSb.jpg

23PEBDA.jpg


All lights on:
E40IhTP.jpg

FuVgwtC.jpg

UNOyTTW.jpg


Stood up through the sun roof and took these next three pics. Looking forward:
8cB2Zgo.jpg

Looking backward:
zsjNema.jpg

Looking directly to the side:
8jh17CJ.jpg


Switches all lit up:
KCpiPth.jpg


I was extremely happy with the light setup. We could see animals on the road or off to the side of the road long before we got close to them. Also, we could shine deer with only the truck lights, in front, behind or on either side of the truck. We didn’t even have to use our hand held spot light. I also like having several small lights that I can aim at different angles, rather than having one large lightbar aimed in only one direction. In addition I like having each set of lights on a different switch, and being able to turn on-off any combination of lights for the necessary situation.

 
Last edited:
So my wife asked me last night how many lights I have added to my truck. I got to thinking about it and started adding them up:

Front bumper:
Fog lights = 2
Offroad/long distance lights= 4
Ditch lights = 4

Roof rack:
Front lights = 2
Side lights = 16
Rear lights = 2

Rear bumper lights = 2

Rock lights = 18

Under hood lights = 4

Rear hatch lights = 3

For a grand total of 57 lights I’ve added to the truck! I have a real problem. My wife just laughed at me. :becky:
 
So are these things water tight on there own? or did you build a housing for them when you put them under your rig?

looks great man! :thumb:

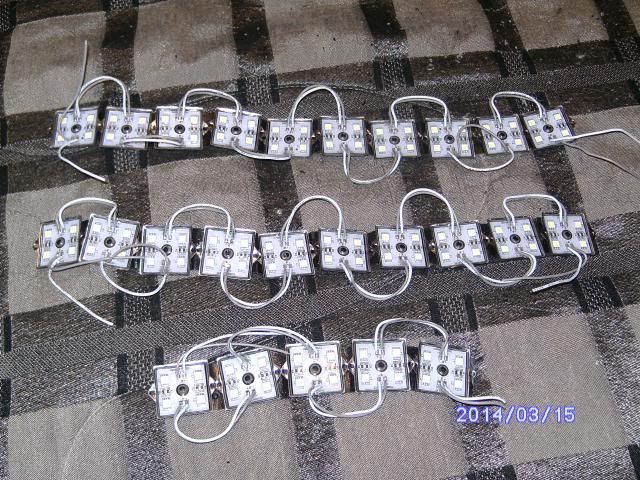
They're water tight out of the box. There is a guy on Pirate 4x4 that sells these in kits for rock light, or anything you can think of using them for. You can buy just the lights stung together, and you can also purchase water tight connectors as well. I had them on my Jeep before I sold it and switched to a Toyota.

Pirate 4x4
Under-Glow
 
They're water tight out of the box. There is a guy on Pirate 4x4 that sells these in kits for rock light, or anything you can think of using them for. You can buy just the lights stung together, and you can also purchase water tight connectors as well. I had them on my Jeep before I sold it and switched to a Toyota.

Pirate 4x4
Under-Glow

EPIC! thank you for the links too!
 
So are these things water tight on there own? or did you build a housing for them when you put them under your rig?

looks great man! :thumb:

EPIC! thank you for the links too!

[MENTION=98153]MStudt[/MENTION] beat me to it. Thanks.

As he said, they are supposed to be waterproof. The circuit boards are completely encased in epoxy. I think there is even a picture of them submerged in a bucket of water while lit up, on the website somewhere.

I'm really happy with them, and they put out a ton of light.
 
Last fall I mentioned that I was building a set of racks to mount to my roof rack to hold our 3 kayaks. I realized I never followed up with a few pics of the finished product. The purpose of this project was to be able to hold 3 kayaks. We have a set of store bought “J” hooks that only allow us to mount two kayaks to my roof rack.

Anyway I made the racks from some 1.5” square steel tubing I had left over from another project. The kayaks fit snugly between the vertical bars and stand vertically on their sides, instead of setting at an angle like with the J-hooks. Thus allowing extra room for the third kayak. I covered the racks with some foam rubber to protect the kayaks too.

The racks:
MIJ3Bsq.jpg


Here is how they look on the roof rack:
mBE8JGP.jpg


This is how they are held on to the roof rack (with 2 U-bolts per corner):
4SBjFvG.jpg


I can now mount all three kayaks:
7GP4FcA.jpg


Or just 2:
Z81Q5qy.jpg


The mounts are very strong, and I don’t have to worry about something ripping apart if the kayaks catch some wind on the highway. Much more sturdy than the store bought J-hooks. I just wrap 2 ratchet straps around the kayaks to hold them in place. It looks somewhat complex, but I can attach the racks, throw the kayaks up there, and strap them down in just under 25 minutes. Not bad at all.

After using them a few times, I have started thinking about adding some quick fist clamps to the sides of the racks to mount the paddles up there too. I might even add a bracket to hold the step stool I use to get the kayaks up there. Future projects I guess.
 
Last edited:
I finally finished changing my accent color to green. I'm pretty happy with the results.
Grille, hood scoop insert and shackles:
014uyAi.jpg


Wheel rings, center caps and sport badges:
NZuNF19.jpg


zg8mSdp.jpg


wtnI1qa.jpg


Rear emblems and shackles:
QYuCSQJ.jpg
 
Last edited:
Well I’ve said it before and I’ll say it again, “I suck at taking pictures”. I went to the park today to take some pictures to put in the 2015 calendar thread or the desktop background thread. Unfortunately they didn’t turn out good enough, so I’ll just post them here.

VIFRr2t.jpg


eKBPxvf.jpg


ef4H1B3.jpg


XiOi9h1.jpg


l9eSgDg.jpg


nA0nuVp.jpg


8jcGToK.jpg


QYuCSQJ.jpg


k4iwEGW.jpg


LCip52p.jpg
 
Last edited:
I've been eyeing those rock lights for a while now. How do you like them? Do you think they provide enough light? Would you be open to posting pics of how you mounted them? Please and thank you! :)
 
I've been eyeing those rock lights for a while now. How do you like them? Do you think they provide enough light? Would you be open to posting pics of how you mounted them? Please and thank you! :)

I am very happy with the light output on these rock lights. They are very bright, and the light output is very wide, like 180 degrees, so they light up a large area.

Here's a post where I talked about how I mounted them:
http://www.toyota-4runner.org/3rd-gen-t4rs/70298-bandit-runners-build-thread-23.html#post1749520

I still need to get a few pics of the mounting. I'll see what I can do.
 

Members online

Forum statistics

Threads
278,309
Messages
3,554,075
Members
248,016
Latest member
Advally Service

Trending content

Back
Top