Best place to establish a ground connection near the 4 pin harness near the hitch

amarpawar

New member
Hey guys, newb at electrical. Trying to transport some extra stuff on a hitch mounted cargo carrier and thought it'd be cool to have some lights on it. So bought a trailer lighting kit which needs a ground connection near the 4 point harness and the trailer lights. For the trailer lights I am just going to use some self tapping screws to ground it into the trailer. What would be a good place to get a ground near the harness. I ideally don't want to scrape any paint off the frame etc. Suggestions??

Sent from my SM-N900T using Tapatalk
 
Register to hide this ad
Hey guys, newb at electrical. Trying to transport some extra stuff on a hitch mounted cargo carrier and thought it'd be cool to have some lights on it. So bought a trailer lighting kit which needs a ground connection near the 4 point harness and the trailer lights. For the trailer lights I am just going to use some self tapping screws to ground it into the trailer. What would be a good place to get a ground near the harness. I ideally don't want to scrape any paint off the frame etc. Suggestions??

Sent from my SM-N900T using Tapatalk
One of the stranger questions I have seen here... The entire frame (rear bumper, hitch....is a ground....

Plus, the harness has a ground in it.... The options are too many to list....
 
One of the stranger questions I have seen here... The entire frame (rear bumper, hitch....is a ground....

Plus, the harness has a ground in it.... The options are too many to list....

I actually ran into this too. I can't figure out why, but many of the extensions and trailer kits sold have a ring terminal for ground instead of running the wire into the 4 pin plug. They just leave ground blank on the plug?

I never even bothered to look for an existing screw near there to be used as ground, the ring terminals on those trailer kits are tiny anyway and i didn't feel like crawling around looking for a tiny screw that had ground. I also didn't want to tap a new screw. In my case i just rewired my boat trailer with longer wire and proper ground in the 4pin connector.

BTW, who the f*** made the call on where to put the trailer wiring connectors on the runner? I think about slapping them every time I'm laying on the ground to plug in the boat trailer lights.
 
There are lots of options as long as the one you pick is really a good ground. Just putting a screw or bolt in the frame may not be a good ground. However any ground point can be measured with a meter. A good ground would be one that measures 2.5 - 3.0 milli-ohms or .0025 - .0030 ohms.

Since this is a pretty low value, the meter must be zeroed first as leads can easily add a couple of ohms. for meters that don't have a zero button you can hold the leads together with one hand and note the reading. Then subtract that number from any measurement values you get.

After making a ground connection it can be protected by sealing. There is a product made for this called Humiseal but you can get by with varnish or even nail polish. The idea is to keep air / water away from the connection and prevent corrosion which adds resistance to the circuit. I would certainly seal any external grounds.

Another way is to make a ground stud that can be used for multiple ground wires. If anybody is interested I can post instructions.
 
I borrowed a neighbors trailer and bought an extension wire for the 4 pin and did not notice it had the ring terminal and did not connect to the ground pin on the harness. I plugged it in and attached the trailer. The hitch ball acted as the ground connection for that trip. Later I looked for another extension cable and found one that used all 4 pins and not the ground ring terminal.

I agree with the comment about the location of the connector, I had to lay on wet weeds to plug mine in. I told myself it's there to prevent pulling it off when off road and having a steep departure angle.
 
Last edited:
Ok, here are the basics for installing a ground stud:

First find a good location close to where your wires are. You want grounds to be as short as possible. Then burnish a small spot (where the hole for the stud will be) to get to bare metal. Then check with a meter to a known good ground to see if you have picked a good spot (see values above).

Get your hardware together: threaded bolt (don't use a shouldered bolt) 2 flat washers and 2 split lock washers and 1 nut. All should be the correct size to fit the bolt chosen and terminal lugs to be attached.

Drill the hole and burnish to bare metal on both sides and area slightly larger than the flat washer chosen. Clean this area with some solvent like alcohol or acetone.

Bolt the stud in as follows: On the bolt put flat washer followed by the lock washer - then through the hole. Then add lock washer followed by the flat washer and then the nut. Tighten.

Then get your meter out again and check to see how you did. If you have a good ground then you can add your wires. 5 is about the limit.

Terminal lug stacking works best if you invert every other lug with the first being installed right side up and the next upside down and so on.

After the last lug is added - add a flat washer, lock washer and nut - tighten!

Then check with the meter. Lugs should be cleaned of any dirt, oil, etc before install. Make sure lug/wire crimps are good too. If your readings are good you are done - almost.

For external areas a good thick coating of varnish (nail polish works good) over the stud and all exposed areas will help deter corrosion.

Note: You can get piloted bonding/ grounding brushes; but an easier way is to use the drill you used to drill the hole and add a drill stop. Then cut out a small circular sized piece of sandpaper the size you want. Slide a washer on followed by the sandpaper - you can glue it to the washer if you want. This works well and does a neat job.
 
Hello.

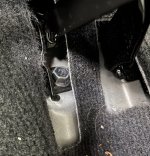
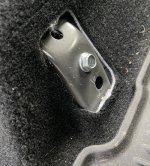
I am looking at taking advantage of any of a couple of interior locations of my T4R5G for grounding as opposed to bringing a 15-ft 6 gage wire all the way from the startup battery for a dual battery purpose. There are a couple of spots related to the rear seat - one that supports the rotating seat bottom and the other is at the bottom of the back side of the rear seat. They both look similar in that the bolt is attached to some sort of gray metal.

Has anyone checked any of these two spots for grounding fidelity? If I want to measure the resistance using a multimeter (per earlier discussions), how do I do that? I am guessing that a long enough 6 gage cable attached to the battery's negative terminal need to be brought to the spot in question and then the resistance, R1, of that cable length be measured. Then the resistance between the spot and the end of cable, R2, should be measured, and the difference between R1 and R2 will be the resistance associated with the spot being considered.

Does this make sense? Is there a better way?

Thanks in advance.
 

Attachments

  • IMG-2565.jpg
    IMG-2565.jpg
    104.3 KB · Views: 721
  • IMG-2566.jpg
    IMG-2566.jpg
    85 KB · Views: 765

Members online

Forum statistics

Threads
278,315
Messages
3,554,130
Members
248,016
Latest member
Advally Service

Trending content

Back
Top