eng208
New member
I am posting a write up on this in the hopes it will help someone on this forum. I couldn't find anything on this job when I needed it, and refused to pay the 3200 I was quoted to fix the problem.
This is a 2007 4Runner that has 118K of well cared for miles on it. This truck has never been abused or neglected. It developed an air sound that I noticed sometime in the late spring. This is my wife's truck and I rarely drive it. I have a 99 4Runner I drive. I asked her about it and she stated it had been doing that for a while. Now, this was barely noticeable, but I pick up on little stuff that just isn't "quite right." I started looking at the possible causes and read about the accumulator. I checked on this one while the truck was running and it cycled about every 4-6 seconds. I figured this was going to be a problem, since it would be like riding around constantly pressing the brakes and the little motor can't sustain that very long. It was also very hot. So hot I could not touch it after driving just a few miles home.
I was discouraged by what I found. First the price. Everyone that had this problem reported having to pay between 3100 and 4500 dollars to fix it. The second discouragement was the lack of information available for the repair. I am under the opinion of "if man built it, I can fix it."
After a few hours set aside for searching the part, and figuring out the best thing to do is replace the entire unit instead of trying to piece something together, I found Boch Toyota South as the absolute best place to buy this from. The parts tech I spoke to even recommended I call Toyota to see if they could help with some reimbursement. I did this and was fortunate enough to get a very good credit toward Toyota parts available without an expiration date. This was a good will gesture for being a loyal customer for nearly 20 years. I saved up enough money, and ordered the part, along with some other needed Toyota goodies. It arrived in 4 days and was exactly what I needed.
There's the back story, now for the pictures. I didn't photo the job, but I think I have enough pictures that I can get the information across. It really is not a very hard job at all. In fact, the timing belt, water pump replacement on a 3.4 is much more involved.:heh:
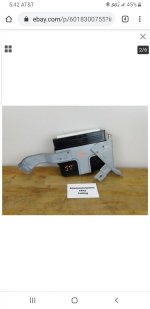
First, this is what you get when you order the part. For the 2007, it is part number 4705035030. This covers several year models and you can call with your VIN to verify the correct number. This is the old one, but the new one is very similar.


It will come with some brake fluid in it, so that tells me the unit is bench bled at the factory. Do not remove the little plugs until you are ready to reinstall the brake lines.
The first step is draining as much brake fluid from the reservoir as possible. Do not spill brake fluid on paint, it will soften and damage anything it comes in contact with. I enlisted my wife for help and gave her a syringe and fuel line to remove the fluid while I started removing the unit from the firewall. I then placed multiple shop rags all around my work area. Number the brake lines in a sequential order just in case they get flipped. It could happen and you don't want that! I also loosened the brake lines just a bit but not enough to start leaking. Disconnect all of the connectors. All but the big connector are squeeze and pull connectors. They should come off fairly easily. Do not break these. The large connector has a white lock on it. The lock slides toward the front of the vehicle and pulls the connector off as it is moved. Very ingenious if you ask me. Move these out of the way to avoid damage.

Remove the small clip that locks the pin connecting the master cylinder piston to the brake pedal.

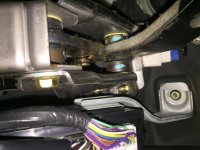
I also removed the steering rod protector due to it catching one of the nuts and being in the way. It has 4 small plastic lock nuts and is very easy to remove.

There are only 4-12 mm nuts holding the unit to the firewall. Use a universal joint to get to the top nuts. It will make life much easier.

Once the last nut is removed, (I made the top left nut be the last one to keep the unit from dropping), Have your assistant hold the weight until the brake lines are removed. The brake lines will have to be pushed down as the unit is pulled out of the firewall, but use some finesse and it will come out.
Now carefully put the new unit in its place and make sure the rod is above the brake pedal under the dash. Again, it helps to have two people. The studs on the unit will easily pass through the firewall. Make sure the gasket is in place. Attach the nuts to the studs, line the rod up with the pedal and reinstall the pin and locking clip.
Next, very carefully, start the brake lines in the new master cylinder. DO NOT cross thread these. Do this by hand until you have several threads going smoothly. Once you put a wrench on these and cross thread it, this unit is DONE and it's another 1600 bucks! I don't know that a seal would ever occur after it is cross threaded. Tighten the small line nuts but remember this is in aluminum.

The rest is filling the brake fluid with new DOT 3 to the line. You will have to bleed the brakes. For this, I instructed my lovely wife on how to work the pedal and I moved to the passenger rear. Break the bleeder valve loose with a 6 point socket so you don't round off the nut. A line wrench will work wonders here. I had the wife pump the brakes and hold them while I opened the valve. This was done 10 times with the truck off. I got very little fluid out, but I equate this to a "bench bleed" and wanted to get what air was in the system down in the lines before putting pressure to the unit. I then had her turn the key on to pressurize the system. There was an alarm when the key was turned on and all of the lights were lit, but after pressure was applied to the sytem by the new accumulator, the alarm quit. I again went through the bleed process about 20 times, checking the reservoir before going to the next position. The order I used was Passenger rear, Driver rear, Passenger front, driver front. The front did not take near as long before good fluid appeared and the pedal was firm.
After doing this, the VSC and Trac indicators will be lit and need to be initialized at the Toyota dealership. It should be about 100.00 to do this.
Good luck and take your time:bravo:
This is a 2007 4Runner that has 118K of well cared for miles on it. This truck has never been abused or neglected. It developed an air sound that I noticed sometime in the late spring. This is my wife's truck and I rarely drive it. I have a 99 4Runner I drive. I asked her about it and she stated it had been doing that for a while. Now, this was barely noticeable, but I pick up on little stuff that just isn't "quite right." I started looking at the possible causes and read about the accumulator. I checked on this one while the truck was running and it cycled about every 4-6 seconds. I figured this was going to be a problem, since it would be like riding around constantly pressing the brakes and the little motor can't sustain that very long. It was also very hot. So hot I could not touch it after driving just a few miles home.
I was discouraged by what I found. First the price. Everyone that had this problem reported having to pay between 3100 and 4500 dollars to fix it. The second discouragement was the lack of information available for the repair. I am under the opinion of "if man built it, I can fix it."
After a few hours set aside for searching the part, and figuring out the best thing to do is replace the entire unit instead of trying to piece something together, I found Boch Toyota South as the absolute best place to buy this from. The parts tech I spoke to even recommended I call Toyota to see if they could help with some reimbursement. I did this and was fortunate enough to get a very good credit toward Toyota parts available without an expiration date. This was a good will gesture for being a loyal customer for nearly 20 years. I saved up enough money, and ordered the part, along with some other needed Toyota goodies. It arrived in 4 days and was exactly what I needed.
There's the back story, now for the pictures. I didn't photo the job, but I think I have enough pictures that I can get the information across. It really is not a very hard job at all. In fact, the timing belt, water pump replacement on a 3.4 is much more involved.:heh:
First, this is what you get when you order the part. For the 2007, it is part number 4705035030. This covers several year models and you can call with your VIN to verify the correct number. This is the old one, but the new one is very similar.
It will come with some brake fluid in it, so that tells me the unit is bench bled at the factory. Do not remove the little plugs until you are ready to reinstall the brake lines.
The first step is draining as much brake fluid from the reservoir as possible. Do not spill brake fluid on paint, it will soften and damage anything it comes in contact with. I enlisted my wife for help and gave her a syringe and fuel line to remove the fluid while I started removing the unit from the firewall. I then placed multiple shop rags all around my work area. Number the brake lines in a sequential order just in case they get flipped. It could happen and you don't want that! I also loosened the brake lines just a bit but not enough to start leaking. Disconnect all of the connectors. All but the big connector are squeeze and pull connectors. They should come off fairly easily. Do not break these. The large connector has a white lock on it. The lock slides toward the front of the vehicle and pulls the connector off as it is moved. Very ingenious if you ask me. Move these out of the way to avoid damage.
Remove the small clip that locks the pin connecting the master cylinder piston to the brake pedal.
I also removed the steering rod protector due to it catching one of the nuts and being in the way. It has 4 small plastic lock nuts and is very easy to remove.
There are only 4-12 mm nuts holding the unit to the firewall. Use a universal joint to get to the top nuts. It will make life much easier.
Once the last nut is removed, (I made the top left nut be the last one to keep the unit from dropping), Have your assistant hold the weight until the brake lines are removed. The brake lines will have to be pushed down as the unit is pulled out of the firewall, but use some finesse and it will come out.
Now carefully put the new unit in its place and make sure the rod is above the brake pedal under the dash. Again, it helps to have two people. The studs on the unit will easily pass through the firewall. Make sure the gasket is in place. Attach the nuts to the studs, line the rod up with the pedal and reinstall the pin and locking clip.
Next, very carefully, start the brake lines in the new master cylinder. DO NOT cross thread these. Do this by hand until you have several threads going smoothly. Once you put a wrench on these and cross thread it, this unit is DONE and it's another 1600 bucks! I don't know that a seal would ever occur after it is cross threaded. Tighten the small line nuts but remember this is in aluminum.
The rest is filling the brake fluid with new DOT 3 to the line. You will have to bleed the brakes. For this, I instructed my lovely wife on how to work the pedal and I moved to the passenger rear. Break the bleeder valve loose with a 6 point socket so you don't round off the nut. A line wrench will work wonders here. I had the wife pump the brakes and hold them while I opened the valve. This was done 10 times with the truck off. I got very little fluid out, but I equate this to a "bench bleed" and wanted to get what air was in the system down in the lines before putting pressure to the unit. I then had her turn the key on to pressurize the system. There was an alarm when the key was turned on and all of the lights were lit, but after pressure was applied to the sytem by the new accumulator, the alarm quit. I again went through the bleed process about 20 times, checking the reservoir before going to the next position. The order I used was Passenger rear, Driver rear, Passenger front, driver front. The front did not take near as long before good fluid appeared and the pedal was firm.
After doing this, the VSC and Trac indicators will be lit and need to be initialized at the Toyota dealership. It should be about 100.00 to do this.
Good luck and take your time:bravo:
Last edited:

 arty:
arty: