BrianSD_42 Photo Journal Build Maintenance Thread

Lone Pine Trip Pics Part II


(Nexus 6P continued)


6.
FRNI34F.jpg


7.
8vLIjLx.jpg


8.
gpULPIV.jpg


9. Lilly (the wife adopted this one several years ago)
4s4gnS1.jpg


10. Looking down into Death Valley
otzxlT6.jpg


11.
p8nSz9u.jpg


12.
6Vl0cUU.jpg


13.
LDmsIts.jpg


14.
fKDeX75.jpg


15.
Rpm0pfE.jpg


16.
EhWXJCo.jpg


17. My friend's 40+ lb Rhodesian Ridgeback is named Patriot
3NnPbsk.jpg


18.
QAeziVD.jpg


19.
BR2uxgC.jpg


20.
qt0nOGo.jpg
 
Last edited:
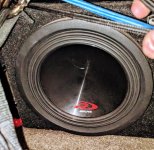
There was at least one fatality on this last trip, my Alpine Type-R 10" subwoofer got smashed in.
 

Attachments

  • IMG_20180108_194241~2.jpg
    IMG_20180108_194241~2.jpg
    135.1 KB · Views: 529
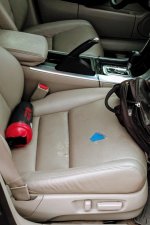
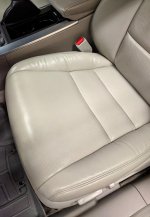
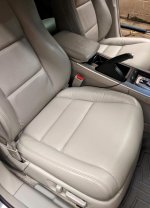
This post isn't about the 4Runner. So shortly after getting my Acura TL which is my daily driver (read drive 3 days a week) the front seats leather started coming apart on the bottom seats. The leather is a white cream color and the whole interior is really really nice.

For awhile now I have wanted to get it fixed up proper. The fix is of course costly and I've delayed nearly a year using various temporary fixes from seat glue to painters tape to hold the material together.

I finally bit the bullet and had a local shop do the work. Each seat bottom is full leather and it looks even better in person than these pics justify. Cost $300 per side including install labor.
 

Attachments

  • IMG_20180103_085621~2.jpg
    IMG_20180103_085621~2.jpg
    128.7 KB · Views: 502
  • IMG_20180109_174030~2.jpg
    IMG_20180109_174030~2.jpg
    138.1 KB · Views: 502
  • IMG_20180109_173837~2.jpg
    IMG_20180109_173837~2.jpg
    134 KB · Views: 499
Nice pics as always Brian. I think I am most impressed on how well the seats turned out. Should now make the car more fun to drive.

I miss my 90s Acuras. Honestly I don't know how Acura even stays in business excluding the MDX and RDX these days.
 
My last trip which was through the hills near Big Pine left my truck with some unpleasant pin stripes. I took a few hours today to work on them and was able to remove a good amount by hand. I don't own an electric polisher but probably will some day. I used this method which I acknowledge is kind of a short cut: wash truck, compound polish, tech wax 2.0. It worked out pretty good. I've now done about 75% of the truck and will likely finish the next chance I get to work on it some more.

01 - Before
D6hbdPW.jpg


02 - After
MckGZoQ.jpg


03 - Before
g1EacFp.jpg


04 - After
ZKhcvbp.jpg


Meguiar's Compound
zshYpcb.jpg


Meguiar's Tech Wax 2.0
g2jXDd0.jpg


:bat:
 
Meguiar's Compound

What's been your overall experience with Meguiar's ultimate compound? I've used it a few times on a white accord I had & the end result was great but the process of applying & removing it was a lot tougher than wax (for me at least). Working the compound into the paint & buffing it off was tough because if I didn't get just the right amount on before buffing it off or if it was left on the paint for a little to long it would leave a hazy finish. I noticed I would go through twice as many microfiber towels buffing off the compound to avoid leaving behind a hazey finish. This is the only compound I've used & the results were great but definitely seemed a little trickier to apply & remove.
 
Unlike with wax, you are supposed to remove the compound before it dries. I saw that on a YouTube video. Yes I have let it dry and it's a pain to remove.

My method is one panel at a time when it comes to compound. I finish up the whole side (panel after panel) and then apply wax to the whole side. But for the compound it's one panel at a time and remove after hand buffing but before it dries :)

There is another step I haven't done which is ultimate polish. Maybe some day I'll step up my game.
 
Last edited:
How did you remove the scratches on the window trim rubber?

I actually just polished it the same as the clear. I used the compound and a foam wax applicator pad. You know the kind you get when you buy certain kits if wax. I used that pad on three passes. So probably about 30 seconds of hand motion. I didn't expect it to make the rubber look better but it did. In direct sunlight you can still see the mark on the rubber and slight scratch on the clear but I'd say it's about 80% cleared up.

Ohh and one more update, this time a bit of personal information. I just did my taxes and found out that we owe the goveeeeerment a chunk of change instead of getting a refund. I won't say much it is but to give you an idea most non modded clean 4Runners could be had for less. So I won't be spending cash on my truck this year unless absolutely necessary.

Thanks California, this is ridiculous. The main reason this happened apparently is because after getting married we switched our w4 to married and since both of us earn pretty decent it turns out our employer's were not taking nearly enough out at all. I checked and yes I paid a lot less actual federal taxes in 2017 vs 2016. This morning I read online that if a couple is both full time working (vs stay at home SO) then you shouldn't actually change your w4 to married. It's a life lesson and hey I guess someone has to fund stupid wars rebuilding other peoples countries. Oh well. Funny thing is Friday I got a $3k award for doing great at work now by Sunday I find out I owe the tax man far more.
 
Last edited:
Compound, whether Meguars or not [MENTION=116877]fourfive[/MENTION], needs to be removed immediately after it is placed on the car. Same for polish. If you want to be anal retentive and provide a nice surface for the wax to adhere to after polishing/compounding, mix 30% rubbing alcohol and 70% distilled water in a small spray bottle and spray the polsihed/compunded area. Then wipe quickly. This removes all the oil in a polish to give a pure surface so to speak. Then comes wax, which one needs to read the directions on how long to leave on once applied.

Well Brian I paid more than $8k in federal taxes last year so I feel your pain. Businesses today need to hire a tax adviser in HR, or at least point one in the direction of a good accountant.
 
Figured I'm not the only one getting shafted in taxes this year.

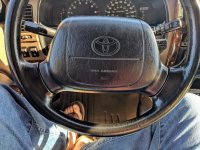
Final update for this weekend. A few months ago I replaced my steering wheel with a very clean used one of eBay (no airbag included) and swapped everything over from the old wheel during the install. The replacement wheel seemed great for $100. I can now see that I was somewhat cheated by the eBay seller. This steering wheel is a Toyota wheel and looks to be the same part except instead of black it is a brown wheel that was repainted black with some vinal paint. I didn't notice anything was wrong until after 2 months had gone by.

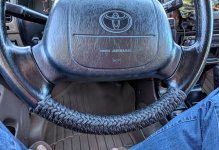
Well I've decided for the time being I'm going to put a black+ paracord wrap around the wheel. Doing the bottom of the wheel (as pictured) caused a blister and I had to stop but I think it looks good. I plan to finish the rest next weekend.
 

Attachments

  • IMG_20180128_093750~2.jpg
    IMG_20180128_093750~2.jpg
    128.8 KB · Views: 713
  • IMG_20180128_093757~2.jpg
    IMG_20180128_093757~2.jpg
    138.8 KB · Views: 756
  • IMG_20180128_143121~2.jpg
    IMG_20180128_143121~2.jpg
    140 KB · Views: 822
Your paint came out really good! I need to get the pinstripes out of mine sometime, but first it needs a wash. I'd also like to do something with those paint protection stickers on the rear fender flares, they're starting to look kinda rough.
 
I'd also like to do something with those paint protection stickers on the rear fender flares, they're starting to look kinda rough.

I took mine off with a rubber eraser wheel a couple weeks ago. I don't have a picture of the finished product though. Came out real nice!
 
Stopping in to say hello from Northern California. This thread is epic and your pics are stunning. Dreading doing a projector retrofit.
 
Last edited:
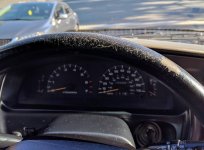
A couple of updates. Finished wrapping the steering wheel! (pics). Then I recently took apart the instrument console to replace the crappy clear white bulbs with OEM + green sleeves and to replace the old scratched up plastic screen. I think it turned out well.

The only issue I'm still working on is my ECT light doesn't work on the dash. More on that to follow once I figure it out. The ECT light stopped working about a month ago, long before I took apart the dash.

Regarding the steering wheel wrap. I used a full 100ft of paracord and barely made it. I prefer to wrap it as tight as possible. I chose this color pattern because it is more interesting than plain black but it also should be fairly resistant to hand smudges. I've seen a few guys wrap their wheel with brown or green only to have it look pretty gross after several months.

Upcoming mods / stuff to do:
* Cadillac horns
* Replace subwoofer which has a hole in it


Upcoming camping trips:
* Joshua Tree (March)
* Alabama Hills and Mtns above Death Valley (April)
* Monache or Yosemite or Sedona (May)


1. Finished Steering Wheel Wrap

Dr2ySBf.jpg


2. Old plastic

G7XesNn.jpg


3. Old plastic

g9JiBvj.jpg


4. Taking the old plastic off

5Y9s5A1.jpg


5. Plastic removed

oT8Vi18.jpg


6. New OEM plastic installed (so clear!!!)

fZVgn4o.jpg


7. Dash put back together with new plastic installed

fdbK2Uj.jpg


8. New OEM bulbs installed (clear with green sleeve)

6GekBxh.jpg


:bat:
 
Last edited:
How much did that new plastic bezel cover set you back Brian? I need to replace bulbs in mine sometime this year and while I am in there.....
 
How much did that new plastic bezel cover set you back Brian?

It cost $55 at Camelback Toyota. The price might have changed slightly. I bought it about 6 months ago.

Code:
Part: 8385235020	
body hardware, instrument panel, cluster & switches, cluster lens
Year: 1996-98	
Qnty: 1
Price: $55.28
 
Last edited:
Dash looks sharp, Brian.

Any trails in particular you were thinking of running near yosemite, or mostly hiking? We were thinking of heading up there this summer.
 
Thanks man. So my current plan is to go with a few friends on a camping and hiking trip May 16th - 20th. These dates are hard (which is unfortunate) because that is when she was able to take vacation. My work is much more flexible with vacation.

So I am going those dates. Where to go? I'm looking at anywhere within about 7.5 hrs from San Diego and the camping has to be either first come sites or BLM style. I wasn't looking to 4wheel in Yosemite, mainly just car camp on this trip. Monache is a tiny bit of 4wd to get to the site. These options are in any particular order.

Option 1 - Monache Meadows. Downside it might not be open in mid-May, even with a low snow year.

Option 2 - Yosemite Tuolumne Meadows
https://www.nps.gov/yose/learn/nature/tuolumne.htm
It opens usually once the pass is open which could be early May (or later) but we won't find out anything until it is open.
The good: North side of Yosemite, less crowded, very beautiful, great (long) day hike to clouds rest. 50% of campsites are first come.

Option 3 - Mineral King in Sequoia National Park
* Lots of first come first serve, but it doesn't open until May 22nd per the Forest Service

Option 4 - Sedona, AZ or somewhere else in AZ that is awesome and BLM style.

Option 5 - Grand Staircase Escalante park ....
* This is a very possible option since so much BLM style camping and no reservations needed.

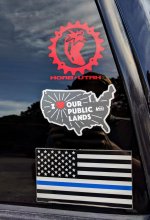
Lastly, I added a Moab sticker to the truck. I've been trying to keep the sticker count low but I when I see one I like ... It's going up!
 

Attachments

  • IMG_20180307_091843~2.jpg
    IMG_20180307_091843~2.jpg
    131.3 KB · Views: 505
Last edited:

Members online

Forum statistics

Threads
278,316
Messages
3,554,120
Members
248,016
Latest member
Advally Service

Trending content

Back
Top