• If you plan to post to Classified forums, you must follow these rules, or your post will be deleted.

    1. Thread title must include at a minimum: FS or FT, Item(1st, 2nd, 3rd, 4th or 5th gen), Price and Location. For Example: FS: 4th GEN Carpet Floor Mats - Tan, $50 Denver, CO.
    2. All Threads must contain the following information
      • What is for sale/trade (model, specs, etc.)
      • Condition
      • Price/What you want to trade for
      • Location of item
      • At least one picture of the item for sale or for trade
    3. No "Feeler" Threads - Its either for sale or it isn't.
    4. Moderators lock Classified Threads that have not had any activity in 90 days or when the part is announced SOLD.
    5. Threads not complying with the rules will be deleted without notice.

C4 Fabrication Rock Sliders Group Buy

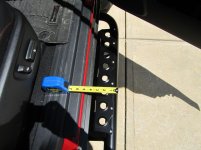
Can anyone tell me how far they extend out at both the front and back doors? I'm unsure if my small kids will be able to use them as steps to easily get in. Thanks

Sent from my SAMSUNG-SM-G900A using Tapatalk

Here's a couple of pictures. Hope this helps.
 

Attachments

  • IMG_1330.jpg
    IMG_1330.jpg
    136.9 KB · Views: 550
  • IMG_1331.jpg
    IMG_1331.jpg
    136.5 KB · Views: 513
Installation Instructions - New Version Needed

Sorry we have not even had the opportunity to get a KDSS equipped model into the shop to create complete install instructions for that side. Yes you need to loosen all of the KDSS pump brackets and line brackets as much as possible so the slider frame plate can slide up between the frame and the KDSS parts. As for the original KDSS skid plate that covers the lines, it should bolt right back into its original location. Just bend the tab flat and it will work fine that way.

The skid will bolt right back into its original location. Just flatten the tab with a couple taps of a hammer.


There really arent any changes except for the plates that now wrap around the bottom of the frame. Those extra plates are pretty self explanatory, they just bolt into the frame where the existing holes are. You will need to use a 5/16" drill bit to drill the two holes on the passenger side forward cross member plate. Then you can thread the two 3/8" thread cutting screws into the frame. There are pics of this a few pages back that I posted a couple weeks ago. I would not recommend using loc-tite on the bolts that thread into the frame. Clean the holes out first before installation and use a very small amount of anti-seize. Once the bolts are tightened down they should never come lose.


There may be a couple bolt holes that just dont line up sometimes, but it shouldnt be a problem. That is why we use so many of the threaded holes in the frame for mounting, that way if one or two just dont sit right, you will have plenty of others to hold it in place. The KDSS sliders are no doubt the hardest to install since so much wiggling and positioning is involved to work around the components. The lines are a close fit to the slider parts, but there should be no worries. Since everything is solid mounted to the frame, there will be very minimal movement or vibration that could cause any problems with the KDSS lines.

I agree on using the anti-seize, thats what i would recommend for the install also.

Using the instructions found by [MENTION=138696]LandoSystem[/MENTION] and your additional instructions in this thread, could you version your instructions to be up-to-date? Then post here for member feedback on any adjustments needed for KDSS installs?

Would be helpful to have one document with the installation steps to avoid lots of frustration and wasted time on the install.
 
Using the instructions found by [MENTION=138696]LandoSystem[/MENTION] and your additional instructions in this thread, could you version your instructions to be up-to-date? Then post here for member feedback on any adjustments needed for KDSS installs?


Would be helpful to have one document with the installation steps to avoid lots of frustration and wasted time on the install.


The install is pretty straightforward with the instructions in the other thread once you start eyeballing everything. It is a complete pain in the butt, so an extra set of hands can't hurt!

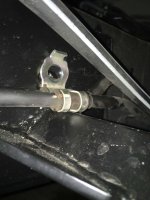
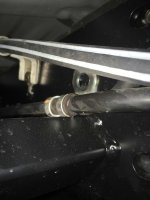
...that said, I'm still pretty concerned about the KDSS lines. Both these pics are of the same bolt hole (rear-most KDSS mount); one is looking back, the other looking forward. I haven't had a chance to get a feeler under the clamp to check clearance, but to my eye it LOOKS like there will be rubbing. Sorry that some of the more interesting bits are out of focus; it's a bit of a pain to get a phone in there and have it focus right, etc.


IMG_0880.JPGIMG_0883.JPG
 

Attachments

  • IMG_0880.JPG
    IMG_0880.JPG
    97.4 KB · Views: 492
  • IMG_0883.JPG
    IMG_0883.JPG
    87.7 KB · Views: 491
Last edited:
The install is pretty straightforward with the instructions in the other thread once you start eyeballing everything. It is a complete pain in the butt, so an extra set of hands can't hurt!

...that said, I'm still pretty concerned about the KDSS lines. Both these pics are of the same bolt hole (rear-most KDSS mount); one is looking back, the other looking forward. I haven't had a chance to get a feeler under the clamp to check clearance, but to my eye it LOOKS like there will be rubbing. Sorry that some of the more interesting bits are out of focus; it's a bit of a pain to get a phone in there and have it focus right, etc.


View attachment 211370View attachment 211371


Hmm I'll take a pic of mine later too see if it looks the same as well


Sent from my iPhone using Tapatalk
 
Spent a couple of hours this afternoon installing. Thanks to a little help from my wife, I got them done. They look great but that's just my opinion. My wife also approves and says that now it is way easier to get in.

Thanks to @C4_Fabrication.
Thanks for posting up some pics, glad you and your wife are happy with them!

I spent a couple hours today with a friend and installed the sliders and gas tank skid. They are very well made and beefy! Thanks again @c4_fabrication
Sent from my iPhone using Tapatalk
Thank you! Also thanks for posting up pics, we love to see the product after it is installed!

Can anyone tell me how far they extend out at both the front and back doors? I'm unsure if my small kids will be able to use them as steps to easily get in. Thanks

Sent from my SAMSUNG-SM-G900A using Tapatalk
A friend of ours has a 4 year old daughter and we put a set of our sliders on her 4runner to assist her daughter in getting in and out. She says her daughter loves them and they work great as a step for her!

Here's a couple of pictures. Hope this helps.
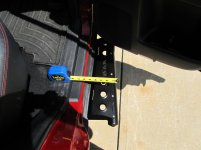
Thanks for posting up a couple measurement pics

Using the instructions found by [MENTION=138696]LandoSystem[/MENTION] and your additional instructions in this thread, could you version your instructions to be up-to-date? Then post here for member feedback on any adjustments needed for KDSS installs?

Would be helpful to have one document with the installation steps to avoid lots of frustration and wasted time on the install.
Yes we can add some of these instructions together onto our vendor forum. The best option would be for us to be able to get a KDSS model into the shop to do an install and instructions ourselves, but we have not found anyone locally who has a KDSS model that we can use.
 
The install is pretty straightforward with the instructions in the other thread once you start eyeballing everything. It is a complete pain in the butt, so an extra set of hands can't hurt!

...that said, I'm still pretty concerned about the KDSS lines. Both these pics are of the same bolt hole (rear-most KDSS mount); one is looking back, the other looking forward. I haven't had a chance to get a feeler under the clamp to check clearance, but to my eye it LOOKS like there will be rubbing. Sorry that some of the more interesting bits are out of focus; it's a bit of a pain to get a phone in there and have it focus right, etc.


View attachment 211370View attachment 211371


Here are my pictures. Mine are a little dirty lol but look in the same spot as yours. If anyone has any tips or to just leave it. I am all ears.
171d58717f0f1f545e11cb70c92d8c48.jpg

5b4905f2b2f65e83961a834d21f8999c.jpg

5a3110c2ad5581abeaa0131c0dd1b8cf.jpg


Sent from my iPhone using Tapatalk
 
I never received a call, but they were there. Might want to give them a call to see if they have arrived.

You're a genius [MENTION=132887]popey[/MENTION]. I gave them a call and of course my sliders are waiting at the company- I guess they assume I can read their minds.

Hoping to pick them up today and get them installed this weekend!
 
Here are my pictures. Mine are a little dirty lol but look in the same spot as yours. If anyone has any tips or to just leave it. I am all ears.

Sent from my iPhone using Tapatalk
I know i already messaged you through IG but, im just responding to this post so the other KDSS guys can see it.
The lines will be fine in that location. If they rest on the slider leg it will not hurt them since they are covered by the rubber insulated mounting strap in those points.
 
Dumb question....those little plastic tabs in random spots where the slider mounts...leave those in place or take them off?

Edit. Called Caleb, plastic tabs can stay on. Should be done with this later, will post some pics.
 
Last edited:
Took awhile to get it done, but I was doing it by myself with 2 cheap jacks. Everything fit into place nicely, no issues at all with the install.

Freight truck dropped off the sliders
fwYuOta.jpg


Got them unwrapped
LoyvZT6.jpg


Setup and ready to lift into place
Xv5AIuZ.jpg


uYKyrBM.jpg


Had to remove the line to put the sliders in place on both sides on top of the sliders
qggEIL9.jpg


3 screws under here where it slides in
B8tJXdO.jpg


I ended up getting help on the last slider...yes I gave him a wrench and some loose bolts and he went to town
fL37uQx.jpg


DgZVWQA.jpg


All done
EXQ4Y30.jpg


XJHE2EU.jpg


jBeQ6sW.jpg


udrqrQm.jpg
 
Took awhile to get it done, but I was doing it by myself with 2 cheap jacks. Everything fit into place nicely, no issues at all with the install.

Freight truck dropped off the sliders
fwYuOta.jpg


Got them unwrapped
LoyvZT6.jpg


Setup and ready to lift into place
Xv5AIuZ.jpg


uYKyrBM.jpg


Had to remove the line to put the sliders in place on both sides on top of the sliders
qggEIL9.jpg


3 screws under here where it slides in
B8tJXdO.jpg


I ended up getting help on the last slider...yes I gave him a wrench and some loose bolts and he went to town
fL37uQx.jpg


DgZVWQA.jpg


All done
EXQ4Y30.jpg


XJHE2EU.jpg


jBeQ6sW.jpg


udrqrQm.jpg
Looks really nice.
 
My advice on the drivers side is to check the alignment on the bottom 2 screws before you tighten the top. I had to kick it over a little because I didn't check how they aligned initially. The bolt holes for the tank plate or whatever it is you have to slide it under lines up perfectly once I tightened the top.

Quick tip....the 3 bolts holding in the plate you replace with the screws in the kit can be used on the 2 bottom bolts if needed. For some reason the screws in the kit on one bolt would never actually screw in so I tried one of those and it worked perfectly. I used some black rust paint so they blended in.

Passenger side was quick and easy.
 
Also just wanted to explain our powder coating process, since I know most of you will think 225.00 is alot for PC. The first reason is because we do not have the equipment to PC our own product, so it gets done at a local business i work with, which means the price will be a bit higher.

Their process includes a complete sand blasting of all parts to remove mill scale and offer the best adhesion. Next they pre-heat the parts to remove any moisture in the steel. Then the parts are primed with a zinc rich primer. Lastly they get the satin black top coat.

Also, part of the PC cost is to cover all of the proper packing materials to ensure the product gets shipped without scratching.


Not sure if this is the best thread to post this question...

For longevity, is this the best paint process for bare metal? When looking for a shop to paint my rails, I'd like to know what questions to ask.

Thanks GS
 
Last edited:
Not sure if this is the best thread to post this question...

For longevity, is this the best paint process for bare metal? When looking for a shop to paint my rails, I'd like to know what questions to ask.

Thanks GS
Everyone has there own preferences, but typically PC is the most common way to go since it is affordable, more durable than paint, and it adheres into all the tight corners and hard to reach areas better than paint. Also you can get regular paint in a rattle can to touch up the heavily scratched areas and it will match pretty close.
 
A few more sliders shipped out on Monday. We also have a couple more sets that just got finished with PC today. We will try to get them shipped tomorrow or Thursday!

List of who's have shipped so far this week:
[MENTION=141778]El_Todo_Terreno[/MENTION]
[MENTION=3442]Boyds4Runner[/MENTION]
[MENTION=141773]Ryza313[/MENTION]
[MENTION=141542]MagnumSG[/MENTION]
[MENTION=141602]Colorado 4runner[/MENTION]
[MENTION=139524]spec c[/MENTION]
 
Last edited:

Members online

Forum statistics

Threads
278,316
Messages
3,554,120
Members
248,016
Latest member
Advally Service

Trending content

Back
Top