Calling all 5vz fe mechanics....

jmt2404

New member
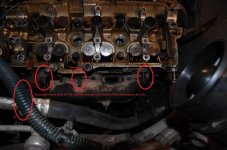
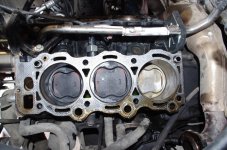
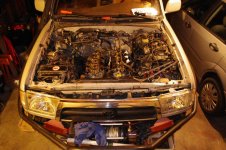
Alright I am in the middle of doing a head gasket repair. my question is how do you take off the exhaust manifold? I got the bolts off, but I need to know how exactly to detatch it from the heads without messing it up by prying it off. I got it to where the heads move, but I think the exhaust manifold is holding the heads down.. Unless yall know of something else I am missing on the backside (firewall side). Any help would be great. here is a pic to let you know how far along I am.
 

Attachments

  • IMGP1611 small.jpg
    IMGP1611 small.jpg
    143.2 KB · Views: 4,412
Register to hide this ad
I did not.. I unbolted the manifold off the head and the the manifold from the downpipe. does that free up everything if I take the crossover pipe off?
 

Attachments

  • IMGP1606 small.jpg
    IMGP1606 small.jpg
    124.4 KB · Views: 4,586
Crossover holds the manifolds, manifolds hold the head.

Another friend said:

"Leave the crossover attached and disconnect it from the downpipe. 2 heads at once removal. You will be there all day trying to remove/install the crossover pipe with the heads in the vehicle."
 
Last edited:
that reallly sucks.. sounds like a big pain in the butt..

On that note.. is it to soon for another maintenance party? lol maybe to pull the entire engine and just get it over with.. I still have to try and dig out that crank bolt.

Oh and btw I did take out the head bolts but in the picture they are still there. I just leave the bolts where they go so I dont loose them.
 
ok.. ill keep you posted. I just got the wife and baby home today so probably not this weekend but next.. in the mean time I am still going to wrench around on it and keep busy.. i am officially off work for the next 2 weeks.. then I start ACAP'ing after that. So I am going to have alooottt of time for Modern warfare 3.. I mean.. working on my truck..I mean.. hanging out with my wife and baby.. lol
 
I did my HG this past spring and from what I remember is you have to unbolt the crossover pipe and disconnect if from where it attaches to the rest of the exhaust. That gives you the wiggle room to pull the studs from the crossover out of the each exhaust manifold flange. Then you can get the heads out.

Oh, and the idea of removing both heads with the crossover attached won't work. There isn't the clearance for it.

Good luck!
 
ok.. that was pretty much my next course of action.. I was hoping there might have been something I was over looking to make my job a bit easier..

Does anyone have a picture of a cracked or warped head? I've looked here and toyota nation but came up with nothing.
 
Here's the cross over pipe disconnect. I'm not sure why I took a picture of it, but I guess it worked out.

crossoverpipe.jpg~original


And here's what my cracked heads looked like. I wasn't sure what to look for either. I brought my heads to a machine shop to be cleaned and pressure tested and they found all these cracks.

crackedhead1.jpg~original

crackedhead2.jpg~original


As far as warped heads, if you have access to a mill you could put a dial indicator in the chuck and run the table. The specs for the max warp are in the FSM I believe. You could use a straight edge, but that probably wouldn't be exact enough.
 
Another friend I asked said this:

"There is also an 8mm hex bolt on each head. There's usually oil in so you cannot see it. The heads will move, but not pry off if it's still in there. One way to get it out is to use an 8mm bit for a screwdriver, and a 1/4" socket to turn it."
 
You could get the Torx sockets and pull all the exhaust manifold studs out individually. I had to pull them all out before I took my heads into a machinist. On reassembley there wasnt much of a finangle job because I was able to just slide things into place and rebolt.

My cousin is a Toyota mechanic and suggested the leaving the cross member and pulling the heads together technique, so Im going to join the possible side of that argument. Although I didnt do it that way myself.

The way I ended up removing my heads was to unbolt the cross member and have my little brother underneath the truck pulling back on the exhaust to clear the studs on the back of the manifolds. It tooks some leverage on his part but worked. If I ever have to do it again I would probably do the Torx methood. But then again, none of my studs were seized in the manifold, that may not hold true for all studs in all manifolds.
 
My cousin is a Toyota mechanic and suggested the leaving the cross member and pulling the heads together technique, so Im going to join the possible side of that argument. Although I didnt do it that way myself.

The person who said to leave the cross member and pull them together was also a Toyota mechanic. He did say that one person may not be strong enough to lift it all out at once.
 
You could get the Torx sockets and pull all the exhaust manifold studs out individually. I had to pull them all out before I took my heads into a machinist. On reassembley there wasnt much of a finangle job because I was able to just slide things into place and rebolt.

My cousin is a Toyota mechanic and suggested the leaving the cross member and pulling the heads together technique, so Im going to join the possible side of that argument. Although I didnt do it that way myself.

The way I ended up removing my heads was to unbolt the cross member and have my little brother underneath the truck pulling back on the exhaust to clear the studs on the back of the manifolds. It tooks some leverage on his part but worked. If I ever have to do it again I would probably do the Torx methood. But then again, none of my studs were seized in the manifold, that may not hold true for all studs in all manifolds.

The torx idea is actually pretty good.. It makes perfect sense to do that. I just wonder if the studs are in there with lock tight.. and what color lock tight it is.. if its red its almost permanent.... good idea.. I might give it a try..

I want to get these heads off and decide what I am going to do next.. If I have to spend more than 1000 on repairs.. I think I amm going to try and do a 1uz swap!! a wilson will have some competition on fastest runner!! lol I would love nothing more than to do the v8 swap but the wife hates the idea just because of gas prices. But IDC because I have my rice burner up here now and can drive it to save on gas.
 
Man, I have to admit that there is a part of me that kinda hopes it's over $1k. Sorry. I am a bad person.
 
I do too.. I think I will keep having trouble with this engine in the long run. I have been doing some research on the 1uz fe swap. I think if I play my cards right I will be able to get a good deal on the engine, tranny, ecu and wiring harness. It will definately be a learning experience to do this swap in my garage. the only thing I would need to source out would be engine mounts.
 
well played..

Yeah I saw that one already and really debating it.. I can get a ls400 1uz fe from the shelton all west coast wrecking for 325. Not sure of the condition of it but its only the engine and not the engine tranny and ecu.. I want it really bad! I might pick it up just in case...

Just fyi.. I got my heads off..

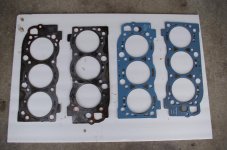
1) pic is the gaskets new and old
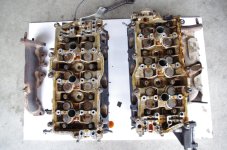
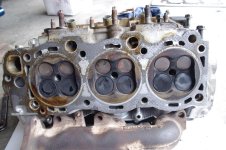
2)over view of the top of the heads
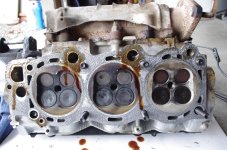
3)right bank cylinders #2 , 4 , 6 in the order from left to right
-notice how #6 is cleaner (not sure why)
4)left bank cylinders #1 , 3, 5 in same order
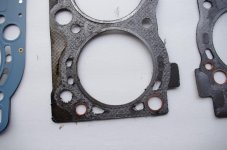
5)#6 head gasket on top
-I think the problem at around the 9 o' clock from the center of the cylinder
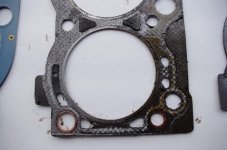
6)bottom of the gasket #6
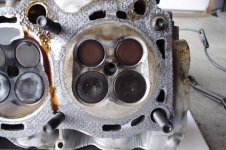
7)right bank cylinder # 2 , 4, 6 in that order.

From what I can see the heads aren't cracked that I can tell (compared to privious pictures of cracked heads. If anyone sees something that I don't please point it out not only for me but for others head gasket troubles . Anyone know anything about the felpro gaskets? they are completely different from the ones that were on the truck. They are made of sheets of steel instead of flexable material. I think they might be oem but not to sure.
 

Attachments

  • gaskets small.jpg
    gaskets small.jpg
    107.4 KB · Views: 4,227
  • heads small.jpg
    heads small.jpg
    142.1 KB · Views: 4,014
  • right bank bottom  small.jpg
    right bank bottom small.jpg
    141.4 KB · Views: 3,844
  • left bank bottom.jpg
    left bank bottom.jpg
    139.6 KB · Views: 9,504
  • #6 top small.jpg
    #6 top small.jpg
    104 KB · Views: 3,256
  • #6 bottom small.jpg
    #6 bottom small.jpg
    98.1 KB · Views: 3,281
  • #6 head small.jpg
    #6 head small.jpg
    141.4 KB · Views: 5,723
  • right bank block small.jpg
    right bank block small.jpg
    141.4 KB · Views: 13,304
Last edited:

Members online

Forum statistics

Threads
278,309
Messages
3,554,075
Members
248,016
Latest member
Advally Service

Trending content

Back
Top