

89FourRunner
New member
I changed the upper ball joints on my 89 and I wanted to share the unorthodox, backwards way I do it to save a ton of time and money.
Most shops will quote you 3.5 labor hours per side, which is pretty steep.
In reality you can do each side in about twenty minutes.
You need:
1 floor jack
1 bottle jack
2 2x4s cut at 12" length
1 7/8th inch wrench
1 15/16th inch wrench
1 7/8th socket on a half inch drive
1 pair of pliers
1 ratchet with a 12 or 14mm socket (depending on brand ball joint installed)
1 Hammer
The great thing about the IFS trucks and 4runners are they are suspended by a torsion bar attached to the top control arm (as opposed to the bottom like most trucks). This means the torsion bar pushes both control arms down, and when in contact with the road pushes both together. This will keep ball joints in tact way past their service life, but adds an extra step to remove the upper.
What this means for you is when changing the upper ball joint you need to ensure that the upper control arm isnt pushing down, as opposed to popping up when releasing the joint.
1. Jack the truck up under the lower control arm of the side you are changing the ball joint on. slide the jack in from the front of the truck (you need the rear for bottle jack placement). Jack the truck up off the ground. Place a jack stand under the frame behind the tire back by the door.
2. Take the wheel off. Remove cotter pin from ball joint bolt now.
3. Unbolt the shock using a 7/8th inch wrench on the bolt head, and turning the nut with a 7/8th socket on a half inch drive ratchet. Remove the bolt and place it aside.
4. Take the bottle jack and one 12" 2x4 and position the bottom jack behind the lower control arm (see picture) and get the 2x4 as vertical as possible. Place one end of the 2x4 on the bottle jack top and the other in a good spot under the upper control arm. Gently jack up the bottle jack so the 2x4 puts pressure on the upper control arm, pushing it up. The control arm will not move upwards because it is still bolted to the knuckle. The truck may start to lift off the floor jack under the lower control arm, so do not jack too much, if the pressure comes off the floor jack a bit that is fine, but you dont need to lift the lower control arm off the jack like an inch, because thats too much.

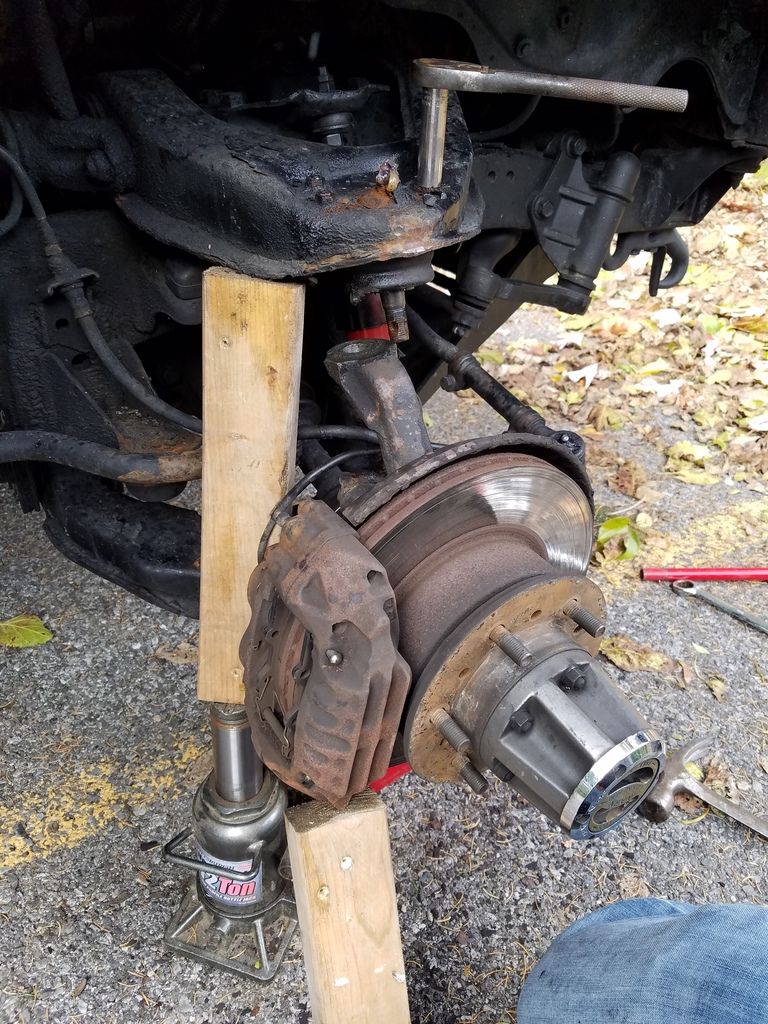
5. Remove the upper ball joint castle nut with a 7/8th (or 15/16 sometimes) wrench. You wont be able to get a socket wrench in there with the caliper intact, so ensure you have a wrench.
6. Strike the knuckle next to the ball joint to release the ball joint from the knuckle. Once it breaks free, or appears to break free, slowly lower the floor jack under the lower control arm to lower the lower control arm and free the ball joint's bolt from the knuckle. (The truck wont lower to the ground because you put a jack stand under the frame.
7. Once the ball joint is clear of the knuckle place the 2nd 12" 2x4 under the hub body/ rotor/whatever to ensure the axle stays put and doesn't put stress on brake lines or pull the cv axle out.
8. Use the 12mm or 14mm socket on the 3/8th drive to remove the four nuts on the top of the upper control arm and remove the ball joint.
9. Place the new ball joint in and under the upper control arm and bolt it in.
10. Raise the lower control arm with the floor jack to get the bolt back in the knuckle (Do NOT attempt to lower the upper control arm with the bottle jack to get it in, not necessary).
11. Bolt castle nut back on, and put new cotter pin in and bend it.
12. Bolt shock back up (you can lower the lower control arm again if needed to align, but I like to just man handle the shock into place if it isnt aligned).
13. Slowly lower the bottle jack, releasing the 2x4 from the upper control arm, the upper control arm wont move because it is bolted back on to the knuckle.
The rest you should be able to figure out - put the wheel back on, remove the jack stand, lower the truck, torque lug nuts on ground, congrats.
This 3.5 hour labor job can be done in twenty minutes a side, but if you are not familiar with the truck, even if it took an hour per side, it is still rather quick, and will save you a ton of money.
With this method, because you do not need to lower the lower control arm down to clear the ball joint for removal and installation, you do not need to unhook the sway bar, take off the caliper etc. Using the second jack and the. 2x4 you can simply keep the upper arm in place. Since it stays in place - you do not need to get the lower control arm all that low, hence why this method is so easy. This can be a blessing for anyone dealing with road salt, as the more parts that need to be removed, the more parts break and need replacement, especially the sway bar end links.
Take your time, and make sure that 2x4 that will support the upper control arm is as vertical as possible so it doesnt pop out. Even if it does pop out, the truck isnt going anywhere though (jack under lower arm and jack stand).
Most shops will quote you 3.5 labor hours per side, which is pretty steep.
In reality you can do each side in about twenty minutes.
You need:
1 floor jack
1 bottle jack
2 2x4s cut at 12" length
1 7/8th inch wrench
1 15/16th inch wrench
1 7/8th socket on a half inch drive
1 pair of pliers
1 ratchet with a 12 or 14mm socket (depending on brand ball joint installed)
1 Hammer
The great thing about the IFS trucks and 4runners are they are suspended by a torsion bar attached to the top control arm (as opposed to the bottom like most trucks). This means the torsion bar pushes both control arms down, and when in contact with the road pushes both together. This will keep ball joints in tact way past their service life, but adds an extra step to remove the upper.
What this means for you is when changing the upper ball joint you need to ensure that the upper control arm isnt pushing down, as opposed to popping up when releasing the joint.
1. Jack the truck up under the lower control arm of the side you are changing the ball joint on. slide the jack in from the front of the truck (you need the rear for bottle jack placement). Jack the truck up off the ground. Place a jack stand under the frame behind the tire back by the door.
2. Take the wheel off. Remove cotter pin from ball joint bolt now.
3. Unbolt the shock using a 7/8th inch wrench on the bolt head, and turning the nut with a 7/8th socket on a half inch drive ratchet. Remove the bolt and place it aside.
4. Take the bottle jack and one 12" 2x4 and position the bottom jack behind the lower control arm (see picture) and get the 2x4 as vertical as possible. Place one end of the 2x4 on the bottle jack top and the other in a good spot under the upper control arm. Gently jack up the bottle jack so the 2x4 puts pressure on the upper control arm, pushing it up. The control arm will not move upwards because it is still bolted to the knuckle. The truck may start to lift off the floor jack under the lower control arm, so do not jack too much, if the pressure comes off the floor jack a bit that is fine, but you dont need to lift the lower control arm off the jack like an inch, because thats too much.
5. Remove the upper ball joint castle nut with a 7/8th (or 15/16 sometimes) wrench. You wont be able to get a socket wrench in there with the caliper intact, so ensure you have a wrench.
6. Strike the knuckle next to the ball joint to release the ball joint from the knuckle. Once it breaks free, or appears to break free, slowly lower the floor jack under the lower control arm to lower the lower control arm and free the ball joint's bolt from the knuckle. (The truck wont lower to the ground because you put a jack stand under the frame.
7. Once the ball joint is clear of the knuckle place the 2nd 12" 2x4 under the hub body/ rotor/whatever to ensure the axle stays put and doesn't put stress on brake lines or pull the cv axle out.
8. Use the 12mm or 14mm socket on the 3/8th drive to remove the four nuts on the top of the upper control arm and remove the ball joint.
9. Place the new ball joint in and under the upper control arm and bolt it in.
10. Raise the lower control arm with the floor jack to get the bolt back in the knuckle (Do NOT attempt to lower the upper control arm with the bottle jack to get it in, not necessary).
11. Bolt castle nut back on, and put new cotter pin in and bend it.
12. Bolt shock back up (you can lower the lower control arm again if needed to align, but I like to just man handle the shock into place if it isnt aligned).
13. Slowly lower the bottle jack, releasing the 2x4 from the upper control arm, the upper control arm wont move because it is bolted back on to the knuckle.
The rest you should be able to figure out - put the wheel back on, remove the jack stand, lower the truck, torque lug nuts on ground, congrats.
This 3.5 hour labor job can be done in twenty minutes a side, but if you are not familiar with the truck, even if it took an hour per side, it is still rather quick, and will save you a ton of money.
With this method, because you do not need to lower the lower control arm down to clear the ball joint for removal and installation, you do not need to unhook the sway bar, take off the caliper etc. Using the second jack and the. 2x4 you can simply keep the upper arm in place. Since it stays in place - you do not need to get the lower control arm all that low, hence why this method is so easy. This can be a blessing for anyone dealing with road salt, as the more parts that need to be removed, the more parts break and need replacement, especially the sway bar end links.
Take your time, and make sure that 2x4 that will support the upper control arm is as vertical as possible so it doesnt pop out. Even if it does pop out, the truck isnt going anywhere though (jack under lower arm and jack stand).
Last edited:


