
I know there have been a few posts about changing CV axles, but most of the more specific ones with photos or videos that I have seen were for FJ Cruisers or Tacomas. So hopefully this is somewhat helpful for anyone wanting to change cv axles on a 4runner without power tools. My mechanical expertise is fairly low – I didn’t grow up working on cars, and started learning by changing the clutch, oil pan seals and slave cylinder on my 4Runner last year. I’m very thorough and careful, and the whole process of changing CV axles took a few hours strung out over two days as I worked from home during that time. About an hour and a half of that was trying to get the new driver’s side axle in. When I called my cousin to hold it while I used a hammer, we had it in within ten minutes.
I don’t have any repair manuals and I’m not a mechanic, so please excuse me if I refer to some parts by the wrong name.
1997 4Runner SR5, manual 4wd.
Tools: Socket wrench and Sockets (10mm for wheel sensor, 12mm, 14mm, 17mm, 36mm)
Breaker bar and extender
Adjustable wrench works for brake dust cover bolts
Big flat screwdriver
Hammer
2x4 to use with hammer so you don't damage axles
Gear oil
Brake cleaner
PB blaster
A little grease never hurt
10mm allen wrench for differential
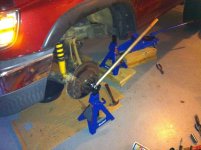
1. After you remove the wheel and get the cap off that protects the axle nut, you can either put the wheel back on and screw in a couple of the lug nuts, then drop the car back down to get leverage, or you can use something like this to loosen (and at the end, tighten) the axle nut. I didn't have a 1/2” drive extension for my breaker bar to get into the hub cap, so I went with this method. A strong extension (in this case, hi-lift jack handle) is very helpful.
2. Two bolts (17mm if I remember correctly) attach the brake caliper at the back. Loosened those and used paracord to tie the caliper up. 10mm & 12mm sockets will loosen the wheel sensor and the brake line bolts. Careful with the brake line. In this case, unlike the FJ Cruiser thread, I found that the brake dust cover bolts were very accessible. They weren’t that tight, but a little rusty – a touch of PB Blaster and a wrench did the trick.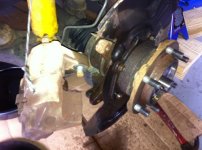
3. BEFORE you unbolt the bearing housing from the lower control arm, go ahead and knock the CV axle loose a bit. I put the axle nut back on and used a piece of wood between the hammer and the axle to prevent the end from mushrooming. Worked pretty well. You might have to wedge a little something in between the bearing housing and the axle to keep it from slipping back into place. Just be careful about the seals and the bearing.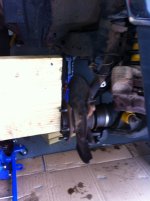
4. Once the axle is loose, go ahead and unbolt the bearing housing from the lower control arm. Support the lower control arm with something sturdy. Now you can slide the whole bearing housing off to the side.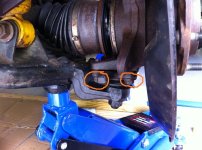
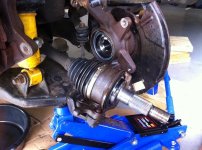
5. Make sure an oil pan is under the axle/differential. Use a heavy screw driver and a hammer or a pry-bar to get the axle loose from the differential. Rotating the axle after every few taps or pushes, it should come loose pretty easily.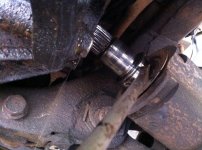
6. Once the axle is out, go ahead and do whatever else you need to do while that space is open – tighten oil pan bolts, clean up the area.
7. Carefully remove the seals from the old axle, clean them up and put them loosely on the new axle. I just let the seal and the metal protector sit on the new axle and then it slid on evenly as I bolted the new axles into place. Seals looked good and no leaks.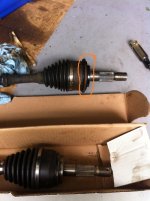
8. If the locking clips are a little bent on the new/remanufactured axles, they can be a pain to get back into the differential. My passenger side axle slid in really easily, possibly because of the slight difference between the connection on that side and the one on the driver’s side. For the driver’s side, I had my cousin hold the axle straight while I used the wood and hammer to tap it back into place.
9. Slide the CV axle shaft back through the bearing, put the axle nut in place lightly, then bolt the axle housing back to the lower control arm.
10. If you’re doing this by yourself, it can be hard to get the lower control arm to match back up with the bearing housing while you screw in the bolts. I used a wratchet strap around the top of the suspension to lift the lower control arm back to the right position so I could line the bolts up.
11. As you tighten the axle nut, make sure that the seal on the back side is sliding into place correctly.
12. Top off the differential with gear oil, make sure the seals are not leaking, and take her for a spin around the neighborhood before you put the skid plates back on.
I don’t have any repair manuals and I’m not a mechanic, so please excuse me if I refer to some parts by the wrong name.
1997 4Runner SR5, manual 4wd.
Tools: Socket wrench and Sockets (10mm for wheel sensor, 12mm, 14mm, 17mm, 36mm)
Breaker bar and extender
Adjustable wrench works for brake dust cover bolts
Big flat screwdriver
Hammer
2x4 to use with hammer so you don't damage axles
Gear oil
Brake cleaner
PB blaster
A little grease never hurt
10mm allen wrench for differential
1. After you remove the wheel and get the cap off that protects the axle nut, you can either put the wheel back on and screw in a couple of the lug nuts, then drop the car back down to get leverage, or you can use something like this to loosen (and at the end, tighten) the axle nut. I didn't have a 1/2” drive extension for my breaker bar to get into the hub cap, so I went with this method. A strong extension (in this case, hi-lift jack handle) is very helpful.
2. Two bolts (17mm if I remember correctly) attach the brake caliper at the back. Loosened those and used paracord to tie the caliper up. 10mm & 12mm sockets will loosen the wheel sensor and the brake line bolts. Careful with the brake line. In this case, unlike the FJ Cruiser thread, I found that the brake dust cover bolts were very accessible. They weren’t that tight, but a little rusty – a touch of PB Blaster and a wrench did the trick.
3. BEFORE you unbolt the bearing housing from the lower control arm, go ahead and knock the CV axle loose a bit. I put the axle nut back on and used a piece of wood between the hammer and the axle to prevent the end from mushrooming. Worked pretty well. You might have to wedge a little something in between the bearing housing and the axle to keep it from slipping back into place. Just be careful about the seals and the bearing.
4. Once the axle is loose, go ahead and unbolt the bearing housing from the lower control arm. Support the lower control arm with something sturdy. Now you can slide the whole bearing housing off to the side.
5. Make sure an oil pan is under the axle/differential. Use a heavy screw driver and a hammer or a pry-bar to get the axle loose from the differential. Rotating the axle after every few taps or pushes, it should come loose pretty easily.
6. Once the axle is out, go ahead and do whatever else you need to do while that space is open – tighten oil pan bolts, clean up the area.
7. Carefully remove the seals from the old axle, clean them up and put them loosely on the new axle. I just let the seal and the metal protector sit on the new axle and then it slid on evenly as I bolted the new axles into place. Seals looked good and no leaks.
8. If the locking clips are a little bent on the new/remanufactured axles, they can be a pain to get back into the differential. My passenger side axle slid in really easily, possibly because of the slight difference between the connection on that side and the one on the driver’s side. For the driver’s side, I had my cousin hold the axle straight while I used the wood and hammer to tap it back into place.
9. Slide the CV axle shaft back through the bearing, put the axle nut in place lightly, then bolt the axle housing back to the lower control arm.
10. If you’re doing this by yourself, it can be hard to get the lower control arm to match back up with the bearing housing while you screw in the bolts. I used a wratchet strap around the top of the suspension to lift the lower control arm back to the right position so I could line the bolts up.
11. As you tighten the axle nut, make sure that the seal on the back side is sliding into place correctly.
12. Top off the differential with gear oil, make sure the seals are not leaking, and take her for a spin around the neighborhood before you put the skid plates back on.
Attachments
-
 2014-08-01 06.37.03.jpg131.7 KB · Views: 9,042
 -
 2014-08-01 09.05.17.jpg82.2 KB · Views: 9,105
 -
 2014-08-01 12.18.22.jpg95 KB · Views: 8,147
 -
 2014-08-01 10.27.10.jpg96 KB · Views: 9,357
 -
 2014-08-01 10.42.59.jpg98.5 KB · Views: 13,726
 -
 axle_out.jpg92.7 KB · Views: 8,387
 -
 2014-08-01 11.04.28.jpg112 KB · Views: 8,952


