Daystar/Cornfed 2/1 Lift

Blute

New member
Ok, so this is what I finally decided to do on my stock '06 4Runner Sport:

Daystar 1" Budget Boost spacer in front (2" lift)
Cornfed 1" spacer in rear (1" lift)

This should give me exactly a 2/1 lift. I bought the Daystar spacers at a local 4wheelparts for $34. Today I ordered the Cornfed spacers directly from Dave at Cornfed at a good price.

I considered the Daystar 2.5/1.5, but in reality I believe it is a 3/1.5 kit. I think that raises the front a little high and corrects too much of the factory rake. For me, I just wanted something that will correct some of the factory rake, and allow some slightly larger tires (265/70R17). Plus I wanted something compatible with my XREAS, and something cheap. Eventually when the XREAS dies, I will probably replace with an OME/Toytec or similar setup.

Right now I have about 2 3/8" rake, which should be reduced to about 1 3/8" after the install. After I am done I will try and post pics and give before/after numbers. Wish me luck!
 
Register to hide this ad
Good luck I sure do want to see the pictures because that sounds exactly like what I want to do.
By the way what part of SLC do you live in I used to live in West Jordan.
 
if you dont mind me asking, how much did you pay for the 1" rear spacers direct from cornfed?

I bought them for $60, incl. shipping. Dave from Cornfed was willing to work with me on the price to allow me to try their product.

I also considered just doing the 1.5" rear Daystar spacers, which would only cost me about $34. But I really only wanted 1" spacers to make it a true 2/1 lift. I even thought about ways to shave 0.5" off the rear Daystar spacers, but then decided it would just be easier to use the Cornfed ones, and that price isn't bad.
 
Where did you get the daystar spacers? I thought they only sell 1.25 or 2.5? Not sure i've seen the 2" lift for the front.
 
Where did you get the daystar spacers? I thought they only sell 1.25 or 2.5? Not sure i've seen the 2" lift for the front.

I bought a couple different Daystar kits from 4wheelparts locally, so I could check out the parts and return what I decided not to use. But Amazon is another good place to buy.

Daystar part #KT09117BK is the 1" front budget boost spacer. The spacer is exactly 1" thick which will net 2" of lift.

Part #KT09115BK is the 2.5/1.5 Daystar kit. The front spacer in this kit is 1.5" thick, so in reality will result in 3" of lift. The rear spacer gives you 1.5" of lift. They really should market this kit as a "3.0/1.5" kit. I even considered shaving off 1/4" of the front spacer in their 2.5/1.5 kit, but then the thicker base portion of the stud extenders included in the kit would be too long and would extend past the spacer, which would not work for the install. You would have to cut 1/4" off the bottom of those stud extenders as well.

You can also buy the front/rear spacers from the 2.5/1.5 kit separately if desired.

They also sell kits for the FJ which are configured similarly and would work the same for the 4Runner.

I wish Daystar made a 1.25" thick front spacer for the 4th Gen (2.5" of actual lift), if so that's probably what I would have purchased, and then paired it with their 1.5" rear spacer. That would have been a true 2.5/1.5 lift. But the 2/1 Daystar/Cornfed lift I am doing will be the next best thing for me.
 
i thought KT09117BK is a topout spacer, not a preload spacer.

Daystar? - Driven by Design


That's what it's listed on the website, just want to make sure you ordered the correct part before you install it. You'll only get 1" lift, not 2".
 
i thought KT09117BK is a topout spacer, not a preload spacer.

Daystar? - Driven by Design


That's what it's listed on the website, just want to make sure you ordered the correct part before you install it. You'll only get 1" lift, not 2".

I already have the budget booster kit from 4wheelparts which I am going to use. It is a topout spacer, but in reality is exactly 1" thick. It will give you 2" of lift. Whether a front spacer is preload or topout, it doesn't matter it will still give you 2x the spacer thickness for lift.

Daystar is not very good with their product information, obviously. The picture on their website for the budget booster is an old picture. It is now a topout spacer with the ez-install design. Also, they should call their 1" budget booster kit a 2" lift kit, and really their 2.5/1.5 kit should be called a 3"/1.5" lift kit.
 
New Tires! But uneven lift results??

No lift installed yet, but I went ahead and got my new tires, 265/70R17 Nitto Terra Grapplers. The local Discount Tire was willing to match a price I found on TireBuyer.com, including a 10% off coupon. About $665 out the door, which is a dang good deal. I love Discount Tire.

But here's a weird thing, I took some height measurements after installing just the tires, and I got around 7/16" of lift in front, but the rear lifted around 7/8"! How the heck did that happen? I checked my measurements several times, and they look good, but I am somewhat baffled. I haven't checked the tire pressures yet, but they appear normal. Anyone have ideas on why this happened????

So now I'm thinking my plan for a 2/1 lift won't provide enough correction for the rake on the vehicle (running a rake of about 2 7/8" right now). I would like my final rake to be between 1-1.5" when done. Maybe I should go ahead with the Daystar 2.5/1.5, which should provide about 1.5" of correction, as it is closer to a 3/1.5 lift. I can return my Daystar budget boost spacer, but the returning the 1" Cornfed spacer may be a little more tricky...

(Ignore the above info, I re-measured the following day and all was well. I got around 7/8" to 1" of lift from the new tires, and there wasn't much difference between the front and rear. My measuring may have been off, or the tires needed time to cool down and the pressures equalized...)

On a similar note, I got some rubbing on the drivers' wheel well from the new tires. I moved the well liner forward, and while I was at it I also went ahead and trimmed the little triangles off the fender, just for good measure.
 
Last edited:
Done!

Got the lift done today! Took most of the day, but wasn't too bad. The front was a breeze using Richierollz's instructions: http://www.toyota-4runner.org/4th-gen-t4rs/68638-daystar-2-5-1-5-install.html

The back kind of sucked, actually. It took me forever to get the springs/spacer back in. Trying to pry them in without the top falling out was a total pain. I actually used a bungee cord around the top, secured to the frame to hold the top while I pried the bottom in.

Anyways, I ended up with about 2" lift in front, and 1" in the rear, as expected. I'm now riding at about 36" in the front and 37.5" in the rear, which leaves about 1.5" of rake. I wanted somewhere between 1-1.5" so that's good. It still needs an alignment, so that could tweak those numbers a little bit. I'm heading to Les Schwab in the morning...

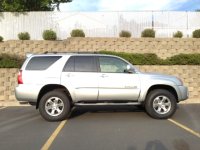
An after pic is below. I don't have a before pic, but you can just imagine a stock runner. I'm happy with the results, looks great with the new 265/70R17 Terra Grapplers!
 

Attachments

  • photo (1).JPG
    photo (1).JPG
    130 KB · Views: 6,256
Got the lift done today! Took most of the day, but wasn't too bad. The front was a breeze using Richierollz's instructions: http://www.toyota-4runner.org/4th-gen-t4rs/68638-daystar-2-5-1-5-install.html

The back kind of sucked, actually. It took me forever to get the springs/spacer back in. Trying to pry them in without the top falling out was a total pain. I actually used a bungee cord around the top, secured to the frame to hold the top while I pried the bottom in.

Anyways, I ended up with about 2" lift in front, and 1" in the rear, as expected. I'm now riding at about 36" in the front and 37.5" in the rear, which leaves about 1.5" of rake. I wanted somewhere between 1-1.5" so that's good. It still needs an alignment, so that could tweak those numbers a little bit. I'm heading to Les Schwab in the morning...

An after pic is below. I don't have a before pic, but you can just imagine a stock runner. I'm happy with the results, looks great with the new 265/70R17 Terra Grapplers!


Looks good.

Can you post measurements in this thread:
http://www.toyota-4runner.org/4th-gen-t4rs/144737-lift-vs-ride-height-list.html
 
Got it aligned today. It wasn't out of alignment too bad, but it did affect the measurements a little. Here's my final measurements:

Front: 35 3/4"
Rear: 37 3/8"

The difference between the driver and passenger sides is within 1/8", so I think these numbers are good enough. I also filled up the gas tank today which probably made it settle a little bit more. I estimate I got around 1.75-2" of lift in the front and 7/8-1" in the back. My final rake is around 1 1/2 to 1 5/8". If anything, that is on the high end of what I wanted for preferred rake, but it's fine. I think a rake around 1.25" would be ideal...
 
I'm going a somewhat similar route. After trying FJ springs /shocks up front with a 1/2" toytec spacer, it only netted around 1.25" lift. After measuring, I didnt want to install rear FJ springs/shocks as i was worried this would bring more rake back.
Plan now is to ditch the toytec for the 1" daystar and install the FJ shocks/springs in the rear with no spacer. I also have Firestone airbags so I can control sag a bit. Hoping for a mostly level ride and ability to fit 265/65/18's.
 
Here's some additional notes from the install, just in case it may prove helpful to folks doing a similar lift themselves. Again, the link to the instructions by Richierollz were excellent, even without the pictures.

1. The innermost nut of the three nuts on the shock tower is a total pain to remove. I really wish I had a ratcheting wrench to do this. I just had to use my regular 14mm box wrench and keep flipping it around, using both the open and box ends until I could get on the nut and make small rotations. It took forever.
2. A breaker bar is essential to remove most of the hardware...that stuff is on there tight. (but too bad you can't fit a breaker bar when loosening those nuts on the top of the shock tower...)
3. On the 1" Daystar budget boost front spacer, the instructions say to cut the studs on the top of the strut down to a length of 3/4". I did not have to trim the studs, the stud extenders that came with the kit fit perfectly and the spacer and everything else also fit perfectly.
4. I had to use the vehicle's bottle jack to jack the LCA back up under the spindle to reconnect everything, but it was easy to do this.
5. I used the pages from the service manual to get the torque settings for all the nuts/bolts, and re-torqued everything accordingly (except for the three nuts on the shock tower, of course; no way you can fit a torque wrench in there).
6. The rear was more difficult than I expected. It was somewhat difficult to pry the rear springs out, even with the rear axle dropped way down. When lowering the axle, I kept a close eye on the brake lines, as I was worried about snapping those babies. It was also a total pain to get the spacer/bumpstop/springs back in there. The top kept popping out while trying to pry the bottom of the spring onto the axle perch. It did help to wrap a bungee around the top of the spring, secured to the frame. But this process took several minutes to an hour on each spring for me to do it by myself. If I ever change the springs in the rear again, I think I will try using a spring compressor to avoid all the prying and such.

In the end, I actually enjoyed doing this install. For around $100, I got a great, simple lift. Thanks to this forum and all the great information and advice from everyone!!
 

Members online

No members online now.

Forum statistics

Threads
278,311
Messages
3,554,082
Members
248,016
Latest member
Advally Service

Trending content

Back
Top