Debadging

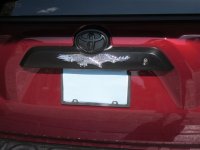
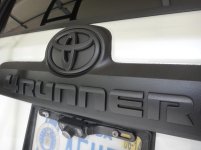
The 4 Runner number and letters come right off, just like the side badges. The "putty" that they use to put it on, is a bit harder to clean off the silver painted plate the letters were placed onto. However, after removing, a little lighter fluid or maybe goo gone, should clean it up. I used lighter fluid. After you take the number and letters off, there is a clean plate underneath, but it has 4 small "indentations", rectangle in shape. 3 of the indentations are in line, the fourth is a bit lower and near the key lock cylinder. They are a bit strange looking by themselves, but not to bad. I plan to put something over the plate in the future...a design or name plate etc. Good luck.

anyone have pics with the rear "4RUNNER" letters removed?

trying to clean around all those letters is BRUTAL!!!

anyone figure out something else to do that is maybe a little more "cleaning friendly"?

thanks!!
 
Last edited:
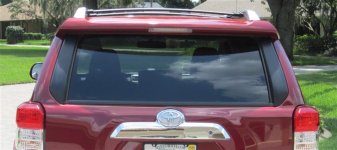
anyone have pics with the rear 4runner letters removed?

trying to clean around all those letters is BRUTAL!!!

anyone figure out something else to do that is maybe a little more "cleaning friendly"?

thanks!!

Here is what it looked like after took the letters off. The next photo shows what I eventually did with the back area. If you copy and paste the first photo onto your desktop, then expand the size to say 100%, you can more clearly see the back plate after the letters and numbers are removed. Hope this helps, good luck and be safe.
 

Attachments

  • IMG_0121 (Small).jpg
    IMG_0121 (Small).jpg
    51.7 KB · Views: 4,024
  • IMG_0133 (Small).jpg
    IMG_0133 (Small).jpg
    42.1 KB · Views: 4,151
thanks for the pic without the rear letters.

i like that clean look A LOT!!!, but i think the couple little divots might make me crazy after a while.

may be something custom to cover it would be good.....like from.....
Customized Billet Aluminum Badges For Your Ride

anyone else with any other ideas?
thanks,
rich

rich,
Thanks for the url to billetbadges.com. I have a custom order in with them right now. We are in the "rendering" process at the moment. I'll be showing this off in the next few weeks if all goes well. My idea for the removed "4Runner" letters is to apply them to the passenger side dash just above the glove box...after blacking them out, of course. They are, along with the Toyota Badges (Front & Rear), at a custom body/paint shop as I am writing this.
 
That piece looks awesome blacked out! Is that something you were able to take off and paint yourself? And if so how did you do it? Or did you have a shop take care of that? Thank you!
 
Gus, if you are talking about my post above, yes, took it off myself and had a body shop paint it. But that was before I heard of plasti-coat paint.. With the instructions below, you can take it off AND paint yourself and it should come out fine. It can't remember who posted the instructions I have pasted below, but thanks lots to that person! Be safe.


Pull the little square cover in the door panel (inside) and then swiftly pull outward. The door panel is only held on with push pins. Then you'll have to unplug the interior lights, pull the plastic sheet that's stuck on with dum gum, and unbolt the 4 10mm nuts that hold the garnish.
Also the nuts for the lock. And be careful when pulling up in the area of the oval Toyota emblem. There is a weird looking clip that you can’t to from underneath, but with a little work, it will come up. From there on, you should be able to figure it out.
 
Last edited:
Gus, if you are talking about my post above, yes, took it off myself and had a body shop paint it. But that was before I heard of plasti-coat paint.. With the instructions below, you can take it off AND paint yourself and it should come out fine. It can't remember who posted the instructions I have pasted below, but thanks lots to that person! Be safe.


Pull the little square cover in the door panel (inside) and then swiftly pull outward. The door panel is only held on with push pins. Then you'll have to unplug the interior lights, pull the plastic sheet that's stuck on with dum gum, and unbolt the 4 10mm nuts that hold the garnish.
Also the nuts for the lock. And be careful when pulling up in the area of the oval Toyota emblem. There is a weird looking clip that you can’t to from underneath, but with a little work, it will come up. From there on, you should be able to figure it out.

Awesome, thank you! Definitely my next project, love the look
 
Instead of using a hard material to take emblems off, I have always used dental floss and did a sawing motion FWIW
 
Do you have any more pics of the blacked out emblem but from further back? I'm thinking of doing it too.
 
I waited until mid day and it was really hot then stuck my finger nails under emblems and slowly pulled away from the truck
 
I'm gonna pull mine of tomorrow. It's suppose to be around 50 degrees out. It is only 33 degrees out today, so I'm not sure if it's warm enough today.
 
I debadged my new 2015 SR5 today. I used a plastic scraper and WD40. The SR5s on the side came off easily and left minimal glue to remove. The "4Runner" on the back hatch was a bit of a pain as all of the glue stayed on and had to be scraped off - took me a quite a while to strip it all. I think it looks better debadged but there are four minor divots in the back hatch now, likely a guide for applying the lettering. Not a big deal for me but I'm sure it would bother some folks. They're somewhat less noticeable than it seems in the picture.

IMG_2113.jpg
 
Sorry bring up an old thread. I just debadged the Limited emblem off of my 5 year old 4Runner this past weekend and there is some ghosting left over from removing them.

I've read this article, but haven't tried it yet as he was unsuccessful when he tried to remove the ghosting. Is there other processes to remove the ghosting?

How to Properly Debadge a Vehicle | Ask a Pro Blog
 
Sorry bring up an old thread. I just debadged the Limited emblem off of my 5 year old 4Runner this past weekend and there is some ghosting left over from removing them.

I've read this article, but haven't tried it yet as he was unsuccessful when he tried to remove the ghosting. Is there other processes to remove the ghosting?

How to Properly Debadge a Vehicle | Ask a Pro Blog

I did not read the article you posted but just try some polishing compound. Start with mild and work your way down to rubbing compound (if necessary). Once you see the ghosting blend then work your way back to polishing and finish with a good paste wax. Just a warning if you go crazy with the rubbing compound you can quickly rub the clear coat right off so be gentle.
 
interesting b/c this discussion is currently ensuring at forum.miata.net....

Just take the badges off

we don't need no stinkin' badges....
 
I have been wanting to debadge my SR5 since I got it; mostly to reduce weight and improve aerodynamics, but I thought it might also look better. I gave it a tug (the SR5 emblem) when I first bought it, but it was warmer then and the badge was planted like a well stuck booger; stuck-stuck. I had a look on this forum on how to remove it, but all I had from the list of needed supplies was the fishing string (no blow dryer), so I let it go for a while.

I was walking to the car yesterday and my fingers were drawn to the badge like a ripe zit - it had to go. It was in the low 40s (the American kind, not EU degrees) and I gave it a little bit of a tug (again, the emblem). I held it for a few seconds and it started to lift up. In about a minute, I had it removed. Not only did I get it off, there was zero sticky residue left behind. No cleaning needed. Pleased with my self, I took a photo.

Thinking about the two attempts and the temperature difference, two things stand out. The sticky tape is much harder when its cold and doesn't tear (allowing you to use more force). Also, the glue didn't seem to adhere as tightly. So, no tools, no mess, and nothing rougher than your skin lightly touching your car.

Maybe it was just a bad glue day at Toyota when mine rolled off the line, but maybe thats not the case and the "hand method" has some merit.

I think I'll try this today.
 

Members online

Forum statistics

Threads
278,305
Messages
3,554,044
Members
248,016
Latest member
Advally Service

Trending content

Back
Top