December 2004 4ROTM - Luxury

Eyelids

slowginjoe: that smily is perfect......

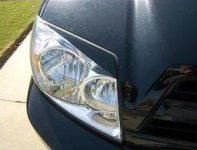
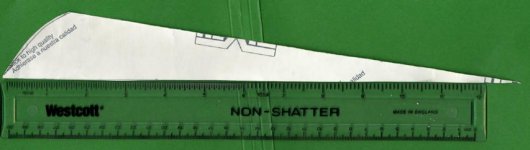
Jason B: Is that supposed to be a joke, because they are so small, or did you really not even see them? It is the black triangular portion shown in the picture below, copied from a previous post. See it?

BTW, Jason B sells the JDM-fiberglass-unpainted-larger version.
 

Attachments

  • eyelid detail.jpg
    eyelid detail.jpg
    11.5 KB · Views: 2,367
@Luxury: your PM box is full so I'm posting this here.

I assume the unlighted switches are just the simple single pole on/off style. The lighted one requires an extra power wire for the light. Other than that, they should be about the same, either one is more than capable of handling the power load because ultimately they switch enough power to energize the relay coil -- a relay switch handles the device load.

Page 300 of the '04 wiring manual shows how the OEM 115V switch was originally wired to handle the inverter. The exact same setup would work for your fogs albeit you might need a bigger relay and wiring for the light circuit side depending on how much power those are going to pull. Since you already have the oem inverter & switch, you can even tap the power/gnd (Yellow/red = Ignition power circuit, White/Black = gnd) wires from that switch to drive your new switch and relay. Adding one extra relay to the Ignition circuit should be harmless. You'll then need to run a new neutral wire from your new switch back to whereever you mount your new relay and of course hook the other side of your relay coil to your ignition circuit. After that, the relay switch is ready for you to drop in your new lighting circuit wiring, fuse, bulbs, etc.

Thanks for the info about the costco deal -- I might look into that.
 
I like everything you've done to that 4Runner. I think I am going to try that grill mesh under my front Toyota emblem on my 3rd Gen. I'll post a pic when I get around to it. Thanks for the idea!
 
Mesh Emblem Details & Giveaway:

Thanks rando for your as-always detailed help and thanks to MSU4Runner for the complements. I don't know if you saw my previous post (on page 6), but I have extra of that mesh material that I'll send you if you want. I already made some rectangular cut-outs that will fit in an envelope. If MSU4runner wants one, then there are 6 left, so the first 6 people to post that they would like one, I send you it free.

BTW, I'm going to be painting that emblem black, very soon, and I'll definitely post pics.

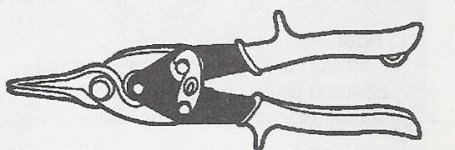
MSU4Runner, I'm answering your PM here so everyone has the answer. Your Question: "Did you just cut it with good scissors? I don't remember reading what you cut it with." Answer: I used a combination of metal sheers and standard small wire cutters. The metal sheers I used are of the type shown in the picture below. They worked really well if I did fast cuts. Wire cutters could do the whole job without much more effort. Good scissors could probably do a decent job, but you would run the risk of dulling/denting them.
 

Attachments

  • metal sheers.jpg
    metal sheers.jpg
    18 KB · Views: 2,256
Last edited:
Luxury, if they are still available, I will take one. It looks very interesting! Thanks for the offer!!!
 
Trance: :cheers:

I thought I would continue with my theme of excessively posting everything with these really minor details:

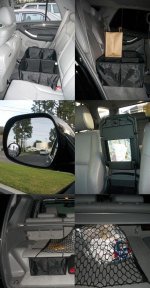
  • Cargo Tote: Pretty self explanitory pics. So, far I've used it under the double decker shelf and also in the rear seat to hold groceries. It also folds up very small.
  • Flat DD Cargo Net: This cargo net surprised me when it held a load of KFC completely stationary, despite my aggressive driving.
  • Kleenex: I didn't know that spot under the armrest was for a Kleenex box until I asked on the forum a couple days ago. While I was at Pepboys I picked up a box. Details: $1.50 Kleenex Juniors 65 2-ply tissues 8.4 x 5.8 IN. They fit almost too snug. Update: CLICK HERE to go to a new thread dedicated to this Kleenex topic.
  • Mirrors: I have read several times jharris2's posts about blindspot mirrors being the first mod he does to any car so I bought some at Walmart for 99 cents each. I have already made good use of the drivers side, but the passenger side is very small and hard to use. Maybe I don't have it in the right location or I need to upgrade to the $1.50 adjustable type at Pepboys. Update 6/21/05: I removed the passenger side mirror over a month ago because it was too small to use. One day I may even upgrade my driver's side mirror to one of the larger styles. Does anyone have one and how does it work?
 

Attachments

  • small mods.jpg
    small mods.jpg
    134.1 KB · Views: 2,232
Last edited:
Luxury,

You should try and use the 2" mirrors. The ones you posted look they are only 1". The 2" ones are easier to see especially on the passenger side.

July
 
Mirrors & Shackle Hitch Receiver

Damn, I wasted all that time and money! :D I remember jharris2 saying 2", but I didn't take the time to really worry about the size. I think the ones I have are actually 1.5", but that little extra on the diameter adds a lot to the area of the mirror. Thanks for pointing that out. Correction: At lunch I went out and measured the mirrors with the mini-leatherman that I keep in the compartment above the cupholders, and sure enough, they are already 2" mirrors. They sure seem small though.

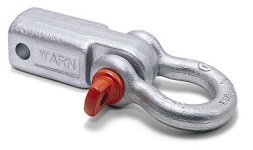
Does anyone know of a common store that would have a receiver shackle in stock and not have to order them? I've tried Pepboys, Kragen, Walmart, Sears, Super Autobacs and a Warn-authorized part shop. Click Here to go to a thread over at yota that discusses them. I got the idea from seeing T4R.ORG member 4route's. Pepboy's looked it up and said there would be no restocking fee if it didn't fit or I didn't like it. There are plenty of places online that sell them, but I wasn't sure it fits, so I wanted to find a store that has them in stock. Update: I bought it from Pepboys for $44. And now, 2 months later, I found it at 4 Wheel Parts Performance Center for $36.99 and they had a quantity of 4 in stock.
 

Attachments

  • warn shackle hitch receiver.jpg
    warn shackle hitch receiver.jpg
    13.8 KB · Views: 2,053
Last edited:
Mesh Giveaway

OK, I finally got the latest three mesh pieces out the door. Sorry for the delay guys. I actually had to cut a couple extra to finish the 10 I promised. But, now that all 10 have been sent, I really don't mind doing a few more if anybody wants one. Just let me know.

  1. Noloc - Received/Installed precut emblem piece.
  2. Cleric - Received/Installed precut emblem piece.
  3. TranceKrayz - Received/Installed precut emblem piece.
  4. MSU4runner - Received/Installed rectangular piece of mesh.
  5. Mark86 - Received rectangular piece of mesh.
  6. hamster_13 - Received rectangular piece of mesh.
  7. AlfieG - Received/Installed rectangular piece of mesh.
  8. Del34 - Received/Installed rectangular piece of mesh.
  9. 24runners - Shipped precut emblem piece.
  10. 24runners - Shipped rectangular piece of mesh.
  11. Hank - Gave a rectangular piece of mesh at So Cal meet.
  12. Kenn - Gave a rectangular piece of mesh at So Cal meet.
  13. darktiger - Shipped rectangular piece of mesh.
  14. broncosi - Need Address.
    [/list=1]
 
Last edited:
Re: Mesh Giveaway

Luxury said:
OK, I finally got the latest three mesh pieces out the door. Sorry for the delay guys. I still have 4 Free Mesh Emblem pieces if anyone wants one.

Thanks a lot Luxury. I can't wait for it to come!!
 
Maglite

Your Welcome Mark.

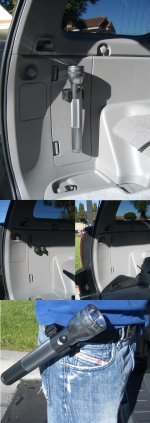
Well, I did another lunch-time mod, and since it was completed in less than an 15 minutes or so, you can imagine it is yet another minor addition to my 4runner. Thanks to everyone that posted in the Maglight modification EZ as pizza pie thread for the idea. I opted to use a little different mount than they did. I love this mount because it doubles as a swiveling belt holster. I bought my mags at costco for $19.99 which included the D and AA aluminum finish mags, batteries, and AA belt holster. This D mount is by Nite Ize and I bought it from Zbattery.com for $12.83. Shipping was pretty cheap since I ordered 4 things from them. One cool thing about this mounting location is that it doubles as additional light for the interior if needed.

Sorry if you guys are getting bored with all my small mods........somebody just rated my thread a 4-star :headslap: ......which I guess is like a B......so it's not that bad I guess.
 

Attachments

  • maglite mount.jpg
    maglite mount.jpg
    115.9 KB · Views: 3,454
That maglite mod looks very interesting being I have the same maglite as you too(Home-Dept special)!! I don't know if I want to drill through the cargo area of my truck. Very smart idea though. You do very eventful things during your lunch hour. I wish I had such intersting lunch's. You are like the "lunchtime modder." :D

PS: I like the idea of wearing the flashlight on your belt, but isn't it a little heavy there?? I would be a little scared that my pants would fall down!! :eek:
 
Maglite & Eyelid Procedure

Mark: How much did you get your mag for @ Home Depot? Oh, the weight of the mag hasn't bothered me much at all so far, but I just got this holder so it is a little early for me to say. It is definitely helpful when climbing ladders or when you need a light while using both hands on something else. Plus, this way you never will set it down and loose it like a dumb-ass (I'm speaking from experience with that one). Pants fallin' down? :moon: Not a chance with my fat ass!

TranceKrayz wrote on 12-10-2004 07:01 PM:
Hey I just recieved the sample vinyls in the mail today. I was just curious as to how you went about cutting the vinyl the right shape. Did you make some sort of stencil out of paper? The black gloss actually looks good. I think this is a way better deal than paying $200 for the jao's eyelids. Thanks!
Trance, I replied to your PM here so that everyone would have the answer. I was really flying by the seat of my pants! But it turned out pretty good. These are the basic steps:
  1. Align a straight edge of the piece with the top of the headlight
  2. Use scotch tape to temporarily attach it with the white backing facing towards you
  3. Roughly mark the part of the corner that needs to be cut (it doesn't have to be too exact because you can fold some of the excess over and under)
  4. Mark, with a pencil, two bottom pts
  5. Remove workpiece from headlight
  6. Use a ruler to draw a straight bottom edge
  7. Cut a little larger then you drew so that you can fold the outside edges over for a cleaner look
  8. Use wallpaper scissors (if you have them) to help with a straight cut
  9. Clean & dry headlight in whatever manner you think is best
  10. Partially peel backing and start from one edge
  11. Try and prevent bubbles (this is the hardest part)
  12. Move on to the next headlight and use the backing from the previous as a template to save time
 

Attachments

  • eyelid pattern 55 percent.jpg
    eyelid pattern 55 percent.jpg
    31.6 KB · Views: 2,792
Last edited:
LUXURY's new catch phrase

now, put on your thinking caps and remember a movie that had a similiar ring to it... well, here is Luxury's new phrash....


IT's LUNCHTIME


but , you have to say it with pizazz like eddie murphy did... then it'll work...

i'm brilliant.. i know...

:boink:
 
Luxury said:
Mark: How much did you get your mag for @ Home Depot?

I got mine about a year ago for $14.99. I needed it mainly because we get blackouts where I live and for when I have to fix things. It is a great flashlight.
 

Members online

Forum statistics

Threads
278,313
Messages
3,554,090
Members
248,016
Latest member
Advally Service

Trending content

Back
Top