December 2004 4ROTM - Luxury

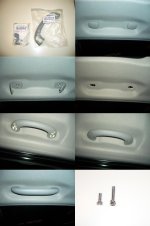
Driver's Side Roof Handle

Your welcome hamster_13. I've got 3 left now.

This mod wasn't a lunchtime mod, sorry to disappoint. It was actually a while-the-girlfriend-is-on-the-phone mod. Totally simple, quick, relaxing, and went off without a hitch. Click Here to go to one of the threads that gave me the idea. I bought this from Carson Toyota:

74603-60010-B0 Grip subassembly = $23.54
74617-60050-B0 Plug = $2.88
74617-60040-B0 Plug = $2.88
93381-26030 Screw (4) = $.48 each

The installation is so self-explanatory that you don't really need any directions, but I thought I would post pics anyway. There are only two bits of info that I can impart. First, make sure you order the right colored handle; the part numbers above are for a grey interior. Second, I ordered the screws on a gut feeling since they were so cheap, even though in another thread someone said they are not needed. When I opened up the blanks that were existing, I thought I was a dumb-ass for ordering them........turns out the screws I ordered are quite a bit longer and have a washer attached to them. I doubt if there is much extra female thread up there, but if there is, it would mean extra strength for the handle. My only theory on the washer is that it is there to prevent the screw from cutting into the plastic on the handle.
 

Attachments

  • drivers handle.jpg
    drivers handle.jpg
    127.7 KB · Views: 3,126
Last edited:
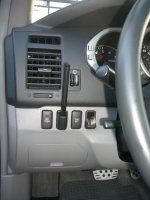
JDM Coin & Pen Holder Switch Blank Replacements

We began to discuss these on PAGE 8 of this thread and there are pics there of these installed on some JDM vehicles. The pic below is of my 4runner.

Carson Toyota came through again with these JDM parts. In my excitement, I took them out of the bags before checking which part # corresponds to which holder, but here are the numbers anyway and my guess at which is which based on what I researched previously:

JDM Pen holder: 55539-52020-C0
JDM Coin Holder: 55441-52040-C0

I actually installed these before leaving the parking lot of Carson Toyota. All I did was take off the little panel below them and reach up to unclip the switch blanks and slapped these suckers in. BTW, I want to buy a really short pen to use in this holder. If anyone knows of a good brand or anything, please let me know.
 

Attachments

  • coin & pen switches.jpg
    coin & pen switches.jpg
    112.2 KB · Views: 2,918
Luxury, I installed the driver side assist handle too. It is a great mod and an easy install. I bet it took your girlfriend longer on the phone that it did for you to install the mod!! :p
 
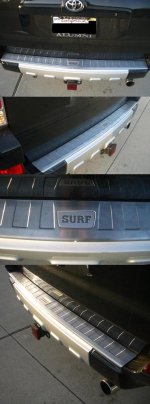
Hilux Surf Brushed Aluminum Rear Bumper Guard

Mark, yep I finished way before she did. Ha Ha, I just re-read what I wrote.......sounds about right!!!!!:D

So, I also picked this up at Carson Toyota today:
 

Attachments

  • hilux surf rear bumper guard.jpg
    hilux surf rear bumper guard.jpg
    135.5 KB · Views: 2,801
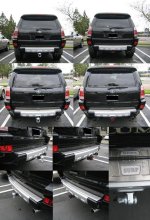
Hilux Surf Exterior Door Sill

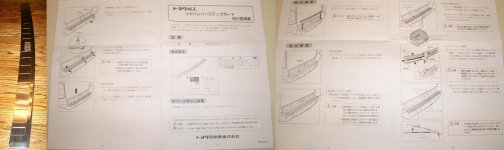
We first talked about this mod on PAGE 6 of this thread. There is a picture there of a white Hilux Surf with this bumper protector. The JDM part number is 08475-35020 REAR STEP GUARD. From what I can tell so far, it looks like I need to heat the tape to 30-40 degC with a hairdryer or heat gun. I’m guessing a hairdryer because 30-40 C is 86-104 F. Quick note to those of you who are going to be installing this soon (keep an eye out for Noloc’s pics next week): DON’T REMOVE the round sticker on the center front of the piece. I didn’t realize it is used to align the part until I looked at the instructions closer. I had already removed it, but I think I put it back in about the right spot. I haven’t gotten it installed yet, so I rested it on my dirty 4runner so that you could get an idea of how it looks installed.
 

Attachments

  • hilux surf bumper guard 65.jpg
    hilux surf bumper guard 65.jpg
    133.9 KB · Views: 2,795
Hood Scoop Mods

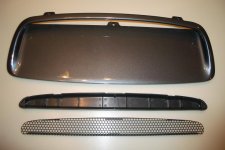
I need all of your help in deciding what to do with my new hood scoop. My prefered idea right now is to place a neon light tube between the grill and plastic pieces. The one I was looking at changed colors and had a switch to make it either change colors at random or to stay on one color. Or maybe go with a Night Rider type of deal in there. Or mini little spot lights.

Another option is to make it functional to cool the engine bay. fourunnabilly did this and said, "My engine temp runs about 25% cooler solely due to opening the scoop." I have two concerns about this. One is the elements like rain or snow getting into the engine. The other is if his fire or heat blanket (I'm guessing that is what it is called) is removed.

One option that I don't think I will consider is using the scoop to route air to the engine intake, as has been discussed on the forum before.

Notice that I accidentally got a galactic grey scoop. Do you guys think it will look ok on my black runner? BTW, I have been struggling to figure out where to get my new sport hood painted, so I started a new thread today about that boring PITA topic.

Thx in advance for any help.
 

Attachments

  • sport hood scoop.jpg
    sport hood scoop.jpg
    51.9 KB · Views: 3,338
Last edited:
i think you need to paint it. and i think the neons would look cheesy. if it were me.....i'd either make it functional or leave it. leds may look nice and won't overkill like neons.
 
I have to agree with Trance... you have a beautiful truck and neons would definitely change the appearance... and make it look more like a Pimp My Ride 4Runner. I like the idea of making it functional to cool the engine down. Now as far as painting it.. I also like the idea of leaving it galactic gray and using that them down the center of the hood. Either way I think it will look nice.
 
Hood Scoop Ideas

Thanks to my two partners in crime. I can always count on the two of you for some quality help. You are probably both completely right about the neon. I think I'll look into LEDs for a softer glow from the scoop. So one vote for the grey and one against. Anybody else have an opinion? Right now I am leaning towards keeping it grey, because I could always buy a black one later if worst comes to worst. I bet I could sell the grey to someone with grey cladding or trade someone with a black/grey-cladding combo. Personally, I think it would pretty dam sweet with the cladding.........did I just start a trend?? If any locals would like to try this puppy on, just shoot me a PM or email.

Does anyone know what size nuts are needed to install the scoop, mine didn't come with any? Or what screw or bolt should be used to attach the smaller pieces?
 
Last edited:
Automatic Door Locking & Unlocking Functions

It has always bothered my girlfriend and I that when we get out of the car and need to get stuff out of the back doors we had to hit the unlock button first. So today, when there was a great song on the radio and I didn't want to get out of the car, I actually cracked the Manual to solve this problem. :nerd: Turned out to be really easy:
  1. Get in
  2. Shut the door
  3. Put the key in
  4. Stop to revel in how hard it has been so far
  5. Turn the key to ACC or LOCK
  6. Hold the rear of the door lock switch for 5 sec.
  7. Release
  8. Listen for the locks to activate back and forth automatically to confirm change
  9. Be amazed and wish you could change more settings this easily[/list=1]The only tip I can really give is to not hold it down longer than 5 seconds. I first did this and it didn't work, so I tried a second time holding it closer to exactly 5 seconds and it totally worked. The way it works now is the door locks unlock when I moved the shifter into park. Not the safest setup, but it sure is convenient.
 
Yup, I did that about an hour after I got my car home (after I realized I COULD from reading the manual). On the car I drove before my 4Runner, the doors would lock once I started the ignition and unlock once I turned it off. So it was a bit of an inconvenience for me when I got my 4Runner. I just thought it was weird how it would lock when you shifted out of Park, but not unlock when you shifted back into Park.
 
This is a nice thred Luxury! I like everything you have done to the car except I do not like the Sheui grille. I can not wait to see what is next!
 
Grill Replacements or Inserts

LeeRunner said:
This is a nice thred Luxury! I like everything you have done to the car except I do not like the Sheui grille. I can not wait to see what is next!
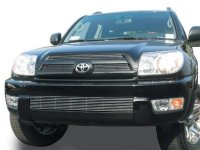
Thanks LeeRunner. I never ordered the Shuei Grill, because of how much money it was and I still wasn't sure how much I liked it. TranceKrayz was going to try and get a local shop to make a couple for us for less, but I think we abandoned that idea. Or at least I did. My other idea was to get the 2005 Chrome Grill off the SR5, but I decided I didn't want anymore chrome up front. My current thought of "what is next" is to get the top piece of this billet grill insert and paint it black. I don't think I want the lower piece because my bull bar covers it to where you can barely see it. I have probably provided the link before, but just in case you want to check out grills further, Click Here to go to the thread I started on the different grill options.
 

Attachments

  • 4runner billet.jpg
    4runner billet.jpg
    18.5 KB · Views: 2,540
i'm actually working on saving up money for a new sound system, and while i'm at it i'm planning on buying another OEM grill from Carson's and having the shop cut it up into a JAOS grill (or something like that). this is all going on in the spring hopefully. i'm a college student so i need to save money. this shop is pretty reputable. i'll give updates on what i do so that maybe they can use my truck to mold parts for you guys too. for now, luxury is the king of mods. :p
 
Christmas Presents

Trance, that sounds like a cool idea.

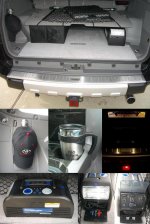
I installed the JDM Rear Bumper Guard on Christmas day. I used a hairdryer to heat the bumper and the guard after leaving it in the sun a few minutes. Then used that 3M activator stuff, put it on there, and applied a lot of pressure. Much to my happiness, it actually stayed on there after traveling about 85 mph.

My parents got me the other three things pictured below. The maglite is serving as a storage location for the moment, but I may get it it's own hook. Most people don't need to keep a hat in their car, but since I am a red-head, it is a good idea. Then there's the mug......not much to say about that.

I also finally got the inverter combo unit that I first talked about on the first page I believe. It was about $79 at Costco. Here are some details from the box: 400 watt (800 watt peak) power inverter powers small 110V AC household appliances and electronics. Powerful, high-current EHP battery; jumpstarts vehicles quickly. 260 psi programmable air compressor with automatic shutoff safely inflates items such as tires or sports equipment. Ultravrite Cold Cathode Light. Includes storage baf to keep detachable [jumper] cables safe. The Professional PowerStation runs these items and more:
  • Alarm Clock Radio 8 watts 22 hours
  • Portable Vacuum Cleaner 100 watts 1 hour
  • Portable Stereo 10 watts 17 hours
  • Cordless Telephone 5 watts 40 hours
  • Flourescent Work Light 14 watts 10 hours
  • Laptop Computer 25 watts 6 hours
  • Lamp 40 watts 3 hours
  • 13" Television 60 watts 2.5 hours
  • Cellular Telephone 6 watts 30 hours
  • Electric Cooler 30 watts 4 hours
 

Attachments

  • presents.jpg
    presents.jpg
    134.2 KB · Views: 2,513
Last edited:
Adding DRLs

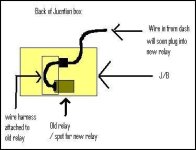
I received my DRL flasher and am hoping to install it tonight. Click Here to go to the thread that I learned about this mod from. The installation instructions copied below are from a thread over at yota. Click Here to go to another thread that discussed the pricing and where to buy it. I bought the flasher from Carson Toyota (they matched the partznet price). Click Here to go directly to the post where the diagram below came from. BTW, some insurance carriers give a discount for DRLs. Does anyone have any tips or pics before I try this installation?
Originally Posted by Yosmany and added to by fish:

The relay it's self had a small clip in it. It slides into a holding clip behind the fuse juction box.

1) remove lower steering panel by removing two 10mm screws at the bottom of the panel on either side of the hood release. Unplug any/all connectors on left side of panel so the panel can rest down on the floor. No need to remove connector on right side of panel.

2) Remove metal shield behind the lower steering panel (two 10mm screws on either side of steering column).

3) Unplug all the fuses and relay that have wires attached to them as this will allow you to freely move the fuse box. (all plugs have "tab releases" on them, so make sure you push the tabs and don't force them).

4) Unscrew the fuse/junctionbox. (one 10mm screw and two 10mm nuts).

5) Turn the J/B towards you. There you will see a beige relay about 1.5" wide. That's the non DRL relay. Use a sharp pointed tool, like an awl, and push it under the relay from the left side to release the tab, then slide it out, it's tricky.

** The NON-DRL relay is smaller then the DRL relay. You will see the the lighting wires connect to a small wire harness, and that wire harness connects to the NON-DRL relay that is clipped on. you must remove the relay and the small harness.

6) Connect slide the new, bigger (2.5"), Black, DRL relay into the wiring harness and then onto the same clip the NON-DRL relay was on. Plug the connector in to the relay without the wire harness adapter. (You don't need it anymore)

7) Reverse for assembly

 

Attachments

  • drls.jpg
    drls.jpg
    16.1 KB · Views: 2,456
Last edited:
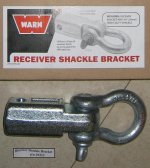
Warn Shackle Hitch Receiver

Special Order SKU # 5700442
Part # 29312
Description: RECEIVER SHACKLE
Mfg: WARN
Pepboys Total Before Tax: $44.85
 

Attachments

  • warn shackle hitch receiver.jpg
    warn shackle hitch receiver.jpg
    68.2 KB · Views: 3,677

Members online

Forum statistics

Threads
278,313
Messages
3,554,090
Members
248,016
Latest member
Advally Service

Trending content

Back
Top