

TravThePro
New member
Guide is now about 95% complete, if somebody actually tries to install them I'll finish it 100% or if it gets enough attention. Picture guide is all the way at the bottom.
This is probably a 2/10 on the difficulty scale, if you're willing to change your oil you can more than likely do this.
****THIS SHOULD COST YOU LESS THAN $100, ****
first set I did cost me $52 and the second set was $58 for my buddy, next was $60 for another buddy (This includes both seats, all mounting hardware, and Tax)
PROS
-Super easy to install (It's a direct bolt up aside from 1 bolt if you don't correctly heighten the seat)
-The stock seat belt clip safely and securely works with the seats with no added work
-Very kind to the wallet
-The seats hold you in much better
-Seats are far more comfortable
-Seats are more adjustable than the stock cloths
-Easier to get into your rig (This is nice if you have it super lifted)
-Look professional
-You can run a harness with it (doesn't come with one though)
-Doesn't burn or freeze you like the leather ones do (This is a god send)
-More durable than the stock seats
-Great for people who are taller as it gives you room to choose your seat height
-Works with the stock under-seat heater
CONS
-You have to have a little bit of luck with finding a junkyard with the seats and then finding seats that are at least in decent shape (Patience and looking around will solve this)
-You have to drill 2 holes through your entire body
-Better than stock but not the best for people 300+ pounds as the seat doesn't have the width to "perfectly" hold huge people
-You have to buy new mounting hardware for 6/8 of the total mounts =~$15
-You add a larger zone of blindspot for when you're backing up
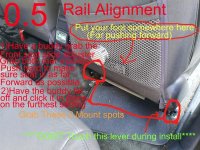
-If you don't line up the rails correctly, the rails bind up and don't smoothly slide back and forth
-Doesn't really save enough weight for it to be considered a performance mod
Tools Required:
-Drill with 3/8 drill bit (or a big screwdriver and a lot of hammering but I DONT recommend this)
-Hammer: I have had a lot of luck with a 4 pounder but anything works if you hit hard enough
-Basic sockets or wrenches
-Patience: with getting seats and lining the rails up before you put the seat in so it doesn't bind
-Big Sexy Muscles (or a second pair of hands to help you slightly bend/hold the seat in place for installing 2 bolts)
Hardware Required:
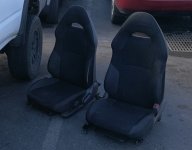
-Seats out of a 7th gen Toyota Celica (2000-2006)
-2 stock seat mounting bolts (believe it or not, this ones easy)
-2 1.5 inch stock mounting bolt threaded bolts
-2 3.5 inch stock mounting bolt threaded bolts
-2 4.5-5 inch 3/8 bolt (I recommend stainless for this one)
-4 3/8 nuts (or 2 3/8 lock nuts are a little better)
-8 3/8 hole by 1 inch diameter washers
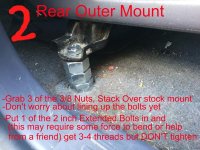
- This is the fun one... you can either make pipe for spacers to level the seats or buy huge nuts that are $0.34/each at your local Lowes. I can find the exact measurements and amount of the giant nuts (I think its 18) you need to do this if there is enough interest.
THIS IS MEANT ONLY FOR FOLKS WHO ARE WILLING TO GO TO THE JUNKYARD
If you're a poor boy like me and have either leather seats or torn fabric seats (like my first rig that I swapped them in), then this is a very good way for you to get much nicer seats with paying around the same price you would for replacement seats in bad shape. Also please keep in mind that there is also a little bit of luck that plays into this as you have to find a junkyard with a certain car in a range of years.
I have swapped them in:
-96 SR5 fabric seats which was a direct bolt 3/4 of the mounts(both sides) Previous owner ruined 3 of the stock mounts and smashes a hole through one of them... This is something almost nobody will deal with, I've only ever seen this issue on my 96
-97 Limited leather seats with rear heater 3/4 direct bolt (both sides)
-99 SR5 with Leather seats, seat warmers, and rear heating 3/4 direct bolts (both sides)
-These should work in all 3rd gens (1996-2002) with the measuring I've done, but the seat mounts change a little bit between the years so if you want a good sturdy mount at the correct height, you're going to have to drill some holes.
Things to consider:
-Once you get your seats and mounting hardware it's only about an hour install if you don't know what you're doing. I can do it in around 15 minutes for both sides now that I know what I'm doing but make sure you take your time so it goes in correctly.
-You should be careful to unplug the electrical from your stock seat so that you don't ruin the plug, it really doesn't matter but there is potential is could save you future hassel.
-The seats are mechanical only, I don't find this to be a big deal but if you're an electrical only person, this pronbably isn't a good mod for you even though you will hardly ever be changing seat positions.
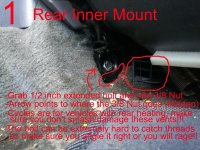
-You need to be careful installing them with the rear heater on the passenger side seat so as not to smash the heating vent that runs right next to the mount.
NOTE:
You can use nothing but stock mounting hardware as long as you have a hammer and don't mind the fact that you're only going to be using 3/4 mounts and it will be off camber, twisted, and way sunken down along with only being stable with moderate street driving and bounce like hell with offroading.
You don't have to buy a new seatbelt or anything as the stock seatbelt will clip safely into the new seat with nothing having to be done.
If anyone would like a more in depth guide on how to completely install them including pictures, I'd be happy to as there is enough interest.
This is my first post so please let me know if I goofed up anywhere, I'd also love any advice anyone has to give!
This is probably a 2/10 on the difficulty scale, if you're willing to change your oil you can more than likely do this.
****THIS SHOULD COST YOU LESS THAN $100, ****
first set I did cost me $52 and the second set was $58 for my buddy, next was $60 for another buddy (This includes both seats, all mounting hardware, and Tax)
PROS
-Super easy to install (It's a direct bolt up aside from 1 bolt if you don't correctly heighten the seat)
-The stock seat belt clip safely and securely works with the seats with no added work
-Very kind to the wallet
-The seats hold you in much better
-Seats are far more comfortable
-Seats are more adjustable than the stock cloths
-Easier to get into your rig (This is nice if you have it super lifted)
-Look professional
-You can run a harness with it (doesn't come with one though)
-Doesn't burn or freeze you like the leather ones do (This is a god send)
-More durable than the stock seats
-Great for people who are taller as it gives you room to choose your seat height
-Works with the stock under-seat heater
CONS
-You have to have a little bit of luck with finding a junkyard with the seats and then finding seats that are at least in decent shape (Patience and looking around will solve this)
-You have to drill 2 holes through your entire body
-Better than stock but not the best for people 300+ pounds as the seat doesn't have the width to "perfectly" hold huge people
-You have to buy new mounting hardware for 6/8 of the total mounts =~$15
-You add a larger zone of blindspot for when you're backing up
-If you don't line up the rails correctly, the rails bind up and don't smoothly slide back and forth
-Doesn't really save enough weight for it to be considered a performance mod
Tools Required:
-Drill with 3/8 drill bit (or a big screwdriver and a lot of hammering but I DONT recommend this)
-Hammer: I have had a lot of luck with a 4 pounder but anything works if you hit hard enough
-Basic sockets or wrenches
-Patience: with getting seats and lining the rails up before you put the seat in so it doesn't bind
-Big Sexy Muscles (or a second pair of hands to help you slightly bend/hold the seat in place for installing 2 bolts)
Hardware Required:
-Seats out of a 7th gen Toyota Celica (2000-2006)
-2 stock seat mounting bolts (believe it or not, this ones easy)
-2 1.5 inch stock mounting bolt threaded bolts
-2 3.5 inch stock mounting bolt threaded bolts
-2 4.5-5 inch 3/8 bolt (I recommend stainless for this one)
-4 3/8 nuts (or 2 3/8 lock nuts are a little better)
-8 3/8 hole by 1 inch diameter washers
- This is the fun one... you can either make pipe for spacers to level the seats or buy huge nuts that are $0.34/each at your local Lowes. I can find the exact measurements and amount of the giant nuts (I think its 18) you need to do this if there is enough interest.
THIS IS MEANT ONLY FOR FOLKS WHO ARE WILLING TO GO TO THE JUNKYARD
If you're a poor boy like me and have either leather seats or torn fabric seats (like my first rig that I swapped them in), then this is a very good way for you to get much nicer seats with paying around the same price you would for replacement seats in bad shape. Also please keep in mind that there is also a little bit of luck that plays into this as you have to find a junkyard with a certain car in a range of years.
I have swapped them in:
-96 SR5 fabric seats which was a direct bolt 3/4 of the mounts(both sides) Previous owner ruined 3 of the stock mounts and smashes a hole through one of them... This is something almost nobody will deal with, I've only ever seen this issue on my 96
-97 Limited leather seats with rear heater 3/4 direct bolt (both sides)
-99 SR5 with Leather seats, seat warmers, and rear heating 3/4 direct bolts (both sides)
-These should work in all 3rd gens (1996-2002) with the measuring I've done, but the seat mounts change a little bit between the years so if you want a good sturdy mount at the correct height, you're going to have to drill some holes.
Things to consider:
-Once you get your seats and mounting hardware it's only about an hour install if you don't know what you're doing. I can do it in around 15 minutes for both sides now that I know what I'm doing but make sure you take your time so it goes in correctly.
-You should be careful to unplug the electrical from your stock seat so that you don't ruin the plug, it really doesn't matter but there is potential is could save you future hassel.
-The seats are mechanical only, I don't find this to be a big deal but if you're an electrical only person, this pronbably isn't a good mod for you even though you will hardly ever be changing seat positions.
-You need to be careful installing them with the rear heater on the passenger side seat so as not to smash the heating vent that runs right next to the mount.
NOTE:
You can use nothing but stock mounting hardware as long as you have a hammer and don't mind the fact that you're only going to be using 3/4 mounts and it will be off camber, twisted, and way sunken down along with only being stable with moderate street driving and bounce like hell with offroading.
You don't have to buy a new seatbelt or anything as the stock seatbelt will clip safely into the new seat with nothing having to be done.
If anyone would like a more in depth guide on how to completely install them including pictures, I'd be happy to as there is enough interest.
This is my first post so please let me know if I goofed up anywhere, I'd also love any advice anyone has to give!
Attachments
-
 4Runner Better seats.jpg131.9 KB · Views: 2,220
 -
 travthepro-albums-how--s-picture48168-rail-alignment.jpg72.2 KB · Views: 1,265
 -
 travthepro-albums-how--s-picture48169-rear-inner-mount.jpg66.5 KB · Views: 1,275
 -
 travthepro-albums-how--s-picture48170-rear-outer-mount.jpg63.4 KB · Views: 1,279
 -
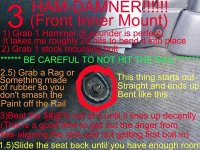 travthepro-albums-how--s-picture48171-front-inner-mount.jpg76 KB · Views: 1,232
 -
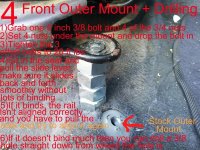 travthepro-albums-how--s-picture48172-front-outer-mount.jpg77.8 KB · Views: 1,257
 -
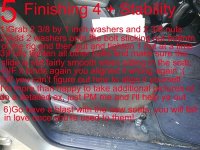 travthepro-albums-how--s-picture48173-finishing-seats.jpg74.2 KB · Views: 1,226
Last edited:


