tacticalcustoms
New member
I was sick of the hyper blink from the LED's I had installed. I have found a work around from searching the web and from experience. I went ahead and did this today and it works. pictures follow.
Dash with two bolts that are located on the bottom left and right. once these are off you will then pry the bottom dash away.
<img src="http://i92.photobucket.com/albums/l26/tacticalcustoms/4Runner/20130619_182715.jpg?t=1371924694">
Dash pulled away. now detach the center lock and A/C circuit switch
<img src="http://i92.photobucket.com/albums/l26/tacticalcustoms/4Runner/20130619_182939.jpg?t=1371924657">
Take the two bolts off that are holding this metal plate.
<img src="http://i92.photobucket.com/albums/l26/tacticalcustoms/4Runner/20130619_183119.jpg?t=1371924673">
Take the top left nut off the fuse panel
<img src="http://i92.photobucket.com/albums/l26/tacticalcustoms/4Runner/20130619_183049.jpg?t=1371924655">
Take the bottom two bolts off. this holds a bracket that supports the fuse panel
<img src="http://i92.photobucket.com/albums/l26/tacticalcustoms/4Runner/20130619_183057.jpg?t=1371924664">
Take the bottom right nut off the panel
<img src="http://i92.photobucket.com/albums/l26/tacticalcustoms/4Runner/20130619_183216.jpg?t=1371924682">
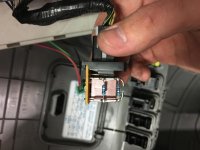
now the fuse panel will come down and give you access to the relay
<img src="http://i92.photobucket.com/albums/l26/tacticalcustoms/4Runner/20130619_183457.jpg?t=1371924444">
<img src="http://i92.photobucket.com/albums/l26/tacticalcustoms/4Runner/20130619_183451.jpg?t=1371924622">
<img src="http://i92.photobucket.com/albums/l26/tacticalcustoms/4Runner/20130619_183645.jpg?t=1371924620">
<img src="http://i92.photobucket.com/albums/l26/tacticalcustoms/4Runner/20130619_195340.jpg?t=1371924624">
relay cracked open and viewing from top
<img src="http://i92.photobucket.com/albums/l26/tacticalcustoms/4Runner/20130619_184425.jpg?t=1371924624">
Once the relay is open. Grab whatever tool you have available that can grind away the metal of the resistor on the relay. I used a Dremel with a sanding drum.
<img src="http://i92.photobucket.com/albums/l26/tacticalcustoms/4Runner/20130622_111149.jpg?t=1371924648">
I ground off about half of the resistor. I kept doing little by little and then testing this on the 4runner to see if the blinker had returned to normal. you must make sure the left and right blinker are functioning properly before reassembling the relay.
ground down resistor.
<img src="http://i92.photobucket.com/albums/l26/tacticalcustoms/4Runner/20130622_111138.jpg">
final product.
<img src="http://i92.photobucket.com/albums/l26/tacticalcustoms/4Runner/20130619_183744.jpg?t=1371924622">
Now reverse install and call it a day. And enjoy your non-hyper flash LEDS:rofl:
Dash with two bolts that are located on the bottom left and right. once these are off you will then pry the bottom dash away.
<img src="http://i92.photobucket.com/albums/l26/tacticalcustoms/4Runner/20130619_182715.jpg?t=1371924694">
Dash pulled away. now detach the center lock and A/C circuit switch
<img src="http://i92.photobucket.com/albums/l26/tacticalcustoms/4Runner/20130619_182939.jpg?t=1371924657">
Take the two bolts off that are holding this metal plate.
<img src="http://i92.photobucket.com/albums/l26/tacticalcustoms/4Runner/20130619_183119.jpg?t=1371924673">
Take the top left nut off the fuse panel
<img src="http://i92.photobucket.com/albums/l26/tacticalcustoms/4Runner/20130619_183049.jpg?t=1371924655">
Take the bottom two bolts off. this holds a bracket that supports the fuse panel
<img src="http://i92.photobucket.com/albums/l26/tacticalcustoms/4Runner/20130619_183057.jpg?t=1371924664">
Take the bottom right nut off the panel
<img src="http://i92.photobucket.com/albums/l26/tacticalcustoms/4Runner/20130619_183216.jpg?t=1371924682">
now the fuse panel will come down and give you access to the relay
<img src="http://i92.photobucket.com/albums/l26/tacticalcustoms/4Runner/20130619_183457.jpg?t=1371924444">
<img src="http://i92.photobucket.com/albums/l26/tacticalcustoms/4Runner/20130619_183451.jpg?t=1371924622">
<img src="http://i92.photobucket.com/albums/l26/tacticalcustoms/4Runner/20130619_183645.jpg?t=1371924620">
<img src="http://i92.photobucket.com/albums/l26/tacticalcustoms/4Runner/20130619_195340.jpg?t=1371924624">
relay cracked open and viewing from top
<img src="http://i92.photobucket.com/albums/l26/tacticalcustoms/4Runner/20130619_184425.jpg?t=1371924624">
Once the relay is open. Grab whatever tool you have available that can grind away the metal of the resistor on the relay. I used a Dremel with a sanding drum.
<img src="http://i92.photobucket.com/albums/l26/tacticalcustoms/4Runner/20130622_111149.jpg?t=1371924648">
I ground off about half of the resistor. I kept doing little by little and then testing this on the 4runner to see if the blinker had returned to normal. you must make sure the left and right blinker are functioning properly before reassembling the relay.
ground down resistor.
<img src="http://i92.photobucket.com/albums/l26/tacticalcustoms/4Runner/20130622_111138.jpg">
final product.
<img src="http://i92.photobucket.com/albums/l26/tacticalcustoms/4Runner/20130619_183744.jpg?t=1371924622">
Now reverse install and call it a day. And enjoy your non-hyper flash LEDS:rofl:
Last edited: