
A few months back I was looking for storage solution and was inspired by this post and this picture:
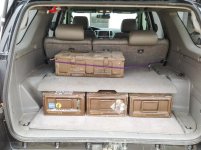
By the way, a big thank you to our friend "Swapmeet" for the inspiration, as he was the that started it all. I haven't contributed much to the forum yet so I hope this is a good start.
Goal: Store stuff in the back, under the shelf.
Solution: 81mm ammo boxes, 3 of them.
![1342[1].gif81 fuse prri.gif](https://www.toyota-4runner.org/data/attachments/183/183498-f23983f2a46ec828f035ceeec5048784.jpg?hash=Y_6FA3agfG "1342[1].gif81 fuse prri.gif")
Sourcing: The boxes are available online from surplus stores and are not too hard to find. They are similarly priced, but the issue is shipping very expensive. They are large and heavy which is no bueno. I shopped around a bunch and got lucky to find a place that had $25 freight, which is fantastic considering the dimensional and actual weight. Whomever you buy from, ask for the best ones they have.
Dry Run: I drove around with these as a test, and within about 5 minutes, the clanging of the handles and things inside drove me absolutely insane. So something had to be done, fast. They were noisy, whether empty or full.
Preparation: The boxes came with large foam chunks glued down to the box to keep the munitions from, you know, exploding. The adhesive was very strong and extremely difficult to remove. After experimenting with 4 or 5 methods, I settled on a hand-saw which worked great. Sanded off labels and stickers. Sanding off the foam adhesive was absolutely awful and it chewed up 80 grit sandpaper, even on a Porter Cable 7336 random orbit sander. Don't kid yourself, you will need a power sander for this part. Some of the foam blocks were loose, so I'll use those in the boxes.
The flip latches, box lid and corners were a little bent, so I had to do some light prep work on those to make everything mate up nicely. Be sure to do this before you paint.
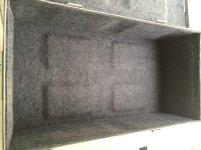
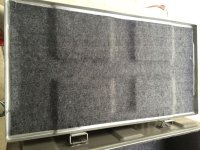
Lining: I used 4.7mm thick synthetic felt, which is about .20" thick. It's thick enough to silence everything, yet pliable enough to form to all of the contours. Natural wool industrial felt was nearly triple the cost of the synthetic, so forget that. The synthetic material was surprisingly hard to find.
I measured and cut each piece for the lid, bottom and sides. For the piece inside the lid, leave about 3/4" space around the edges so it closes easily. I sprayed the glue on the inside of the boxes, working 1 piece at a time, spraying the back of the fabric and the box. It was easier to put the bottom in first, mask it off with tape, and then do 1 side at a time. I used a plastic putty knife to contour the felt to the box.
Inside box:
Top lid:
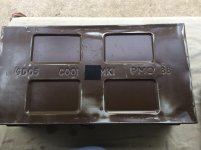
Coloring: Powder coating was my first choice for durability but pricing was high. I had 3 quotes all around $200, so forget that. I rattle can sprayed them with 3 coats each. Not the most durable, but it works decent. I didn't spray the inside since it would be covered with felt, or the bottom since they wouldn't be seen. I went with gloss grey to match interior.
Fastening: I used heavy duty Velcro to fasten them to the carpet, so they wouldn't slide around. I had some left over from other projects. I removed the liner floor mat because the Velcro wouldn't hook up to it. I tested with several sizes and placement. The Velcro was so strong that if you put it on the sides or ends, it is impossible to pull them out without lifting the shelf. Plus, you only need a small amount or you will pull up the carpet. After much trial, I used a 2x2 inch square in the middle of the box. The boxes haven't moved an inch, either empty or fully loaded. To keep the handles from rattling, I cut small pieces of Velcro at 1/4" x 2" and put one on each end.
Bottom:
Handles:
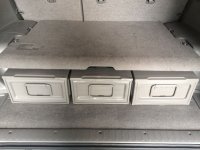
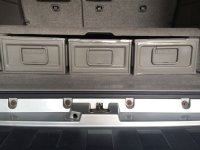
Summary: I absolutely love these and couldn't be happier. They fit perfectly and blend in nicely. They are literally built for combat, so they should be just fine for daily life and regular trail usage. The only thing I would do differently would be to powder coat them but that would about double the project cost.
Finished product:
Materials List & sources:
Boxes: 81MM Ammo Boxes, General Jim's in Clare MI. You need 3.
Felt: 4.7mm synthetic felt, Mood Fabrics in NYC. You need 4 yards.
Glue: Loctite Professional Performance Spray Adhesive. You need almost 3 full cans.
Paint: Valspar Project Perfect Rugged Suede, Lowe's. You need 6 cans total.
Velcro: Anywhere you can find it. You need about 6 square inches.
Sandpaper: 60 grit. Varies by your tool size.
Project Costs:
Boxes: $100
Felt: $80
Glue: $30
Paint: $25
Velcro: $5
Sandpaper: $10
-----------------
Total: $250
I hope you enjoyed this and hope it helps some of you.
- FAFAFOOEY
By the way, a big thank you to our friend "Swapmeet" for the inspiration, as he was the that started it all. I haven't contributed much to the forum yet so I hope this is a good start.
Goal: Store stuff in the back, under the shelf.
Solution: 81mm ammo boxes, 3 of them.
Sourcing: The boxes are available online from surplus stores and are not too hard to find. They are similarly priced, but the issue is shipping very expensive. They are large and heavy which is no bueno. I shopped around a bunch and got lucky to find a place that had $25 freight, which is fantastic considering the dimensional and actual weight. Whomever you buy from, ask for the best ones they have.
Dry Run: I drove around with these as a test, and within about 5 minutes, the clanging of the handles and things inside drove me absolutely insane. So something had to be done, fast. They were noisy, whether empty or full.
Preparation: The boxes came with large foam chunks glued down to the box to keep the munitions from, you know, exploding. The adhesive was very strong and extremely difficult to remove. After experimenting with 4 or 5 methods, I settled on a hand-saw which worked great. Sanded off labels and stickers. Sanding off the foam adhesive was absolutely awful and it chewed up 80 grit sandpaper, even on a Porter Cable 7336 random orbit sander. Don't kid yourself, you will need a power sander for this part. Some of the foam blocks were loose, so I'll use those in the boxes.
The flip latches, box lid and corners were a little bent, so I had to do some light prep work on those to make everything mate up nicely. Be sure to do this before you paint.
Lining: I used 4.7mm thick synthetic felt, which is about .20" thick. It's thick enough to silence everything, yet pliable enough to form to all of the contours. Natural wool industrial felt was nearly triple the cost of the synthetic, so forget that. The synthetic material was surprisingly hard to find.
I measured and cut each piece for the lid, bottom and sides. For the piece inside the lid, leave about 3/4" space around the edges so it closes easily. I sprayed the glue on the inside of the boxes, working 1 piece at a time, spraying the back of the fabric and the box. It was easier to put the bottom in first, mask it off with tape, and then do 1 side at a time. I used a plastic putty knife to contour the felt to the box.
Inside box:
Top lid:
Coloring: Powder coating was my first choice for durability but pricing was high. I had 3 quotes all around $200, so forget that. I rattle can sprayed them with 3 coats each. Not the most durable, but it works decent. I didn't spray the inside since it would be covered with felt, or the bottom since they wouldn't be seen. I went with gloss grey to match interior.
Fastening: I used heavy duty Velcro to fasten them to the carpet, so they wouldn't slide around. I had some left over from other projects. I removed the liner floor mat because the Velcro wouldn't hook up to it. I tested with several sizes and placement. The Velcro was so strong that if you put it on the sides or ends, it is impossible to pull them out without lifting the shelf. Plus, you only need a small amount or you will pull up the carpet. After much trial, I used a 2x2 inch square in the middle of the box. The boxes haven't moved an inch, either empty or fully loaded. To keep the handles from rattling, I cut small pieces of Velcro at 1/4" x 2" and put one on each end.
Bottom:
Handles:
Summary: I absolutely love these and couldn't be happier. They fit perfectly and blend in nicely. They are literally built for combat, so they should be just fine for daily life and regular trail usage. The only thing I would do differently would be to powder coat them but that would about double the project cost.
Finished product:
Materials List & sources:
Boxes: 81MM Ammo Boxes, General Jim's in Clare MI. You need 3.
Felt: 4.7mm synthetic felt, Mood Fabrics in NYC. You need 4 yards.
Glue: Loctite Professional Performance Spray Adhesive. You need almost 3 full cans.
Paint: Valspar Project Perfect Rugged Suede, Lowe's. You need 6 cans total.
Velcro: Anywhere you can find it. You need about 6 square inches.
Sandpaper: 60 grit. Varies by your tool size.
Project Costs:
Boxes: $100
Felt: $80
Glue: $30
Paint: $25
Velcro: $5
Sandpaper: $10
-----------------
Total: $250
I hope you enjoyed this and hope it helps some of you.
- FAFAFOOEY






![1342[1].gif81 fuse prri.gif](/data/attachments/183/183498-f23983f2a46ec828f035ceeec5048784.jpg?hash=Y_6FA3agfG)



