Robb235
Senior Member
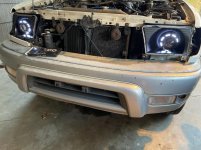
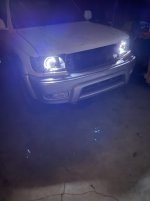
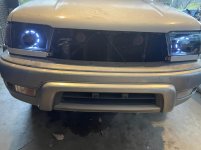
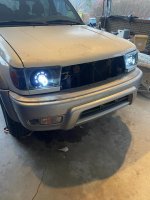
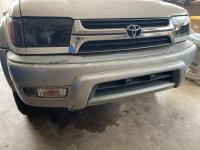
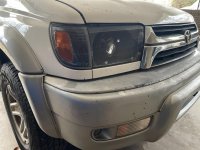
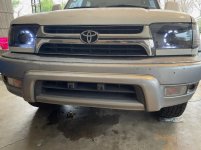
I've owned my '99 4Runner since October of 2012, and the headlights have always been a part of this vehicle that seemed to underperform. In 2018, my my 4Runner was retired from daily driving duties, but I still keep it around. Now it's more of a camping vehicle that mainly sits next to my house, pulls my boat in the summer time, and occasionally pulls my little utility trailer whenever I need to haul something.
The past few months I've been on a bit of kick to restore and bring this thing into the 21st century, including adding a backup camera, reupholstering my front seats, replacing my rear axle bearings and seals, etc. Now it's on to the headlights. Since this isn't my daily driver anymore, I couldn't really justify spending the big bucks on a complete retrofitted headlight assembly, or the more expensive kits from vendors like The Retrofit Source. So I pieced together some of the cheaper...errr.... less expensive parts, mostly from Amazon. Parts list is below:
Parts List
'99+ Headlights $45.50 (Local Junkyard)
H4 Retrofit Projectors $30.58 YUFANYA 2.5"Mini Projector Lens
Cheap LED H1 Headlight Bulbs $14.65 360 H1 Led Canbus Car Headlights Bulbs (will replace with something better once they burn out)
Shrouds $34.69 Morimoto Apollo 3.0 Shrouds: (Black)
Rear Halos $23.35 Qasim 1-Pair 100MM White+Amber Switchback 132SMD 4014 LED Halo Ring Angel Eyes DRL Warning Lights 12V
Harness to control hi/low beams $10.91 Innovited HID Replacement Bi Xenon Relay Wiring Harness Hi Lo - H4 9003 HB2
Pigtail to adapt HID harness to LED headlights $8.73 HUIQIAODS H1 H3 Headlight Fog Light Bulb Extension Socket Wire Harness Connector Holder(Pack of 2)
Headlight Glue $13.10 ZXMOTO 13Ft Headlight Sealant Retrofit Refit Butyl Rope Rubber Glue
Foil Tape $6.54 1PCS Premium Silver Aluminum Tape, Foil Tape (2"x65 Feet,3.9mil)
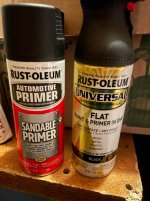
Black Primer $10.48 Rust-Oleum Automotive Flat Black Automotive Sandable Primer Spray
Satin Black Paint (not flat black shown in picture) $16.38 Rust-Oleum Universal Satin Black Spray Paint
Total = $214.91
There's already a few YouTube videos out there describing how to retrofit these headlights, so I'm not going to get into the nitty gritty details of the retrofit. Instead, I'll just point out a few things I did along the way that could hopefully be helpful to someone else considering doing a retrofit.
I started out picking up a set of '99+ headlights from a junkyard. I could have used my '99 headlights already on my vehicle, except that one of my lenses had a small hole in it, almost like a kid had shot it with a bb gun at some point before I owned it.
I heated the headlight assemblies in the oven at 270°F for 10 minutes. Be sure to where something like Mechanix gloves when handling the headlights, because they will be hot when they come out of the oven. I pried my lenses off with a butter knife. Be very careful when prying the lenses off, as you can chip the glass very easily. I first practiced on my headlight that had the hole in the lens, and found out how easy it is to chip the glass. So use care, and start at a corner and slowly work your way around the headlight. Go slow and use care. Put the headlight back in the oven for a few minutes if the glue starts to harden back up on you.
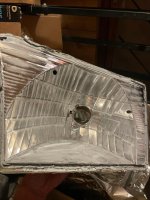
When separating the lens from the assembly, it's easy to get the factory headlight glue everywhere. Even though I was careful, I still managed to get the grey glue onto the lenses. After wasting time trying to use cleaning chemicals and scrubbing, I finally just put both lenses into my dish washer on the hottest water setting, plus steam cycle, and they came out very clean. As you can see in the picture below, I managed to get some of the glue on the reflector housing as well. No biggie because that's going to get sanded.
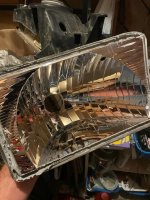
I sanded the chrome reflector inside the headlight with something like 150 grit sandpaper. Just enough to scuff it up and give the primer something to adhere to. After sanding, I flushed the assembly with water in the sink, and wiped it down with Windex.
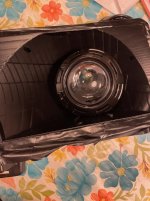
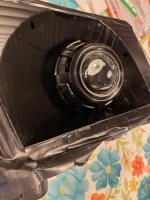
Next I taped off the "valley" of the headlights where the lens glue sits. Then I used the primer and paint pictured below to black out the headlights. Note that the picture shows Flat Black. I was advised by Matthew Berman with SRQ that a Satin finish would look better. So I swapped the Flat Black shown below with Satin Black instead.
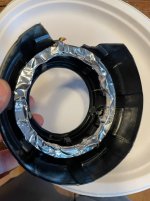
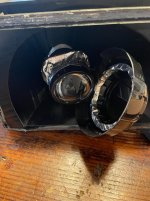
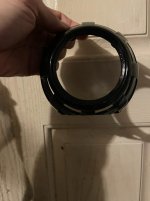
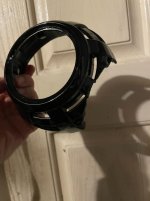
I didn't use the black shrouds that came with my Amazon retrofit projectors. Because the 4Runner headlight housings are so large, I decided to fill some of that space with larger shrouds. I opted for the Morimoto Apollo 3.0 shrouds. The problem with larger shrouds is that they will conflict with the bottom of the headlight housing. I solved this by trimming the bottom of the shroud off with a miter saw. Cut the bottom of the shroud flat, so that is lays flush with the bottom of the headlight housing.
Next I installed the projectors into the headlights using the supplied hardware. I didn't take any pictures of this part, so look at some YouTube videos for more info on how to put the projectors in. I opted to install halo rings inside the Apollo 3.0 shrouds. I didn't document this part of the install either. I simply centered the halos inside the shroud, and tacked it together with some JB Weld, and let it sit over night. The Apollo 3.0 shrouds simply slide into the projectors.
The past few months I've been on a bit of kick to restore and bring this thing into the 21st century, including adding a backup camera, reupholstering my front seats, replacing my rear axle bearings and seals, etc. Now it's on to the headlights. Since this isn't my daily driver anymore, I couldn't really justify spending the big bucks on a complete retrofitted headlight assembly, or the more expensive kits from vendors like The Retrofit Source. So I pieced together some of the cheaper...errr.... less expensive parts, mostly from Amazon. Parts list is below:
Parts List
'99+ Headlights $45.50 (Local Junkyard)
H4 Retrofit Projectors $30.58 YUFANYA 2.5"Mini Projector Lens
Cheap LED H1 Headlight Bulbs $14.65 360 H1 Led Canbus Car Headlights Bulbs (will replace with something better once they burn out)
Shrouds $34.69 Morimoto Apollo 3.0 Shrouds: (Black)
Rear Halos $23.35 Qasim 1-Pair 100MM White+Amber Switchback 132SMD 4014 LED Halo Ring Angel Eyes DRL Warning Lights 12V
Harness to control hi/low beams $10.91 Innovited HID Replacement Bi Xenon Relay Wiring Harness Hi Lo - H4 9003 HB2
Pigtail to adapt HID harness to LED headlights $8.73 HUIQIAODS H1 H3 Headlight Fog Light Bulb Extension Socket Wire Harness Connector Holder(Pack of 2)
Headlight Glue $13.10 ZXMOTO 13Ft Headlight Sealant Retrofit Refit Butyl Rope Rubber Glue
Foil Tape $6.54 1PCS Premium Silver Aluminum Tape, Foil Tape (2"x65 Feet,3.9mil)
Black Primer $10.48 Rust-Oleum Automotive Flat Black Automotive Sandable Primer Spray
Satin Black Paint (not flat black shown in picture) $16.38 Rust-Oleum Universal Satin Black Spray Paint
Total = $214.91
There's already a few YouTube videos out there describing how to retrofit these headlights, so I'm not going to get into the nitty gritty details of the retrofit. Instead, I'll just point out a few things I did along the way that could hopefully be helpful to someone else considering doing a retrofit.
I started out picking up a set of '99+ headlights from a junkyard. I could have used my '99 headlights already on my vehicle, except that one of my lenses had a small hole in it, almost like a kid had shot it with a bb gun at some point before I owned it.
I heated the headlight assemblies in the oven at 270°F for 10 minutes. Be sure to where something like Mechanix gloves when handling the headlights, because they will be hot when they come out of the oven. I pried my lenses off with a butter knife. Be very careful when prying the lenses off, as you can chip the glass very easily. I first practiced on my headlight that had the hole in the lens, and found out how easy it is to chip the glass. So use care, and start at a corner and slowly work your way around the headlight. Go slow and use care. Put the headlight back in the oven for a few minutes if the glue starts to harden back up on you.
When separating the lens from the assembly, it's easy to get the factory headlight glue everywhere. Even though I was careful, I still managed to get the grey glue onto the lenses. After wasting time trying to use cleaning chemicals and scrubbing, I finally just put both lenses into my dish washer on the hottest water setting, plus steam cycle, and they came out very clean. As you can see in the picture below, I managed to get some of the glue on the reflector housing as well. No biggie because that's going to get sanded.
I sanded the chrome reflector inside the headlight with something like 150 grit sandpaper. Just enough to scuff it up and give the primer something to adhere to. After sanding, I flushed the assembly with water in the sink, and wiped it down with Windex.
Next I taped off the "valley" of the headlights where the lens glue sits. Then I used the primer and paint pictured below to black out the headlights. Note that the picture shows Flat Black. I was advised by Matthew Berman with SRQ that a Satin finish would look better. So I swapped the Flat Black shown below with Satin Black instead.
I didn't use the black shrouds that came with my Amazon retrofit projectors. Because the 4Runner headlight housings are so large, I decided to fill some of that space with larger shrouds. I opted for the Morimoto Apollo 3.0 shrouds. The problem with larger shrouds is that they will conflict with the bottom of the headlight housing. I solved this by trimming the bottom of the shroud off with a miter saw. Cut the bottom of the shroud flat, so that is lays flush with the bottom of the headlight housing.
Next I installed the projectors into the headlights using the supplied hardware. I didn't take any pictures of this part, so look at some YouTube videos for more info on how to put the projectors in. I opted to install halo rings inside the Apollo 3.0 shrouds. I didn't document this part of the install either. I simply centered the halos inside the shroud, and tacked it together with some JB Weld, and let it sit over night. The Apollo 3.0 shrouds simply slide into the projectors.
Attachments
-
 6D353938-F4FD-4D87-8801-D3C176663658.jpg136.2 KB · Views: 3,012
 -
 B0DA64CC-2479-4986-9D88-60EB1CB0611A.jpg131.3 KB · Views: 2,953
 -
 A4ADDEEC-DA80-4138-8F4F-484C16F4DF67.jpg125 KB · Views: 2,931
 -
 242B2B56-0D60-4761-889C-A6B22D7CEDCD.jpg77.3 KB · Views: 2,908
 -
 25A620F3-FD48-47A9-B0E1-71440C662159.jpg76.4 KB · Views: 2,962
 -
 77BEFA3A-A800-45F1-B325-E5D33C6C88CA.jpg129.5 KB · Views: 2,955
 -
 3540C7CA-A5A0-415B-A67B-4DB2DD948161.jpg126.7 KB · Views: 2,891
Last edited: