Do I need a valve job while heads are being machined

uncapj

New member
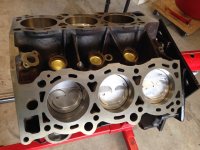
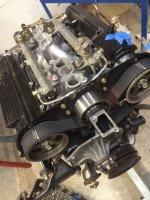
Im gunna go ahead and make myself at home thanks for the kindness.About a month ago I bought a 95 4runner from a coworker with blown headgaskets. As a tech I do a lot of head Jobs. This one's a little different

I really don't want to do a valve adjustment if I don't need to. i know it's a pita the trucks only got 130k on it so should I let the machine shop up sell me a valve job or not.
 
Register to hide this ad
Since you're a Tech, and you seem to want advice, I would suggest learning how to service a cylinder head yourself.
 
do your gap work

just did a careful gap set up;
Not that bad at all, as long as the belt is off ;
With the belt off, the cams are easy to remove.
With the cams off, swapping of shims is easy to do, you just need a stock of correct shims.
With my attention you can have a set of good shims cheap.

I tried to do a light-spring set up while head was still on the bench, but got only soso results, I think the light springs not enough to force the cam in true running position, some non-repeating results .

I did my final set up after installing heads, turning cam with a wrench, had to change a few shims compared to the light spring set up, but then again I was being very picky.

I say its a much easier than expected to gap WITHOUT the belt, since I could just pop the cam off to move the shims around. Clean them, set it up dry ( no oil) and you can just lift buckets and or shims out once the cam is out of the way. put a little builder lube everywhere ONLY AFTER you are done.

If the belt is installed, it is a MAJOR b***h to pull out a shim for swap. I would rather take off the belt than try to pull even one shim ( I dont have the valve compression tool but thats only one problem ... they are STUCK in there when wet) but you have it down already , eh ?

Just make a table of what shims thickness are where when you do first build, install the cam ( dont have to ruin the threads torqing it down, just come close, the torque spec isnt that much), check the gaps, see if you can swap any shims around, the obtain the ones you need.

It most definitely WILL need gaps set after valve work, as that will change the pocket depth, changes the stem tip height, changes the wait for it ... GAP

Would you expect a conventional OHV threaded adjustor motor to be ready with out any set up ?

But if you were just asking should you or a shop; I considered it easy work and enjoyable experience. WITHOUT THE BELT. Did I mention that?


I happen to have a couple heads worth of good useable shims, its get old buying new ones for 7 to 18 each, I only bothered with new since i have new cams too. The old shims are just fine for a used cam, the wear is minimal with this bucket in cylinder design. pm me if you need a supply reasonable,

 

Attachments

  • jugs.jpg
    jugs.jpg
    56.9 KB · Views: 289
  • topless.jpg
    topless.jpg
    64.9 KB · Views: 257
Last edited:
Thanks gtgt bangbang and foot of God for the advice when I get the heads back I'll probably pm for the shims

02se since I lack a machine shop I know seems impossible for a tech, I wouldn't be able to cut my heads myself. just cause I'm a tech doesn't mean I have infinite knowledge of all vehicles so if you have nothing nice to say don't say nothing at all. I'm not here to make enemies just the opposite I'm looking for people who share the same interests
 
well they are here - if you are not pressed for time, then a) know what shims you have in there & where, b) snug cam in & check gaps ( might want to plastigage the cam oil clearance too, if you have not started on the heads). I like those angled feelers but flat ones work too. c) check if you can swap around your present supply d) let me know, I have a couple dozen in a nice distribution in the common range from .103 to .113", no bad ones. If you are pressed for time, buy the lot and trade off the remainders.

I'd seen some reasonable advice elsewhere to set up the gaps at high spec on the hotter cylinders, which seem to be 5 & 6, to head off any heat soaked floaters.

spec was 7~11 IN 9~13 EX. You'd normally like mid point or LOWER (smaller gaps = higher lift = more GoFLow) but heat problem are more important

I did just a little extra heat shielding on the manifolds and cross over - much much less that a full wrap, and only right at the tightest passes between head & exhaust. I'll finish up some pix on another thread soon.

I would not go all out in porting these heads but mine had a lot of mold flash/core mismatch that was easily removed just to take out some of the obstructions & discontinuities in the otherwise pretty decent air path. Seemed like a lot of low hanging fruit in there.

My upper manifold was lousy with crust from the EGR ... its impossible to reach into the secondary passages , I used paint remover to clean the main entrance, but maybe a dip in the hot tank is warranted to keep all that gunk out you new fangled motor. I didnt do that since the guy around with the paint stripper tank (furniture restorer) started charging too much for motor parts.

When placing the lower manifold back in between the heads (before torquing but WITH the gaskets in place, they affect the seating height) look down the passages for any misalignment, bump the manifold around to minimize or distribute the mismatch for a more uniformly breathing motor. The lower manif-to-intake port match up was pretty damn good in my castings ( new odessa heads from a couple years ago and OE block was decked 004 or so), but there was none the less a little shift available in exact manifold placement, which got rid of some of those ugly cresents
 
Last edited:
good info on the valves I had read that the #6 exhaust valve will burn if you don't set it a little on the loose side within the tolerance. And I was gunna do the same thing with the cross over and driver exhaust manifold to try to cool things down i did buy an oem head gaskets and arp head studs. I'm not in a rush right now since I have another car and a bike but it's more or less a car a picked up for my parents since they only have 1 car and 2 places they need to go and they don't like to drive my bug and I can't trust my pops with my bike he's a bit of a show off
 
what do you think of the OE head gasket ? I dont recall much of note with the old one I havent seen for awhile anyway. put a close up pic of some interesting part of it
 
I just did the heads on my '89....what has been everyone's experience with those stupid torque to yield head bolts? I bought the Moroso brand ones...one of the bolts did not feel right on the first 90 degree turn after the initial 33 ft lbs of torque. Then on the second 90 turn it definitely did not torque right. Seems the bolt stretched. Had to undo all the bolts and go buy another set. Now I'm worried the head gasket is compromised from being torqued- released then re-torqued. Thoughts?

I think the head studs would solve MANY blown head gaskets. Add headers to get rid of the crossover pipe and the 3.0 MIGHT actually become a solid motor.
 
'torque to yield" implies stretch, thats what the word yield technically means ... I agree there is could be some weird, yielding feeling to torquing one or two, but at some point you just have to accept new parts as being capable or you will never get done. Torque to yield may seem strange but it's actually a superior way to clamp a part (measuring rod bolts before-and-after for instance), compared to torque wrenches with all their variables and errors.

Toyota FSM admits reuse of head bolts is acceptable with advice to replace if any " dont torque or fail " or somesuch whatever that means. The head , rod and crank bolts on this motor are all TTY, by the way.

I installed some Idontremebers, probably what rock auto was offering with a decent name on them, then I actually had to pull the heads this recent build (dont ask) , did not want to reuse the once-torqued bolts because I have zero room for mishaps, and I installed new felpro the second time.


Don't head studs typically require machining larger bolt passages in the head? Not sure if there is clearance here.

If you are confident the heads did not move (keep a couple bolt snug but not tight at all times, all the time while you do the swap) personally I think you'll be okay. If new gaskets will let you sleep at night and the wallet is okay, then by all means... I saw nothing in the probably cheaper fel pro head gaskets that bothered me.

When I pulled my new Fel-Pro gaskets, there had been nonuniform transfer of the Teflon top layer to the head, about 15 to 20% of the surface area. I could see tiny small marks, made by the gasket metal core, in the head. The block face of the head gasket looks like graphite and did not at all transfer to the iron.
 
Last edited:
Thanks for the reply...I understand gtgt_bangbang that the bolts are intended to stretch but the stretch seemed sudden on the one bolt. All bolts seemed to be taking torque as I would expect but the one got easier to turn on the second to last pass then very easy to turn on the final pass. Being it is a motor known for head gasket issues the red flag went up! To confirm my suspicion it was a problem as I was loosening all the bolts to replace them that bolt turned about an eighth of a turn then was completely loose as all the others loosened up gradually. I did have one bolt on the other head that seemed to get easier to turn on the second to last pass but tightened up and felt ok on the final pass. I may just be a little paranoid but can you blame me....who wants to do that PIA head gasket twice!
Thanks for your input! I was just curious if any others have had any funkiness when torquing the head bolts. Looking for some reassurance that all my work was not in vain!
 
I know what you mean dude, about that let up in the last few degrees of torquing, and the worst part is; just how do you know if something went wrong, except by that feel ??

I could measure the neck down in my OE bolts (a few thou narrower, just above the threaded-into-block section, no idea how often they have been re-torqued, and I have not measured my second set discarded).

Honestly it would be hard for me to feel too paranoid about anything during the first 90° turn, because if it's failing there, it what hopefully snap like a fresh cracker on the final 90. I do think I felt a bolt or two yielding excessively during the last few degrees but only time will tell. Good luck on the ride.
 

Members online

Forum statistics

Threads
278,316
Messages
3,554,121
Members
248,016
Latest member
Advally Service

Trending content

Back
Top