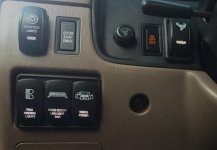
Everyone, Please Post Your Switch Banks.

i really love how creative everyone has been and really like the clean look of [MENTION=135677]michaeljtomey[/MENTION] 's rear view mirror creation.

but i am a sucker for OEM type looks. and [MENTION=74071]Brilliant[/MENTION] 's OEM switch mod in the center arm rest console is awesome. so, with the help of [MENTION=133963]GGFerrier[/MENTION] we bring to you: OEM look switch panels & OEM switches. now, i don't know who was the first to do this but i first noticed it on [MENTION=74071]Brilliant[/MENTION] 's .

i have a plan to re-locate my HAZARD switch, just have to tie in longer wire. Any thoughts regarding the different switch [MENTION=10169]TheDurk[/MENTION]
.

Uhh, any details on the other switch? The stock hazard switch is a complicated beast; I'm not sure any generic switch would do the job unless it was specific for the application. It's not just a DPDT or similar, it's three switches ganged and they are not simple forms.
 
I would if I could, but I no longer have access to rapid prototype machines. :(

That sucks... by chance to you have access to SLOW prototype machines? Really though, main question I have is how did it mount? I went through your whole build thread and didn't see that section (with your 10 switch or your 12). Is it screwed in place under the trim or what?

Thanks man!!!
 
Can you share the 3D files? :-)

I have sold the file to others who wanted to make their own, so yes, I can sell it again.

That sucks... by chance to you have access to SLOW prototype machines? Really though, main question I have is how did it mount? I went through your whole build thread and didn't see that section (with your 10 switch or your 12). Is it screwed in place under the trim or what?

Thanks man!!!

Yeah, I didn't do a very good job of explaining how it mounted. Originally I planned on just using double stick tape to stick it to the center console. This worked for a while, but the top of the switch housing started to sag under the weight of all the switches and wires. I had to epoxy a small L-shaped bracket to the inside top of the housing. I also cut a small slit in the top center of the center console. The L-bracket catches in the slit and holds the housing tight at the top now. There are no screws.

Warning: This setup is not for the faint of heart. It requires extensive modifications to the center console trim piece. Many holes need to be cut in it for wires.

Let me know if you have any more questions.
 
Warning: This setup is not for the faint of heart. It requires extensive modifications to the center console trim piece. Many holes need to be cut in it for wires.

Let me know if you have any more questions.


Many Thanks. As for the holes... Apparently you haven't seen my trim piece. LOL I need a new one, or some major repair work around the stereo. So I have no issues in cutting more holes into it.
 
Similar to Brilliant and infamousRNR with the speedo bezel switch mod...all OTRATTW switches.
 

Attachments

  • image.jpg
    image.jpg
    136.4 KB · Views: 2,435
Since nobody posted an installed pic of the Paranoid Fab single DIN panel, here's mine... ( yes, the one with the light out is making my OCD incredibly irritated, grrrrrrr )

It's a pretty simple thing, but much prettier than I would probably make by hand, and for $20 it's probably cheaper than the time I would have put into a custom one. Came bare aluminum, with hardware and a piece of candy to keep the mouth busy during install :baby:

ac0d9ff93e0227be9ef09c30268cfad0.jpg


Sent from my SM-G920V using Tapatalk

 
Last edited:
Here's my switch panel. It's custom, one one else has this, super easy to install, it's also fun fumbling around with the switches trying to find the one I need.
81f88968c2d6103ee1a1308cef98ebaf.jpg


Sent from my SM-N910V using Tapatalk
 
Since nobody posted an installed pic of the Paranoid Fab single DIN panel, here's mine... ( yes, the one with the light out is making my OCD incredibly irritated, grrrrrrr )

It's a pretty simple thing, but much prettier than I would probably make by hand, and for $20 it's probably cheaper than the time I would have put into a custom one. Came bare aluminum, with hardware and a piece of candy to keep the mouth busy during install :baby:

ac0d9ff93e0227be9ef09c30268cfad0.jpg


Sent from my SM-G920V using Tapatalk

I did. Right above your original post lol
 
Finally have my switch panel ready to go in. I still have to get the locker installed before I make that switch hot.


Members online

Forum statistics

Threads
278,310
Messages
3,554,079
Members
248,016
Latest member
Advally Service

Trending content

Back
Top