fargo4x4
New member
So i guess i figured i should start a build thread so here goes nothing.
2014 Toyota 4Runner SR5 Premium 4x4
Fargo is my wifes daily driver.
Suspension, Tires and wheels
Front: Dobinsons 3" Lift Mid Travel Coil Overs w/Total Chaos Upper Control Arms, Timbren Industries Bumpstops
Rear: Dobinsons Long Travel Rear Coils HD & Dobinsons Long Travel Shocks, Total Chaos Rear Link Skids, Total Chaos Complete Adjustable Rear Link Kit, Timbren Industries Bumpstops
Wheels: Firestone MT2 295/70/17 & 17" Black Rhino Barstows
Spidertrax 1.25 spacers
ENGINE
Stock with k&n filter
Blue Sea Systems e-Series Dual Circuit Plus Battery Switch Isolator
Blue Sea Systems SI-ACR Automatc Charging Relay - 12/24V DC / 120A (detects when primary battery is full and bypasses the isolator to charge secondary battery until its full.)
Armor
C4 Fabrication Front Lo Pro Winch Bumper
C4 Fabrication Rock Sliders
C4 Fabrication Fuel Tank Skid
C4 Fabrication Rear Diff Skid
ARB Full Length Skids
C4 Fabrication Rear Bumper
Lighting
38" Extreme LED Amber/White Combo LED Light Bar w/Dual Control Functionality
30" Extreme Single Row LED Bar LED Light Bar
Accessories
Cquence Brake Rotors
ARB Rear Diff Breather
Amber LED markers installed in the front grill
Flowmaster 40 Series Muffler
Weather Tech Floor Mats
Uniden PRO520XL 40-Channel CB Radio
8 Watt PA Speaker
Dual Chrome Trumpet Air Horn with Dual Heavy Duty 12v Compressors
Full Interior Bulbs Swap to LED's
Frontrunner Rack
Tints
Tram UHF/VHF Door Mount Antenna
CanvasBack Trunk Covers
Bully Brake Light Hitch Step
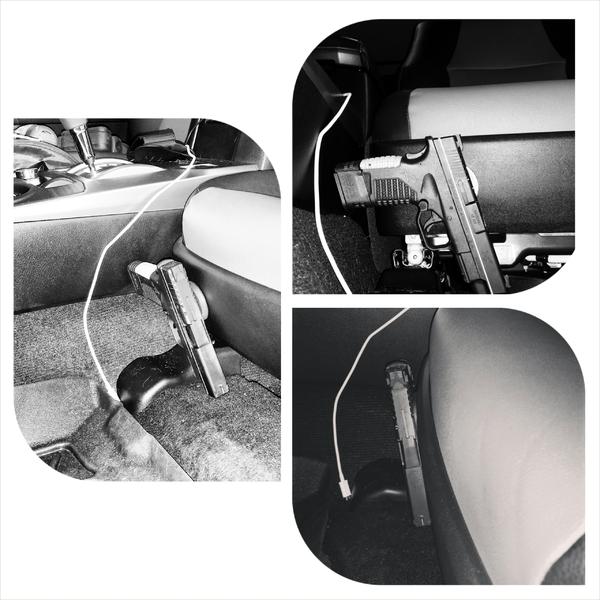
DIY Magnet Handgun Seat Mount
Fire Extinguisher
Little 20 watt solar panel & Renogy charge controller
Dometic CFX 40l
Hi-Lift Jack
Multiple Additional 12v Power Sources
Thule Sonic Alpine Rooftop Cargo Box
Dual 5 Gallon Nato Jerry Cans
Side Step Yellow LED Marker Lights (2 on each side)
Smittybilt 10,000lb Winch
ARB Air Compressor
Freespirit Recreation High Country Edition (Medium)
Upcoming Mods
Lockers in the Rear
Trunk Drawer System
This is how it looks today (Aug 1 2018)


I am sure i forgot something since i have done quite a lot to the truck but feel free to ask away
2014 Toyota 4Runner SR5 Premium 4x4
Fargo is my wifes daily driver.
Suspension, Tires and wheels
Front: Dobinsons 3" Lift Mid Travel Coil Overs w/Total Chaos Upper Control Arms, Timbren Industries Bumpstops
Rear: Dobinsons Long Travel Rear Coils HD & Dobinsons Long Travel Shocks, Total Chaos Rear Link Skids, Total Chaos Complete Adjustable Rear Link Kit, Timbren Industries Bumpstops
Wheels: Firestone MT2 295/70/17 & 17" Black Rhino Barstows
Spidertrax 1.25 spacers
ENGINE
Stock with k&n filter
Blue Sea Systems e-Series Dual Circuit Plus Battery Switch Isolator
Blue Sea Systems SI-ACR Automatc Charging Relay - 12/24V DC / 120A (detects when primary battery is full and bypasses the isolator to charge secondary battery until its full.)
Armor
C4 Fabrication Front Lo Pro Winch Bumper
C4 Fabrication Rock Sliders
C4 Fabrication Fuel Tank Skid
C4 Fabrication Rear Diff Skid
ARB Full Length Skids
C4 Fabrication Rear Bumper
Lighting
38" Extreme LED Amber/White Combo LED Light Bar w/Dual Control Functionality
30" Extreme Single Row LED Bar LED Light Bar
Accessories
Cquence Brake Rotors
ARB Rear Diff Breather
Amber LED markers installed in the front grill
Flowmaster 40 Series Muffler
Weather Tech Floor Mats
Uniden PRO520XL 40-Channel CB Radio
8 Watt PA Speaker
Dual Chrome Trumpet Air Horn with Dual Heavy Duty 12v Compressors
Full Interior Bulbs Swap to LED's
Frontrunner Rack
Tints
Tram UHF/VHF Door Mount Antenna
CanvasBack Trunk Covers
Bully Brake Light Hitch Step
DIY Magnet Handgun Seat Mount
Fire Extinguisher
Little 20 watt solar panel & Renogy charge controller
Dometic CFX 40l
Hi-Lift Jack
Multiple Additional 12v Power Sources
Thule Sonic Alpine Rooftop Cargo Box
Dual 5 Gallon Nato Jerry Cans
Side Step Yellow LED Marker Lights (2 on each side)
Smittybilt 10,000lb Winch
ARB Air Compressor
Freespirit Recreation High Country Edition (Medium)
Upcoming Mods
Lockers in the Rear
Trunk Drawer System
This is how it looks today (Aug 1 2018)
I am sure i forgot something since i have done quite a lot to the truck but feel free to ask away
Last edited: