Fightman's Build Thread

I got my stabilizer bushings for the rear of the truck the other day... so got those put on today! Well half of them anyway... lol!

First I removed the old ones:

DSCF6866.jpg~original


Note the little bushings... those are from the front... I swapped those out today too.

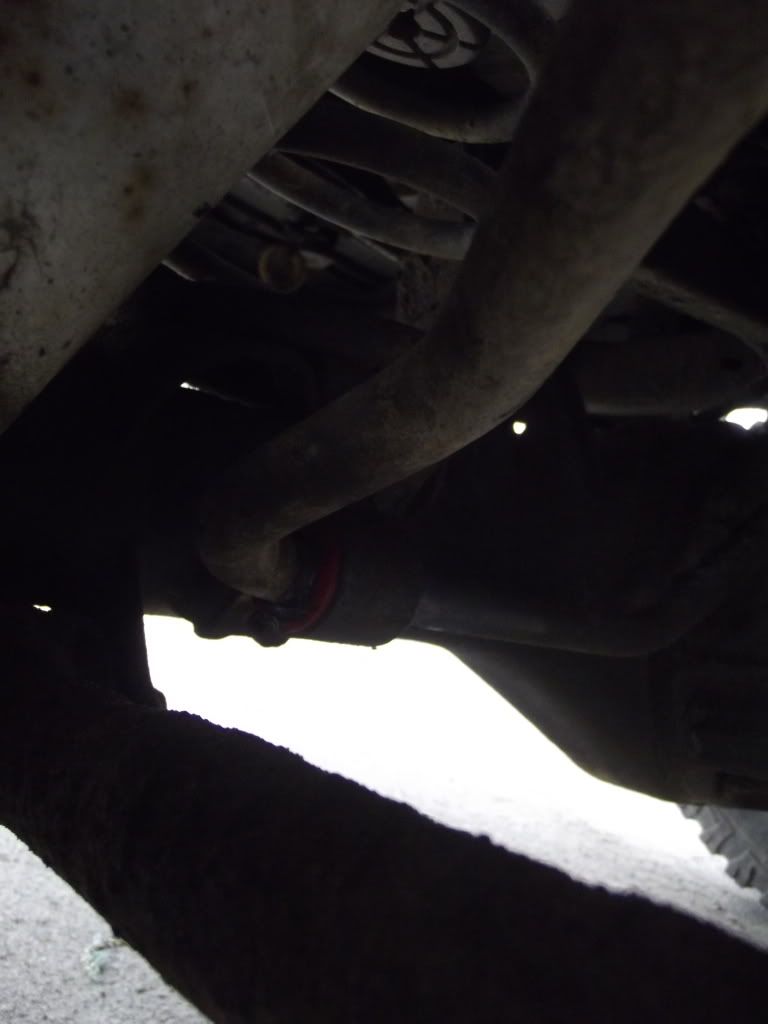
This is a shot of the main bushings installed:

DSCF6867.jpg~original


Now like I mentionned above, I changed out the link bushings today, but not before I bent the passenger side bushing trying to install the new polys!

I had tried to thread on the top nut, but apparently the nut and stud was completely rotted and simply stripped when messed with it.

My buddy (who happens to be an awesome welder), tried to save me a couple of bucks, and heated up the link to get it back in shape, and then cut and welded a new stud on the top.

DSCF6868.jpg~original


It seems pretty strong... but will probably break sooner than later. I'm gonna ride it out, and once it breaks, I'll swap it out.

As for the rear link bushings, I'm gonna wait til next month, and then order some longer front links from a 95 4Runner 4X4. Once I get those in, I'll install the new poly bushings with those too.
 
I got my stabilizer bushings for the rear of the truck the other day... so got those put on today! Well half of them anyway... lol!

First I removed the old ones:


My buddy (who happens to be an awesome welder), tried to save me a couple of bucks, and heated up the link to get it back in shape, and then cut and welded a new stud on the top.

DSCF6868.jpg~original


It seems pretty strong... but will probably break sooner than later. I'm gonna ride it out, and once it breaks, I'll swap it out.

As for the rear link bushings, I'm gonna wait til next month, and then order some longer front links from a 95 4Runner 4X4. Once I get those in, I'll install the new poly bushings with those too.


They look awesome. I currently have a full, front and back, set of bushings sitting in the shop. Just waiting for the conditions to change so I can get after some wrench time!

Sorry for my ignorance, but what did your welder buddy weld? I did not study in great detail, but did not see anything much different....
 
Top stud which has the nut holding the link and bushings together..... that's why there is so much thread on the top of the link. He also welded the bottom washer to the link, to add strength to the welded stud. He had to head the entire middle portion of the link as well, as it had bent nearly to a 90 degree angle!

Again, I'm not gonna hold my breath that it will hold, but if it does that's pretty sweet!
 
Top stud which has the nut holding the link and bushings together..... that's why there is so much thread on the top of the link. He also welded the bottom washer to the link, to add strength to the welded stud. He had to head the entire middle portion of the link as well, as it had bent nearly to a 90 degree angle!

Again, I'm not gonna hold my breath that it will hold, but if it does that's pretty sweet!


Ah, well yes it does seem like it could be a weak point...but the only spot I would be worried about is where it was bent. I was a Metallurgical Engineer in College, and when I hear of all that steel bending I get this recurring nightmare of a Professor warning me about 'FAAAATIGGGGUE LOOOOOOOADING!'

My guess is it will actually be fine, and hey at least the bushings look awesome!!!
 
Thanks man, they do look kinda cool under there.... I must admit.. a little too clean for my undercarriage! lol!

The ride is definitely improved with these bushings, and I definitely recommend anyone wanting a cheap fix for body roll..... to get a set of Poly bushings for your Stabilizer bars! :)
 
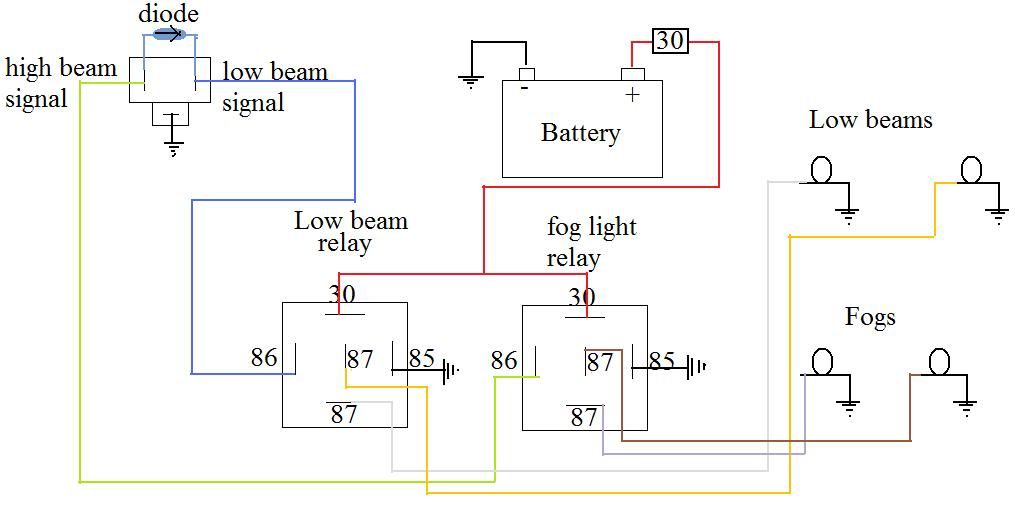
Alright, so for those of you who are interested in wiring up your auxiliary lights the same way Lee did them for me.....

headlightwiringdiagram.jpg~original


Thanks to this wiring job, my auxiliary lights work off of my OEM Highbeam switch! :)
 
Cool Fightman..I will keep this diagram bookmarked in case I have a use for it in the future...in my 4Runner or not.
 
Holy Cow!

Well, I got my parts in from Toyota of Dallas today! Even with the shipping costs, and customs fees... Upper and lower ball joints for both the passenger and driver side cost me $311.47!

DSCF6884.jpg~original


Now, most of you are probably thinking, that's not that great of a deal.... but let me explain! When I got home, I called the local Laking Toyota and asked them how much for all with taxes..... are you ready????? Drum roll.....................

$593.92!

That's $282.45 more than I paid!!!

From now on, I'm ordering from Toyota of Dallas! Screw Laking Toyota!

Now I need to get a hold of a long arm puller for the upper balljoints and a pickle fork for the lowers.....
 
Last edited:
Fightman,

If I may suggest, use new bolts when attaching the LBJ to the knuckle. I cannot remember the metric size though.

What happened to all the pics?

I just finished sweeping my garage, but have no doubt your wife would put my sweeping ability to shame (as per in one of the pics).
 
Just some advice. My experience with the lowers says that using a puller is waaaaay easier than a pickle fork...and you also have to pop out those tie rod ends or whatever they are to free it up. Forgive me if I'm wrong, but that's what I wound up doing. I think I used a HF pitman arm puller.

Toyota of Dallas is my favorite shop now.

I did go to the local dealer for new bolts, though.
 
I would get new bolts.

Also, when I was doing mine, due to the rust, one of them snapped when I was taking them out. Pain in the ass. So I would recommend using a impact wrench if you have one. I did that on the other side and had zero problems.

And don't forget the blue loctite.
 
Fightman,

If I may suggest, use new bolts when attaching the LBJ to the knuckle. I cannot remember the metric size though.

What happened to all the pics?

I just finished sweeping my garage, but have no doubt your wife would put my sweeping ability to shame (as per in one of the pics).

I'll look into finding these bolts! Thanks!

As for the pics, looks like I'm a picture wh@re, and uploaded too many on Photobucket. I should get them back in a few days!

As far as the wife and her sweeping abilities.... yup! She did a great job! lol!

Just some advice. My experience with the lowers says that using a puller is waaaaay easier than a pickle fork...and you also have to pop out those tie rod ends or whatever they are to free it up. Forgive me if I'm wrong, but that's what I wound up doing. I think I used a HF pitman arm puller.

Toyota of Dallas is my favorite shop now.

I did go to the local dealer for new bolts, though.

I'll definitely look into getting an HF pitman arm puller! Toyota of Dallas is also my new best friend, and I'll look into the new bolts!


I would get new bolts.

Also, when I was doing mine, due to the rust, one of them snapped when I was taking them out. Pain in the ass. So I would recommend using a impact wrench if you have one. I did that on the other side and had zero problems.

And don't forget the blue loctite.


I'm definitely gonna use my impact on this! I'll definitely look into the blud loctite... didn't know it was necessary!

Thanks for all the pointers guys! I'm hoping to tackle this sometime this week, or next weekend... depending on when I can get all the tools and other parts lined up! A mechanic friend of mine, offered to help guide me through this job, this way, if I'm about to do something wrong, he can intervene! lol!

Thanks again!
 
Ball Joint time!

Alright, so I did a crap load of errands today, including getting my new bolts for the lower Ball Joints. When I got to the store to get some Locktite, I ended up getting a message from LD Forget (Lee), saying that he was up to helping me get the ball joints done today! I paid for the locktite, didn't bother buying any tools, as he told me he had the pickle fork, and a ball joint press.

We both headed to my place, and met there around 4:00pm. Once in the shop, we jacked the truck up, put it on a jackstand, and took the driver side wheel off.

Once that was done, we began to work on removing the castle nut from the new tie rod we installed a couple of weeks ago.

DSCF6889.jpg~original


We then removed the castle nut from the lower ball joint, and the 4 other bolts as well.

DSCF6890.jpg~original


We then installed the new ball joint:

DSCF6891.jpg~original


Take a look at the lower driver side tie rod... it's pretty crusty! Good thing we replaced that!

DSCF6892.jpg~original


We then re-installed the tie rod, and moved up to the upper ball joint.


The upper ball joint was fastened with a castle nut as well. That one was relatively easy to do, and if I remember correctly, Lee used his ball joint press to push it down. Once it was down, it looked like this:

DSCF6895.jpg~original


It too was pretty crusty looking... in fact... it was completely toast! We had issues using the ball joint press in that tight spot, so we decided to use a little carnage to get the upper ball joint to cooperate with us!

Using a grinder, we cut off the stud from the ball of the joint:

DSCF6896.jpg~original


With that done, we used a short socket on the top to give us the proper surface to work with:

DSCF6897.jpg~original


Here's a shot of Lee using the ball joint press to take off the upper ball joint:

DSCF6898.jpg~original


We then removed and replaced the upper ball joint with a new one:

DSCF6899.jpg~original


When pressing the new upper ball joint, we managed to bend and break the hard brake line that goes from the caliper to the flex line. So after some brake line work, we got that side buttoned up and moved on to the passenger side!

It was running late, and was approximately 9pm when we got to the passenger side lower ball joint. We did the same for the passenger side, however, we had some issues getting the old tie rod off. We tried whacking the ball joint knuckle, the arm of the tie rod, and finally put the castle nut on the tie rod, and pounded on it, till the tie rod fell out. Unfortunately, Lee has the power of 10 men, and managed to blend both the castle nut and the tie rod stud together! This made removing the castle nut from the stud, extremely difficult!! HA HA! I used a dremmel with cut off disk to carefully cut away the damaged portion of the castle nut, this allowed me to back off the nut, and get the tie rod to come out of the ball joint knuckle!

Here's a pic of the chopped up castle nut!

DSCF6901.jpg~original


We then installed the new passenger side lower ball joint, and called it a day.

Here's a comparison pic of the old lower ball joint and the new one:

DSCF6900.jpg~original


I'm gonna head to the parts store tomorrow, get another castle nut, and re-install that tie rod. Upon looking at that tie rod, we noticed it has some play in it, so I'm probably gonna order another one from Toyota of Dallas and change that out at a later date.

I may try to tackle the upper ball joint on my own tomorrow, but if it proves to be beyond my skill level, I may call upon my neighbor to help me, or wait til friday for Lee to finish it with me.


I'll update this spot when it's done! :)
 
Wow, nice work on the UBJ! I've read that that's a bear. You were able to do it fairly easily with that big ball joint press, huh? Cool!
 
Fightman,

I have never thought about cutting the UBJ stud, then pressing it out. I have to ask, how did you press the new one in? Take a couple of pics for curiosity's sake.

I bet the 4runner rides better. Mine did. Can you imagine reusing the old bolts for the LBJ?

Tools make all the difference in the world for shade tree auto repair. When you get back to churning out the green, invest in a ball pein hammer or two for future suspension and steering work.

Can't wait to see the rest.
 
Fightman,

I have never thought about cutting the UBJ stud, then pressing it out. I have to ask, how did you press the new one in? Take a couple of pics for curiosity's sake.

I bet the 4runner rides better. Mine did. Can you imagine reusing the old bolts for the LBJ?

Tools make all the difference in the world for shade tree auto repair. When you get back to churning out the green, invest in a ball pein hammer or two for future suspension and steering work.

Can't wait to see the rest.

Pressed it back in with the ball joint press. Had to get a little creative, as its a bit big for this job. The 4 runner doesnt ride better right now because its missing a tie rod castle bolt, LOL. Im sure it will though. I use ball pein hammers, rob uses claw hammers. You can tell whos the carpenter and who works on cars every day, hahaha.

The lower ball joint bolts looked fine, and theres no reason we couldnt have reused them, but we had the new ones so we figured why not.
 
Thanks for the comments guys! The upper ball joint was pressed in with the ball joint press as well. I'll try to make sure I take pics when that gets done!

For the record, I do have a ball pein hammer... lol! I just happened to use the claw hammer at first... lol! Oh, and to tell you the truth, I'm making more money on my Severance package pay, than I did when I was working! lol!

Only have 4 more months left of that money coming in though.... and looking for work right now!

Anyway, I'll post up more pics when the upper passenger side BJ gets done! Hopefully tomorrow??? :)
 
Yep, I forgot about the castle nut. It will be riding better today then.

I just try and avoid anything with sharp edges when working around an automobile. A claw hammer has merit, just not with auto work.

I have never been able to find a sleeve that is tall enough, and that fits within the C frame of the press, that enables me to press the UBJ into the knuckle. I had thought about having a friend cut some cast iron pipe in the correct length but that never came to fruition.

Good luck.
 

Members online

Forum statistics

Threads
278,308
Messages
3,554,057
Members
248,016
Latest member
Advally Service

Trending content

Back
Top