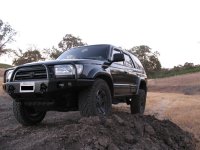
FINALLY! it is done!

Limited96

New member
After hours of reading the instruction guide and hours of patience and heavy lifting I have installed my new Shrockworks Front bumper!
(and yes Fancy camera angles were necessary.)
 

Attachments

  • IMG_0039.jpg
    IMG_0039.jpg
    134.3 KB · Views: 1,047
Register to hide this ad
I think he was referring to the wheel weights.

The rig looks great! My Shrockworks has been sitting in storage, waiting for me to get off my butt and install it.
 
Nice bumper!!

Is it just the camera angle? Or does the bumper/fender gap get larger towards the corner of the bumper?

(hate to be the nit picky poster, but I am about to pull the trigger on a Shrockworks bumper and was wondering about fitment)

I had no idea the install was such a pita:ranger:
 
Nice bumper!!

Is it just the camera angle? Or does the bumper/fender gap get larger towards the corner of the bumper?

(hate to be the nit picky poster, but I am about to pull the trigger on a Shrockworks bumper and was wondering about fitment)

I had no idea the install was such a pita:ranger:

Fitment was lets say "complicated" due to the powder coating that made it seemingly impossible to do small adjustments. But its the camera angle that makes it look off, we had it measured and laser aligned. Once you get the thing on you will just want to show it off! Its a very awesome and rugged bumper that also looks slick. I have no regrets about it!
 
Fitment was lets say "complicated" due to the powder coating that made it seemingly impossible to do small adjustments. But its the camera angle that makes it look off, we had it measured and laser aligned. Once you get the thing on you will just want to show it off! Its a very awesome and rugged bumper that also looks slick. I have no regrets about it!

Any install tips for future shrockworks owners?
 
Any install tips for future shrockworks owners?

Okay no Problem!

1. Have Patience! that is very essential, it took me roughly 7+ hours to properly install my shrockworks bumper

2. You'll need to THOROUGHLY read the provided manual it can be very tricky and hard to understand.

3. You'll also need a grinder, that's a given, they help alot when your having trouble getting the mounts fitted to your frame. (you'll also need a small but long hand grinder to grind off weld slag to help you get he mounts level)

4. A lift jack can help you hold up the bumper when your trying to get the bumper on and bolt it on straight.

5. I suggest you try to weld the mounts on the end of the frame (also known as the end cap mod). It will prevent your bumper from getting misaligned when you use a winch or when someone is trying to recover your car.

6. make sure you leave space between the bumper and grill in-case your body shifts during rough 4W Driving.

7. Be sure to use the correct bolts when mounting the mounts and bumper to your car, it is easy to get confused.

8. put your driving lights and turn signal lights in your bumper before you mount it. Also make sure you wire your car to accommodate the new lights before you mount the bumper.

If i forgot anything ill re-post anything else!

 

Members online

Forum statistics

Threads
278,309
Messages
3,554,068
Members
248,016
Latest member
Advally Service

Trending content

Back
Top