Baja Designs Squadron Fog Lights – Dimmer Install!
I love my lights, but they are too bright for me to use if other cars are on the road (yes, I realize the DOT standards are more about the lens, but I figure if they are dim enough, I can use as DRL’s and at half power use as fogs when needed). I wanted a solutions where:
1. I can use my factory fog light switch and get low light levels
2. I can turn on my fog lights without having to turn on my lows
3. I can turn on full brightness
I think some of the intelligent switch controllers can do this, but I like the simplicity of my bussmann relay system that I’ve built.
I wired up a Skene IQ-275 and got the results I was looking for, with only one issue: when the fogs are initially activated (but not when brightness levels change), the lights start low for a few seconds and then blink three times). I wish I could get rid of that, but so long as you run them as DRL and then activate the different brightness levels, you won’t notice it.
So now I can use my factory fog switch, plus two AOB switches, to control the level of my fogs. Read on to find out how.
Parts Required
- Skene IQ-257
- 2 2-wire connectors
- 1 1-wire connector
- Baja Design Squadrons and Fog Mount Kit (I got mine from Rago Fabrication)
- Wire (I used 2-wire 18 gauge to run from the switches to the controller and 16 gauge for the power and ground)
- 3 Diodes (I use 1N4004, rated for 1A, which is more than enough)
Instructions
I won’t cover the full install, as there are lots of videos on that already, I’ll just cover the electrical.
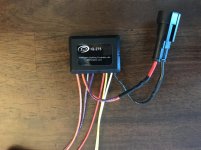
1. On the controller, cut the red, yellow, and white wires, leaving about 3 inches on the white and the yellow and 2 on the red
2. Taking the cut white, yellow, and red wires, cut off 4” and strip one side. Strip one side on the longer leftover pieces
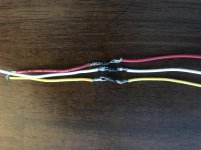
3. Solder the diodes in, connecting the short and long piece for each of the three colors. For all three, have the stripped side of the diode towards the short side. This makes each of these wires one way, allowing current to flow from long to short, but not short to long.
4. Connect the black wire on the controller (ground) to a 2-wire connector and the violet and orange (non-stripped) to the other wire on the 2-wire connector (positive)
5. Shorten the long ends of the yellow and white wire diode setups to as short as you feel comfortable soldering and strip. For both the white and yellow wires, solder one wire from the 2-wire connector to both the newly shortened side of the diode connector and the corresponding colored wire on the controller.
6. Solder the yellow and white wires (coming from the diode, attached to the 2-wire connector) to both the red wire coming from the controller AND the short end of the red wire diode setup, a total of four wires.
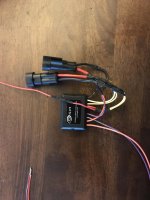
7. Take one of the two wire connector sets from the Baja Designs Fog Mount Kit and cut the brown wire. Attach the free end of the red wire to the female connector side and the free end of the violet/white wire to the male side of the brown wire.
8. Connect the one wire connector to the orange/white wire
9. Take other two wire connector sets from the Baja Designs Fog Mount Kit and cut the brown wire. Tape off the female connector side of the brown wire and then solder a length of 16 gauge wire to it (6 feet is more than enough)
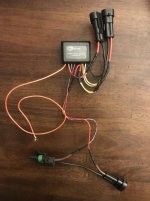
10. Install the passenger side fog light, using the connector with the newly added 6 foot wire. Run that wire in front of the radiator and bring it close to the driver side fog light. Solder the one-wire connector to it.
11. Zip tie/tape up the controller close to the driver fog light. Connect the one-wire connector coming from the passenger light. Connect up the two wire connector set from Baja to the driver side fog light.
12. Bring in positive & negative to the correct two-wire connector you added to the controller
13. Use the 2-wire 18 gauge wire to connect two switches (positive) to the other 2 wire connector on the controller.