Gentry's 2001 4Runner Build

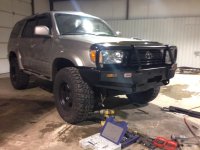
I'm digging the t4r man. Just got a quick question: how big is the gap you have between the body and front bumper? I'm thinking of adding a body lift to mine and trying to bet a feel of what the gap will look like. Thanks

my gap isn't too bad, but i've had people notice it and ask if it's normal.. haha

I bet a fabrication shop would add and inch or so to your bumper mounts if you wanted to.
 
Had some really cool, mellow weather today on my day off so I thought I'd work on the rig a little bit. here's what I did.

PART 1

First thing I did was repaint the plastic trim on top of the rear bumper. I've never really liked that factory gray, and it was fading really bad.

<a href="http://www.flickr.com/photos/92238993@N07/9277992069/" title="Untitled by will.gentry199, on Flickr"><img src="http://farm4.staticflickr.com/3753/9277992069_71492085df_b.jpg" width="1024" height="768" alt="Untitled"></a>

It was easier than I thought to pull it off. Just start by the D ring where the hatch latches, and just pull up.

<a href="http://www.flickr.com/photos/92238993@N07/9280779040/" title="Untitled by will.gentry199, on Flickr"><img src="http://farm4.staticflickr.com/3673/9280779040_6f6f947a96_b.jpg" width="1024" height="768" alt="Untitled"></a>

<a href="http://www.flickr.com/photos/92238993@N07/9280782432/" title="Untitled by will.gentry199, on Flickr"><img src="http://farm4.staticflickr.com/3779/9280782432_f66e2e3be7.jpg" width="375" height="500" alt="Untitled"></a>

<a href="http://www.flickr.com/photos/92238993@N07/9280785754/" title="Untitled by will.gentry199, on Flickr"><img src="http://farm8.staticflickr.com/7442/9280785754_0e797da5fc_b.jpg" width="1024" height="768" alt="Untitled"></a>

I did three coats.

BEFORE:
<a href="http://www.flickr.com/photos/92238993@N07/9280786484/" title="Untitled by will.gentry199, on Flickr"><img src="http://farm8.staticflickr.com/7321/9280786484_9e74bac4e4_b.jpg" width="577" height="1024" alt="Untitled"></a>

AFTER:

<a href="http://www.flickr.com/photos/92238993@N07/9278055395/" title="Untitled by will.gentry199, on Flickr"><img src="http://farm4.staticflickr.com/3752/9278055395_71fa87180a_b.jpg" width="768" height="1024" alt="Untitled"></a>

<a href="http://www.flickr.com/photos/92238993@N07/9278057513/" title="Untitled by will.gentry199, on Flickr"><img src="http://farm8.staticflickr.com/7401/9278057513_af045c5c83_b.jpg" width="1024" height="768" alt="Untitled"></a>

Next up was the cowl. super easy to take out, just a few screws, unbolt the wipers, and pop up some clips holding the rubber strip to the engine bay. (be careful, I dropped one of the clips into the engine bay..)

BEFORE:

<a href="http://www.flickr.com/photos/92238993@N07/9280790884/" title="Untitled by will.gentry199, on Flickr"><img src="http://farm4.staticflickr.com/3759/9280790884_8f58ed55f0_b.jpg" width="1024" height="768" alt="Untitled"></a>

<a href="http://www.flickr.com/photos/92238993@N07/9278003389/" title="Untitled by will.gentry199, on Flickr"><img src="http://farm4.staticflickr.com/3755/9278003389_cb1f42bde4_b.jpg" width="1024" height="768" alt="Untitled"></a>


Did three coats like the bumper plastic.

<a href="http://www.flickr.com/photos/92238993@N07/9280794746/" title="Untitled by will.gentry199, on Flickr"><img src="http://farm6.staticflickr.com/5350/9280794746_5b2eb8fdfe_b.jpg" width="768" height="1024" alt="Untitled"></a>

AFTER:

<a href="http://www.flickr.com/photos/92238993@N07/9278014577/" title="Untitled by will.gentry199, on Flickr"><img src="http://farm6.staticflickr.com/5505/9278014577_04152219e2_b.jpg" width="1024" height="768" alt="Untitled"></a>

<a href="http://www.flickr.com/photos/92238993@N07/9280796890/" title="Untitled by will.gentry199, on Flickr"><img src="http://farm6.staticflickr.com/5496/9280796890_ea501bd6d9_b.jpg" width="1024" height="768" alt="Untitled"></a>

All in all, I really like the improvement. These were two very simple projects, anyone can do it if I could :p and cost me like 6 bucks..

In the future, I plan on doing the license plate trim piece to match. Just did not have enough time to do all the masking around it and I was unsure how to prep it since it is painted and not just dyed plastic. Not sure If I should take some sand paper to it or what. Also I will be plasti dippin the badges
 
Last edited:
PART 2: Interior LED conversion.

<a href="http://www.flickr.com/photos/willgentry/9281987556/" title="DSC_1822 by willgentry, on Flickr"><img src="http://farm4.staticflickr.com/3685/9281987556_b2e0550965_b.jpg" width="1024" height="678" alt="DSC_1822"></a>

<a href="http://www.flickr.com/photos/willgentry/9279224467/" title="DSC_1835 by willgentry, on Flickr"><img src="http://farm6.staticflickr.com/5536/9279224467_7c742d169b_b.jpg" width="1024" height="678" alt="DSC_1835"></a>

<a href="http://www.flickr.com/photos/willgentry/9282000148/" title="DSC_1808 by willgentry, on Flickr"><img src="http://farm3.staticflickr.com/2815/9282000148_16059db16d_b.jpg" width="1024" height="678" alt="DSC_1808"></a>


Here is what I used:

You need 2 of these for the reading lights up front- Buy Alpena DomeLitz 12, White 77254 at Advance Auto Parts

And then 1 of these for dome lamp and 1 for the trunk lamp- Buy Alpena DomeLitz 20 White 77255 at Advance Auto Parts

Next up I plan to start on the guage cluster and other small individual LEDs in the dash. My climate control back light is out so I have an order on the way with some neo wedge bulbs for it and some 74s for the shifter column and key ring. Haven't decided on which type of 192 bulbs I will use for the guage cluster as I want to avoid those uneven hotspots which seem to be common.

Feel free to leave any feedback or questions.
 
Those LED's look good! how much brightness would you say you gained over the stock interior map/dome/trunk lights? This may be my next mod, thanks for posting the direct link to the bulbs needed! Very nice rig by the way!
 
Those LED's look good! how much brightness would you say you gained over the stock interior map/dome/trunk lights? This may be my next mod, thanks for posting the direct link to the bulbs needed! Very nice rig by the way!

Thanks man!

The difference is insane. It would be night and day just with single LED bulb replacements (which is a much cheaper option) but these pods take it to the next level and are pretty straight forward to install. I had to grind off a little area of the plastic to get the pod to sit flush so the cover would fit back on correctly, but I can take a photo to show you if you do decide to go this route. Super easy mod.
 

Attachments

  • 1474478_10202548091726064_881406716_n.jpg
    1474478_10202548091726064_881406716_n.jpg
    75 KB · Views: 939
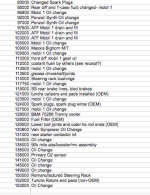
Hey everyone, I'm going to be back home in Colorado Springs for a little over 3rd weeks starting Wednesday. Looking for some ideas on some good maintenance projects to knock out while I have a garage! I'm thinking of doing front and rear diff/t case fluids and greasing driveshafts/joints/squeaking door hinges. Here's my master list of completed maintenance items attached.

My rear drum brakes probably need some work, but the idea of taking them apart scares me, along with what a shop would do with my wallet if I don't do them myself.

What do you guys think I should knock out first? Am I forgetting anything important? Also considering a satoshi grill and some lights for my new ARB once I'm caught up on the maintenance.
 

Attachments

  • Screen Shot 2013-12-09 at 1.48.49 PM.png
    Screen Shot 2013-12-09 at 1.48.49 PM.png
    66.9 KB · Views: 794
whats a custom bumper like that cost to make. i tried hitting up a couple welders and fab guys artound the quad cities . of the ones that got back to me. 1 didnt have the capabilities to do it and the other quoted me between 2000 and 2500 depending on if i wanted a custom skid plate. i look and can get a ARB for under 1k so i didnt think it was worth it
 

Members online

Forum statistics

Threads
278,309
Messages
3,554,075
Members
248,016
Latest member
Advally Service

Trending content

Back
Top