Help on Used Supercharger purchase (video)

4runnerfiend

New member
Hi all SC pros. I'm hoping to get some help on if the sound this SC is making is a cheap fix with the nose cone rebuild.
Called my local Toyota shop for a rebuild cost and they said the Turbines get chipped easily and is a very expensive rebuild.

Coming off a wrecked vehicle, I think one of the cylinders lost compression. Seller has no idea of age, last rebuild ext.

Thanks for any help.


TRD Supercharger Sound - YouTube
 
Register to hide this ad
I think I responded to your FB post. Should be good with a standard nose cone rebuild kit. Nothing too bad really.
 
I think I responded to your FB post. Should be good with a standard nose cone rebuild kit. Nothing too bad really.

Thanks! cool to see your on there too.
Just trying to get as much response as possible, hard to tell who knows what they are talking about and who is just guessing.

My shop guys scared me and said it's likely shot and an 1800.00 fix.
 
Ask him if you can remove it from the engine to inspect the rotors. If the rotors are in good condition, a rebuild will fix that right up.


Sent from my iPhone using Tapatalk
 
went for it. got it home and was able to inspect the rotors. they are in super good condition. Now just need to figure out how to get the needle bearings out of the back. :party:
 
went for it. got it home and was able to inspect the rotors. they are in super good condition. Now just need to figure out how to get the needle bearings out of the back. :party:

I can't tell you how many videos, posts and other things I read as I was worried it would be a real fight without a press. I was wrong! All you need is a 1/4" drive socket extension and it fits perfectly in the back of the bearings. Tap tap tap with a hammer and both will press out the back, one needs a little convincing. Super easy. If the bearing casing busts out the back, get a socket that's the same size as the bearing and tap it out that way.

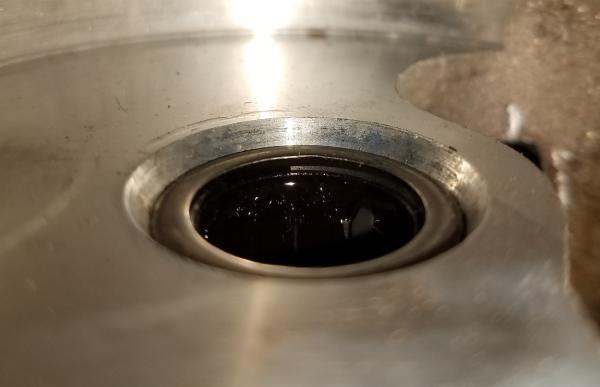
Putting the new ones in does take a bit of finesse. You MUST put them in at the same depth as the old ones. Some close up photos at an angle from your phone goes a long way, this was mine:

gamefreakgc-albums-engine-performance-mods-picture59902-20210215-223927-a.jpg


Use the same socket above and gently tap it in. Once the bearing gets started it gets easy. If you set it too deep, tap it out and try again. Putting the bearings in the freezer beforehand helps a bit as they shrink ever so slightly allowing them to go in easier.
 
I can't tell you how many videos, posts and other things I read as I was worried it would be a real fight without a press. I was wrong! All you need is a 1/4" drive socket extension and it fits perfectly in the back of the bearings. Tap tap tap with a hammer and both will press out the back, one needs a little convincing. Super easy. If the bearing casing busts out the back, get a socket that's the same size as the bearing and tap it out that way.

Putting the new ones in does take a bit of finesse. You MUST put them in at the same depth as the old ones. Some close up photos at an angle from your phone goes a long way, this was mine:

gamefreakgc-albums-engine-performance-mods-picture59902-20210215-223927-a.jpg


Use the same socket above and gently tap it in. Once the bearing gets started it gets easy. If you set it too deep, tap it out and try again. Putting the bearings in the freezer beforehand helps a bit as they shrink ever so slightly allowing them to go in easier.


the back of mine looks like this.. so do these gold ish colored "plugs" pop out the back as well? or do we have different versions.

Good to know I need the get the bearings pressed into the same depth.. That is a huge tip!

<a data-flickr-embed="true" href="https://www.flickr.com/photos/69731669@N03/51395502522/in/dateposted-public/" title="IMG_1681"><img src="https://live.staticflickr.com/65535/51395502522_c07aea10dd_z.jpg" width="480" height="640" alt="IMG_1681"></a><script async src="//embedr.flickr.com/assets/client-code.js" charset="utf-8"></script>
 
now that I look at the part number for the dorman it's listed as a plug. I'm assuming that gets pressed out. Also now wondering if this has been rebuilt before.
 
the back of mine looks like this.. so do these gold ish colored "plugs" pop out the back as well? or do we have different versions.

Good to know I need the get the bearings pressed into the same depth.. That is a huge tip!

<a data-flickr-embed="true" href="https://www.flickr.com/photos/69731669@N03/51395502522/in/dateposted-public/" title="IMG_1681"><img src="https://live.staticflickr.com/65535/51395502522_c07aea10dd_z.jpg" width="480" height="640" alt="IMG_1681"></a><script async src="//embedr.flickr.com/assets/client-code.js" charset="utf-8"></script>

Actually those plugs are left completely alone. Interesting that you have a version with two. Mine only has one, there was no consensus as to why TRD changed it at some point.

One bearing actually pops out of the top of the rotor housing, you can see the back of it just to the top right of the TRD logo. The other just pops out into the intake and rolls out the bottom of the supercharger. It really is that simple.
 

Members online

Forum statistics

Threads
278,316
Messages
3,554,111
Members
248,016
Latest member
Advally Service

Trending content

Back
Top