Hid's or Projector Headlights

Hey jesse1983 is their anyway u can post some pictures of the back of the reflector. I'm trying to figure out how I'm gonna stand the reflector straight while aiming the projector(as per the previously posted youtube video). No biggie if u cant. Thank you.

yes. I will post them here tonight. But the bottom of the reflector bowl is flat, so you can clamp it down to any flat surface for aiming.

Finished mine last week.

they look GREAT. how about letting us know if you got OEM or aftermarket lights? what technique did you use for aiming them? Any challenges you encountered that may be able to help us that haven't started yet (because we don't have our projectors :rant:)?

azn- that looks Really Good. I need to find someone to do this work..I want to do the retrofit but don't know how to do it myself :ybrick:

you can do it yourself. I'm sure when people get their projectors (:rant:) there will be plenty of info for you to tackle this on your own.
 
Thanks guys! Anybody can do it really. Just take your time, unfortunately I didnt document my procedures, sorry. I normally like getting all my work done with the sun out but in order for you to get it right you have to wait till sun down or just have a large garage with no windows. Here's some info for those wondering.

I initially scored a 2nd set of oem lights on this board and then purchased the retrofit kit from TRS. I went with the bixenon morimoto mini stg 3 kit with gatling gun 2.0 shrouds. I had all the parts in hand, I just finally had time to install this past week. During all the waiting, the stealership FINALLY went ahead and replaced my current headlights with a new set due to the hazzing/fogging issue some of us were having. For me the hardest part was getting the headlights opened up, heating them at a lower temp and cutting the glue as you spread the halves apart yielded the cleanest results, cause the glue is a pia to remove once cooled. As far as mounting the projectors, I sandwiched the silicone ring provided between the projector and the mounting hole, from there I just added the locking ring and was sure to screw it on tight. I did have to remove some material from the reflector for the projector to seat evenly. After making sure the horizontal plane and the projectors were lines up straight youre pretty much done, since the headlights themselves can be adjusted up and down via nut on the back of the unit. For fine tuning I just used a generic procedure online, measuring 25ft back and the height of the lights and adjusting the cutoff 2" below that line, those results were pretty close to the stock halogen output. Big thanks goes out to those who have already performed this mod themselves!
Hope that helps!
 
Last edited:
Looks great azn-sensation! How's the light output and cutoff on those MM's ?Those Morimoto Minis are supposed to be the easiest to retrofit by far since that is what they are designed for with the threaded projector base and nut. Plus they can be re-aimed easily as you just loosen the nut ,reaim and retighten.Rather the the other projectors that were designed for a specific vehicle and made to work on a retrofit by epoxying,using silicon or making brackets to hold them in place.
Thanks guys! Anybody can do it really. Just take your time, unfortunately I didnt document my procedures, sorry. I normally like getting all my work done with the sun out but in order for you to get it right you have to wait till sun down or just have a large garage with no windows. Here's some info for those wondering.

I initially scored a 2nd set of oem lights on this board and then purchased the retrofit kit from TRS. I went with the bixenon morimoto mini stg 3 kit with gatling gun 2.0 shrouds. I had all the parts in hand, I just finally had time to install this past week. During all the waiting, the stealership FINALLY went ahead and replaced my current headlights with a new set due to the hazzing/fogging issue some of us were having. As far as mounting the projectors, I sandwiched the silicone ring provided between the projector and the mounting hole, from there I just added the locking ring and was sure to screw it on tight. I did have to remove some material from the reflector for the projector to seat evenly. After making sure the horizontal plane and the projectors were lines up straight youre pretty much done, since the headlights themselves can be adjusted up and down via nut on the back of the unit. For fine tuning I just used a generic procedure online, measuring 25ft back and the height of the lights and adjusting the cutoff 2" below that line, those results were pretty close to the stock halogen output. Big thanks goes out to those who have already performed this mod themselves!
Hope that helps!


Sounds like you aimed them on the truck like I did. That's by far the most accurate way to aim them as I even drove mine slowly around the neighborhood and some local back roads with the front bumper cover off to verify the aim and fine tune.I just took the other front lights with harnesses and the fender liners that were hanging down after the bumper cover removal and zip tied them up out of the way.

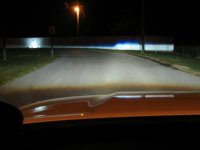
They can be done and get a flat cutoff doing them clamped to a table or something . But ,it's hard to get the steps perfect when aiming them off the truck because the oem halogen headlights don't have steps and are aimed more straight down the middle of the lane.Aim them on a garage door or wall at ~25ft and then fine tune taking it for a ride around the block , at night of course.

There should be one step in the cutoff when your driving and it should be right on the center stripe when your on a 2 lane road. That's the purpose of the step so it shines farther down the road in your lane and dips down in the oncoming lane to not blind them. The step on the pass side should be the same height and blend in with the drivers step. Kind of hard to explain but there's no reason for a step in the middle of your lane.

That's the way good oem HID's ,like my old E46 M3 and my brother in laws Honda S2000 came factory aimed. It makes it so easy to drive when you can just look ahead and keep your one step on the center line of the road on your left.

That's why if shopping for projectors on ebay you will sometimes see some right hand drive ones from foreign countries where the step is on the other side because they drive on the other(wrong) side of the road.All there is a shield inside the projector with the step blocking output and only allowing light to escape on the bottom side . In a bi-xenon projector that shield is motorized and flips up out of the way to give full light and thus,hi beams.
All this info is over on the HID Planet forum.
 
There should be one step in the cutoff when your driving and it should be right on the center stripe when your on a 2 lane road. That's the purpose of the step so it shines farther down the road in your lane and dips down in the oncoming lane to not blind them. The step on the pass side should be the same height and blend in with the drivers step. Kind of hard to explain but there's no reason for a step in the middle of your lane.

Thanks! I did use your thread for pic references. Side note to others, when ordering your projectors be sure to order LHD/left hand drive or (North America) type if you live here in the states. Due to the step that harper is referring to otherwise when aimed properly you will more than likely get flashed.
 
.... There should be one step in the cutoff when your driving and it should be right on the center stripe when your on a 2 lane road. That's the purpose of the step so it shines farther down the road in your lane and dips down in the oncoming lane to not blind them. The step on the pass side should be the same height and blend in with the drivers step. Kind of hard to explain but there's no reason for a step in the middle of your lane......

What Gary is sayin' is ......
 

Attachments

  • IMG_0016_1.JPG
    IMG_0016_1.JPG
    34.2 KB · Views: 3,298
yes. I will post them here tonight. But the bottom of the reflector bowl is flat, so you can clamp it down to any flat surface for aiming.

That's how I did mine but I didn't test out the aim for stock headlights and that's how my aim came out wrong.

If you are going to use the Sika epoxy, then it might be best to mount it while it's on your truck. I plan on re-doing mine this way, this weekend hopefully. Since the epoxy drys in minutes...

I had a couple of emails with Andrew from TRS and he made the recommendation to put it on your truck for more accurate alignment with your vehicle. Check out that PDF from the jeep from my previous post. You can tape off the wall for the lines.
 
There should be one step in the cutoff when your driving and it should be right on the center stripe when your on a 2 lane road. That's the purpose of the step so it shines farther down the road in your lane and dips down in the oncoming lane to not blind them. The step on the pass side should be the same height and blend in with the drivers step. Kind of hard to explain but there's no reason for a step in the middle of your lane.

From reading other forums and posts, my understanding is the step should be on the driver side, exactly where the headlight is @ 25ft & ~2 inches down. Is that correct? Is that how your set up is?
Like this ?:
ProjectorAiming.jpg~original
 
Hey jesse1983 is their anyway u can post some pictures of the back of the reflector. I'm trying to figure out how I'm gonna stand the reflector straight while aiming the projector(as per the previously posted youtube video). No biggie if u cant. Thank you.


as requested. Drivers side reflector bowl:

Laying down

e51f99fc.jpg~original


holding it up on the flat bottom:

6a6e3981.jpg~original
 
Nice, just got my shipment notification for the HID package. Total was ~$82 off of retail. Now to get the lights and then retrofit into my existing ones.
 
sweet. what options did you go with?

1 x Bi-xenon FX-R Stage III Kit (FXRStageIII) = $330.00
Bulbs Morimoto 5Five 5000K D2S
Projectors LHD (North American Standard)
CCFL Angel Eyes No
Ballasts Morimoto 5Five (50w)
Re-sealing Glue Yes please
Shrouds E46-R
Wire Harness Relay: H11
------------------------------------------------------
Coupon R6TacomaWorld25: -$82.50
 
1 x Bi-xenon FX-R Stage III Kit (FXRStageIII) = $330.00
Bulbs Morimoto 5Five 5000K D2S
Projectors LHD (North American Standard)
CCFL Angel Eyes No
Ballasts Morimoto 5Five (50w)
Re-sealing Glue Yes please
Shrouds E46-R
Wire Harness Relay: H11
------------------------------------------------------
Coupon R6TacomaWorld25: -$82.50

You're going to love that light setup with the bulbs and ballasts you went with. I just swapped out crap ballasts and 6K bulbs for this setup and I'm in love all over again with my retrofit that I did years ago.
 
oh no. I just got the bulbs and ballasts. When I got my projectors they were painted black. I like the industrial look of them so I left them exposed in my housing.
IMG_0777.jpg~original

IMG_0741.jpg~original

IMG_0101.jpg~original

IMG_0103.jpg~original

IMG_0107.jpg~original
 

Members online

Forum statistics

Threads
278,306
Messages
3,554,044
Members
248,016
Latest member
Advally Service

Trending content

Back
Top