SRQ-Runner
New member
I’ll start out by saying that by no means is this supposed to replace something like a full tire carrier bumper that costs $1000 +, but I do feel it is an affordable median between no tire carrier and a full one. This also can be a very nice addition for someone wants to retain their stock rear bumper yet still have the look and function of a rear tire carrier.
In my case I have a full steel bumper but it was designed without a tire carrier and this caused a problem when I went up to 33’s. While I could try and squeeze my 31’s into the stock spare spot, it hung awkwardly low with my bumper being set so high. So I have been keeping the spare in the back on top of my storage box. While this has worked for a while, it’s a pain having a tire take up most of my storage space and worrying about taking the tire out every time I go camping to sleep. So this is where the hitch tire carrier has come in handy.

SRQ Fabrications Hitch Tire Carrier
Link Here
Fabricator: Evan Neise
Stock Price (as shown): $225 plus $55 shipping
Total: $280
Additional Hitch Built into Tire Carrier: $245 plus $55 shipping
Total: $300
Build time: 2-3 weeks
Info:
-Holds up to a 35 inch tire
-License plate bar below tire
-Quick release pin to allow the tire to drop fast and easy
-Option to extend hitch out through the tire carrier so you can still trailer with the tire carrier attached
Install:
Install took about 45 minutes. It can easily be done quicker but my locking hitch pin was giving me trouble. The tire carrier is shipped in a big box that contains two pieces. The first piece is the section that actually slides into the hitch. To keep movement of the tire carrier down, it’s designed to be a tight fit. Using a rubber mallet you, makes it a breeze though. The second piece is the actual arm the holds the tire. You attach this to the hitch part with a grade 1 1/8th grade a bolt along with two washers per side, a locking washer, and a large nut. After doing this, your tire carrier is together. You can then put the pin in that hold the tire carrier in the upright position. Next you’ll remove your license plate and attach it to its new spot under the tire. The carrier comes with bolts to attach the license plate into the pre drilled holds with nuts welded to the back side. Finally it’s time to throw on your tire. There are three studs which are mounted to a plate like most other tire carriers for your tire to be mounted.
Review:
So far it’s been great. While I haven’t done any hardcore off-roading with it on yet, it has done great on the small trails I’ve gone down. I haven’t heard a sound from it yet, even down the dirt roads at speed. The tire will move some off-road, but this is to be expected with it only being held up by a single post into the hitch. Overall I couldn’t be happier with how it turned out. While I still hope to have a full tire carrier down the road, this will get the job done till then. I plan on attaching some roto packs between the tire carrier and the hatch as there is enough room to do so (will post pictures up when the time comes). Also need to still rig up a license plate light. I’m going to go ahead and order some bolt lights from SuperBrightLED as it should make for a quick and easy install.
Pictures:


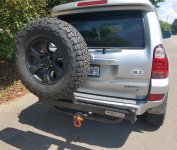
The tire carrier seems to fit far back in this picture but this is in part because of my hitch location on my bumper. I don't mind this space as I'm going to go ahead and mount Roto Packs between the hatch and carrier.

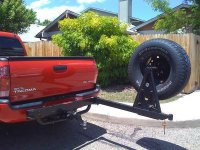
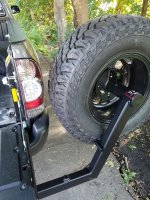
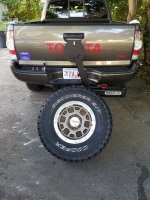
As you can see, the tire carrier is universal. Included these pictures to show the craftsmanship put into each carrier by Evan.


In my case I have a full steel bumper but it was designed without a tire carrier and this caused a problem when I went up to 33’s. While I could try and squeeze my 31’s into the stock spare spot, it hung awkwardly low with my bumper being set so high. So I have been keeping the spare in the back on top of my storage box. While this has worked for a while, it’s a pain having a tire take up most of my storage space and worrying about taking the tire out every time I go camping to sleep. So this is where the hitch tire carrier has come in handy.

SRQ Fabrications Hitch Tire Carrier
Link Here
Fabricator: Evan Neise
Stock Price (as shown): $225 plus $55 shipping
Total: $280
Additional Hitch Built into Tire Carrier: $245 plus $55 shipping
Total: $300
Build time: 2-3 weeks
Info:
-Holds up to a 35 inch tire
-License plate bar below tire
-Quick release pin to allow the tire to drop fast and easy
-Option to extend hitch out through the tire carrier so you can still trailer with the tire carrier attached
Install:
Install took about 45 minutes. It can easily be done quicker but my locking hitch pin was giving me trouble. The tire carrier is shipped in a big box that contains two pieces. The first piece is the section that actually slides into the hitch. To keep movement of the tire carrier down, it’s designed to be a tight fit. Using a rubber mallet you, makes it a breeze though. The second piece is the actual arm the holds the tire. You attach this to the hitch part with a grade 1 1/8th grade a bolt along with two washers per side, a locking washer, and a large nut. After doing this, your tire carrier is together. You can then put the pin in that hold the tire carrier in the upright position. Next you’ll remove your license plate and attach it to its new spot under the tire. The carrier comes with bolts to attach the license plate into the pre drilled holds with nuts welded to the back side. Finally it’s time to throw on your tire. There are three studs which are mounted to a plate like most other tire carriers for your tire to be mounted.
Review:
So far it’s been great. While I haven’t done any hardcore off-roading with it on yet, it has done great on the small trails I’ve gone down. I haven’t heard a sound from it yet, even down the dirt roads at speed. The tire will move some off-road, but this is to be expected with it only being held up by a single post into the hitch. Overall I couldn’t be happier with how it turned out. While I still hope to have a full tire carrier down the road, this will get the job done till then. I plan on attaching some roto packs between the tire carrier and the hatch as there is enough room to do so (will post pictures up when the time comes). Also need to still rig up a license plate light. I’m going to go ahead and order some bolt lights from SuperBrightLED as it should make for a quick and easy install.
Pictures:


The tire carrier seems to fit far back in this picture but this is in part because of my hitch location on my bumper. I don't mind this space as I'm going to go ahead and mount Roto Packs between the hatch and carrier.

As you can see, the tire carrier is universal. Included these pictures to show the craftsmanship put into each carrier by Evan.