HokieRunner Build

Bummer. I understood that part of it, but I keep seeing mention of earlier manifolds (03/04) being used on VVT-i engines with the secondary air injection with block off plates. While what you have/mention works fine to isolate on systems that have all of the secondary air components, the manifolds actually feed ports on the head - not into the manifold itself. So they would need block off plates themselves - which I have found no evidence of as of yet. Thanks for the responses though.
 
Bummer. I understood that part of it, but I keep seeing mention of earlier manifolds (03/04) being used on VVT-i engines with the secondary air injection with block off plates. While what you have/mention works fine to isolate on systems that have all of the secondary air components, the manifolds actually feed ports on the head - not into the manifold itself. So they would need block off plates themselves - which I have found no evidence of as of yet. Thanks for the responses though.

No problem. I understand exactly what you mean. Sorry to link to another forum but here's a thread from last year on toyota120:

Performance exhaust with block off plates

Not sure if he's still making these or not but it's worth a try.
 
Thanks for the link.... that's EXACTLY the block off plate that I need... but I need it PRONTO. I'll see if I can get in touch with the guy - or I'm out another 850+ for the stock setup.
 
Couple updates over the past month or so:

Swapped in a remanufactured steering rack from CVJ axles in Colorado. High quality unit with new bushings and new inner tie rods. We're gonna do Zak's on Saturday and i'll take pics this go around and update the DIY writeup. Install was pretty straight forward and if you do a good job keeping track of thread counts on the tie rods, you can get the wheel back pretty much straight and alignment almost in spec.

Here's the rack as it arrived from CVJ Axles. Cost is $322 plus a $175 core charge. It's a bit more than 'new' Chinese units but it's rebuilt with a Toyota casing and high quality parts.


Alignment specs after I swapped in the new rack and after alignment at High Tech.


Also got in the new ARB 2500 Awning. The newer 2014 model has an 8.2' width and now extends out 8.2' (old one extended 6.5'). Working on fabricating some brackets so it will lock into one position for transport and then swivel on hinges to a better position during actual use.


Last and most importantly, got out the past two weekends to enjoy a bit of summer. Went kayaking and fishing last weekend and then up to the Poconos this past weekend for some driving through the woods and more fishing. Caught a boatload of monster crappies and a few bass.


I haven't seen a lot in regards to this issue on 4Runners but occasionally posts pop up where folks have one of these error codes or experience a noisy/faulty air injection pump.

The following are error codes which can be remedied with a bypass module or the cheaper relay option:

P1441, P1442, P1444, P1445, P2440, P2441, P2442, P2443, P2444 or P2445

I had several CEL lights this past summer relating to stuck closed valves and air pumps stuck off. Tundras had a HUGE issue with failing/faulty pumps and Toyota decided to cover them under warranty. Even though 4Runners have the same systems and problems, Toyota decided they would not extend the courtesy to 4Runner owners.

Long story short - if you have any of those codes and need to pass emissions/want to clear the CEL lights or prevent even worse AIP (air injection pump) issues in the future, there are a couple options other than replacing pumps and valves which can run upwards of $3000.

These codes CANNOT be cleared with bypass:P0412, P0415, P0418, P0419, P1613, P1614

The two bypass methods are:

1. DIY Relay Method Runs about $40 in supplies.

2. AIP Solid State Bypass Module with block off plates. Was $200 when I got it but looks like price has increased (I think you have to contact the seller for exact pricing) Module link. The seller also provides about 14 pages of detailed instructions so as long as you aren't color blind and can solder it's a VERY easy install.

I know [MENTION=68704]superman3043[/MENTION] had this issue and used option #1. He was extremely helpful when I installed mine and had a question or two. Hopefully he doesn't mind me name dropping him here

I ended up going the second route. While it was more expensive I liked the solid state module and how clean the install would be. I'm in the process of adding a lot of wiring and a 2nd battery and really wanted the cleanest OEM look possible for the least amount of work. I'm sure you can make the relay look pretty clean but I just wanted a quick fix and to be done with it.

Install took about an hour and a half and about an hour of that was spent cleaning and re-looming everything to keep it factory looking.

**Quick background on what the bypass does/how it works. The air injection system runs a system check whenever you start the truck at a COLD start up. It checks the air temp via the MAF sensor and if the air temp registers GREATER than 41 degrees, it fires up the air pumps to pump air into the catalytic converters to warm them up faster and prevent unwanted air pollution. So, the bypass intercepts the temperature check signal and tells the air pump system that it does not need to run. For emissions testing the computer just checks to see that the system is running its protocols so it will see that it's running standard checks and pass (assuming there aren't unrelated emissions issues).

Now on to the install pics.

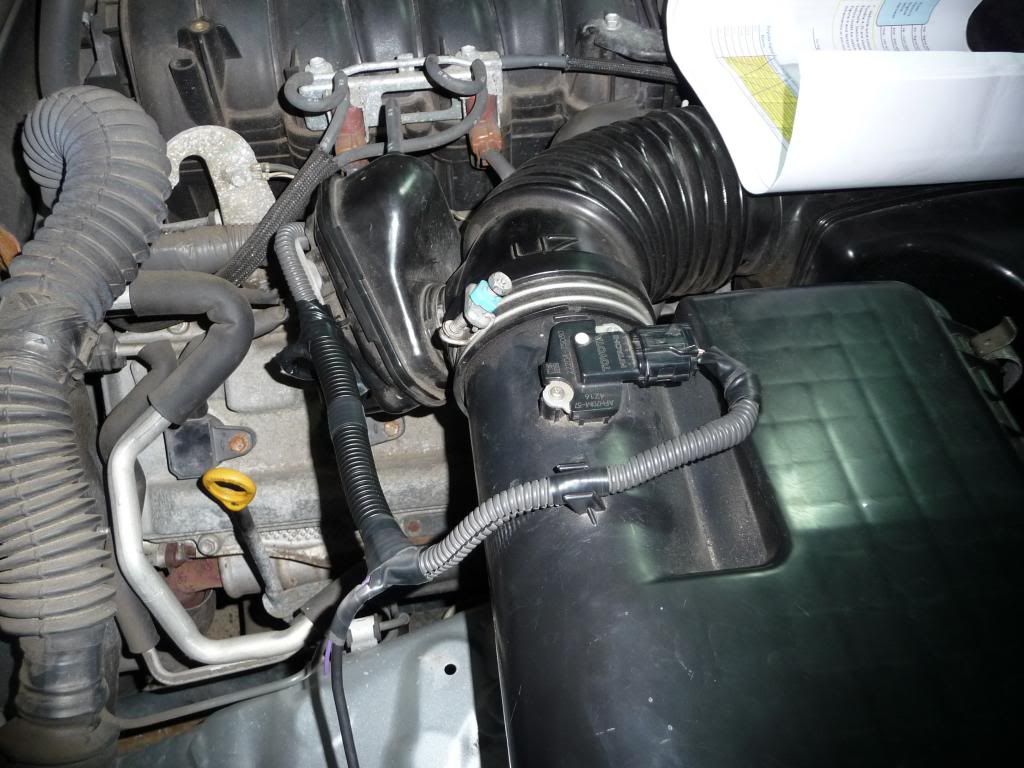
First step is to locate the MAF sensor wire.
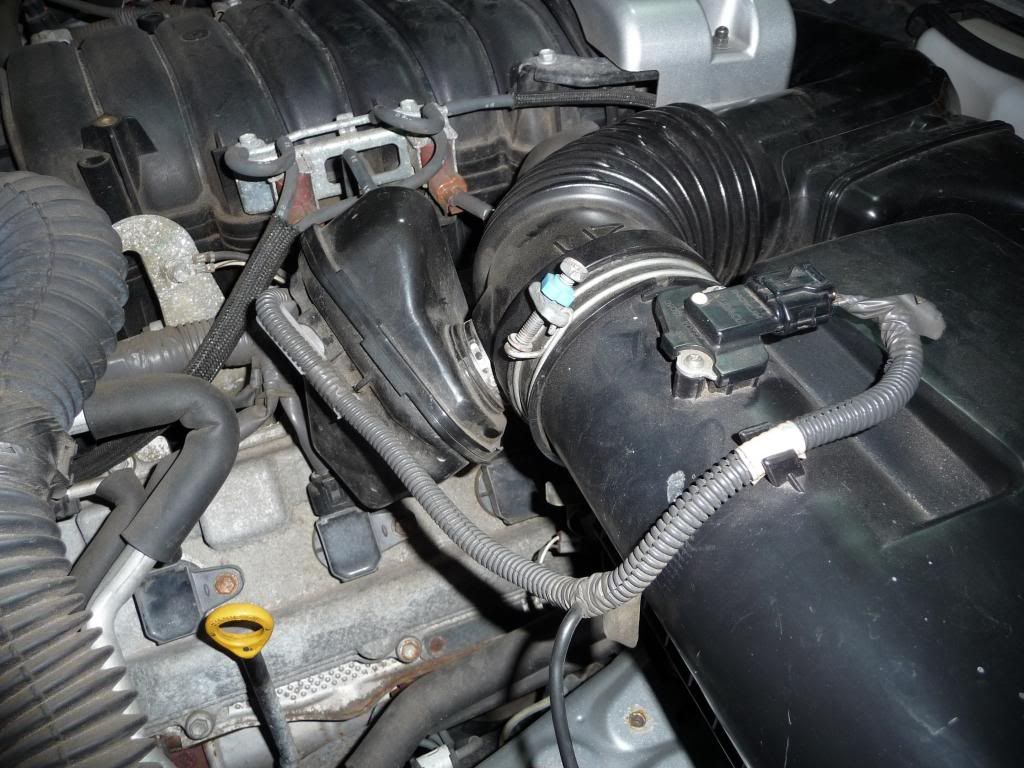


Unplug the sensor and take the wiring out of the loom. There should be 5 wires:

You can ignore the Brown wire and white/red wire as those will not be tapped into.

Here's the bypass module and wiring diagram:
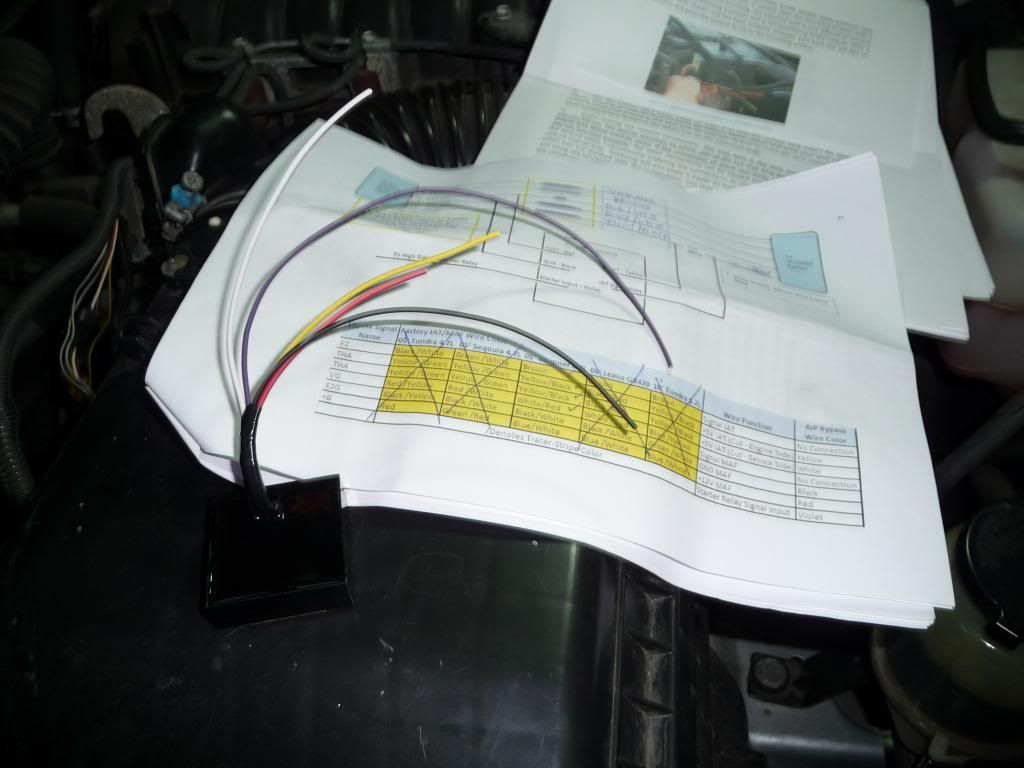


*edit - need to add a pic of the diagram here...

The wires soldered and ready for heat shrink tubing:
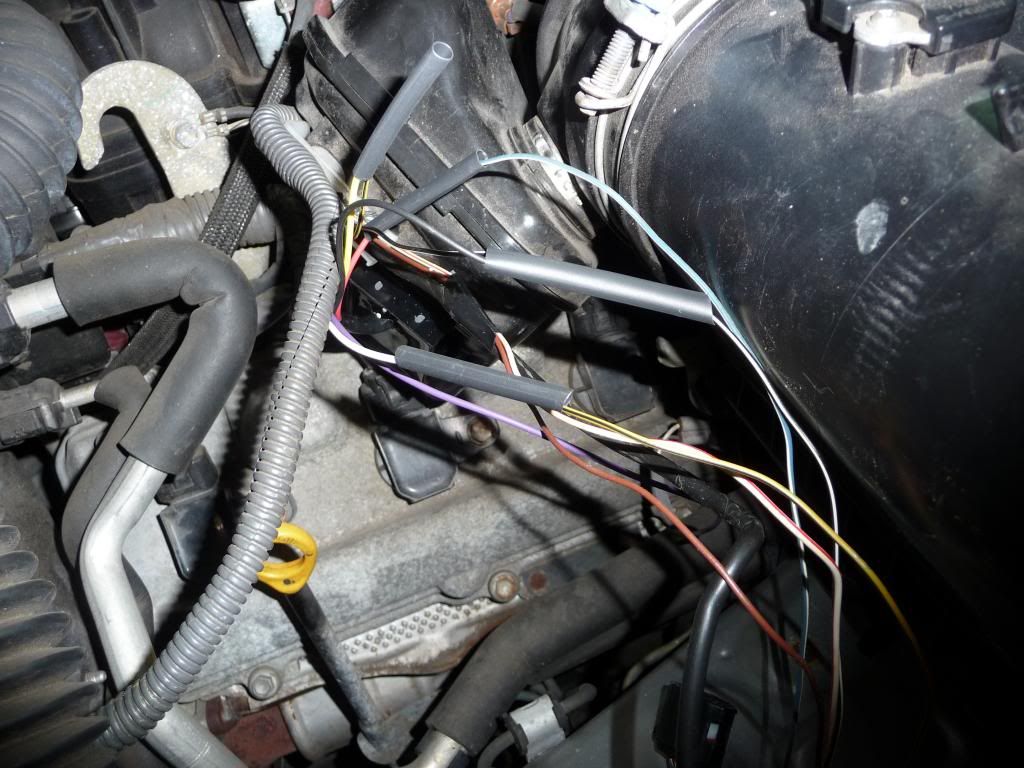


Re-wrap with electrical tape and re-loom. Even though I staggered the wiring taps with clean solder joints, the OEM loom was too brittle and narrow to house the modified harness so I added larger loom to the center section to keep it protected and somewhat factory.
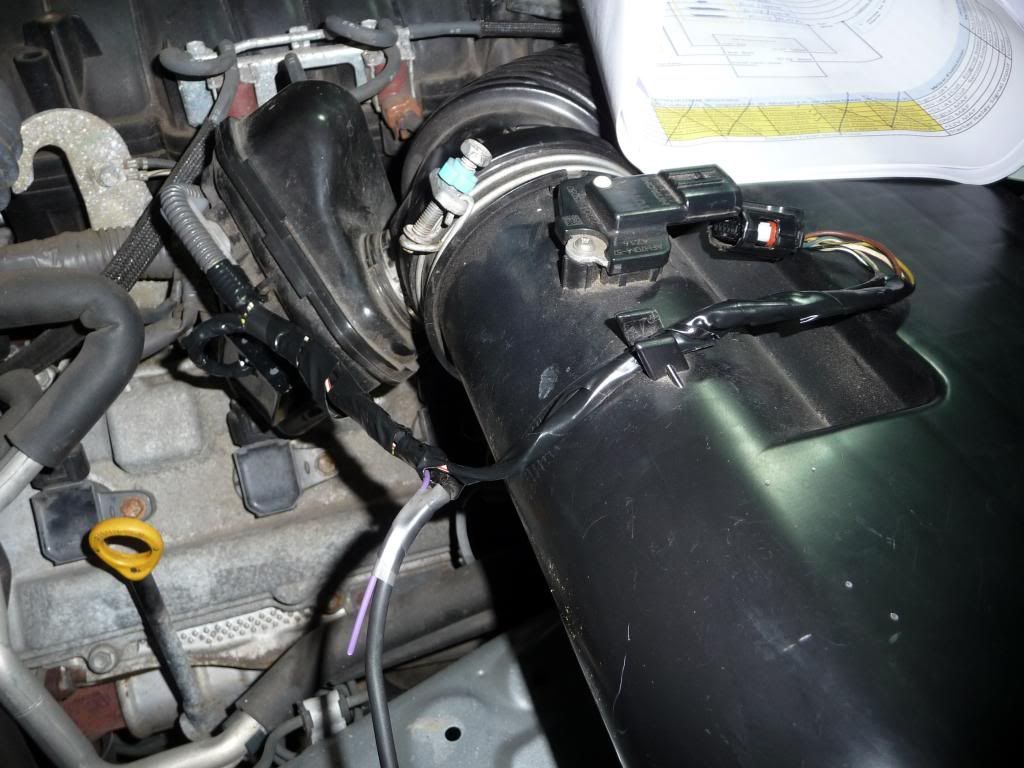


The block off plates are near impossible to get a decent picture of but following the instructions is very straight forward. Just loosen the 2 nuts on each manifold, slide the plates in and re-tighten.

I need to get an updated picture of the starter relay wire (purple wire). Its function is to send the signal when the starter fires up. Basically if you turn the key to accessory and don't start the truck for 5 secs, the module will no longer start the signal so the starter signal re-starts the module. You really don't need it if you get in and start your truck up right away.

i went with option 1 also but note sure which wire goes where. any help??
 
i went with option 1 also but note sure which wire goes where. any help??
Sorry bud - I didn't go the relay route so I'm not sure. Superman may be able to help you out or try to Google it? I remember finding it fairly easy when I looked for it. I'd try to find it for you but I'm about to run into a hearing for the next couple hours.
 
How did you trim the mudflaps? I've been planning to do that.
If you pull the flaps there's a lip on the inside (the side that faces the rear tire). I used that line as a guide and cut along it with a hacksaw. Then filed it smooth and hit it with a torch to smooth the edge. Looks like they from the factory like that! It's maybe a 10-15 min job.
 
Dual Battery Install and wiring stuffs

So after getting some time today, I fabricated the rest of the 2nd battery bracket including the solenoid mount. The hobart 140 welder continues to impress me although there's a bad side effect of having it....I keep coming up with more projects and ideas to build!

For the 2nd battery I picked up a Sears Diehard Marine group 34 battery. I'll be using the T-max dual battery kit which includes an in cabin monitor for battery charge display and the ability to link the batteries.


For dual battery trays, there are some pre-made options like the Dirty parts kit, but I felt like saving some coin and making my own. I started with a trailgear box I picked up for $30. The rest is just 1/8" x 2" flat steel welded on. With hardware, the box will end up costing around $50. It ended up way overbuilt but at least I have peace of mind it won't be sliding around the engine bay!!

Pulled the air box:


Made the lower bracket - I bent up some thin aluminum straps I had to get the shapes I needed for the legs, then bent the steel once I had the measurements close.


I originally intended for this to be bolted in, then the battery box would bolt to it. But I decided to just weld it all up...of course, then it started to rain so excuse the ugly arse welds as I was in a hurry. Not pretty but they're strong enough!


I also added a bracket on the side for the solenoid. I had originally mounted it lower but you can see where I had to cut it off and move it aft and up to clear some of the OEM wiring loom. It clears the hood in the new location and should actually make wiring a lot easier. Since all my bussmann boxes will be on the driverside, I wanted to keep the solenoid on the passenger side.


And holy smokes, the battery fits. Like a glove!


Ready for paint:


Fresh coat of hammer finish paint and hopefully I can get it all wired up tomorrow.

This picture made me laugh cuz it looks like it has legs and an arm....


Also added the quick disconnects and loom to the center console switch harness. Now all that's left is the in truck harness!


This was the other day, but vinyl wrapped the fairing and added my WM (Whitson Metalworks) decal.


Finally posted some updated pics in my first post. :hungry:
 
Seems like that Air Injection Pump problem has been popping up on the boards recently. Do you remember at what mileage yours went out and had to perform the bypass?
 
Seems like that Air Injection Pump problem has been popping up on the boards recently. Do you remember at what mileage yours went out and had to perform the bypass?
Mine started acting up with the pump noise around 130k. I put off the bypass for a bit but then it started to get worse Initially just happened for a few times over a week or two and then stopped. Maybe 2 months later came back with vengeance. Then i did the bypass and just in time to pass emissions too.

If it happens, do the bypass ASAP so it doesn't worsen and look into getting it covered under warranty after youve stemmed the bleeding. Just my $.02.
 
Blacked out headlights / lens upgrade

Took apart my new to me OEM headlights so I could black out the trim and install the clear lenses from TRS.

1. Took out the screws and seals on the back of the housings

2. heated in oven for 10 mins at 250 degrees.

3. pryed them apart and disassembled the inners.

4. prepped and painted the trim using black satin krylon fusion plastic paint


5. threw the trim in the oven for 5 mins at 350 degrees to cure the paint


6. swapped out the lens in the projectors for the TRS black series clear lens


7. re-assembled and put butyl sealant in housing edge to help ensure a good seal

8. re-baked for 10 mins at 250 degrees.

9. pushed them all back together and re-assembled the seals and screws.


10. installed in truck with new Morimoto HID 4300k 35 watt kit.


I'll have the old ones up for sale soon - nothing wrong with them, just initially planned on doing a retrofit or something but too many projects and too little time. Got the second set so I wouldnt' be without headlights.
 
Last edited:
Those look great. Would it be possible to take out the amber plastic in the corners ?

Thanks and yes - they're pretty easy to pop out or paint. I liked the contrast and the reflector for added visibility. Ya know...just in case they miss the steel bumper :bluejump:
 
So great to see another Hokie fan on the forum. I'm getting into the nitty gritty with my 2005 and it starts with some serious rust removal. But the hope is once all is done I will get to do some real modding and I hope to use much of your build as a guide! I imagine I'll be bugging you alot in the near future. Great build and keep it up!!
 
So great to see another Hokie fan on the forum. I'm getting into the nitty gritty with my 2005 and it starts with some serious rust removal. But the hope is once all is done I will get to do some real modding and I hope to use much of your build as a guide! I imagine I'll be bugging you alot in the near future. Great build and keep it up!!

Thanks Edward! Hokies are having a rough go of it this year so far...definitely been a tough one. Good luck on the rust mitigation and let me know if you have any questions
 

Members online

Forum statistics

Threads
278,310
Messages
3,554,079
Members
248,016
Latest member
Advally Service

Trending content

Back
Top