How to Change A/C Condenser

Chris_19

New member
HI!
I got my 99 4 runner into a bit of a front end collision which ended up putting a hole through the fins in the A/C condenser. I am doing the repairs myself as a shop will charge too much for labour but am unsure weather or not the refrigerant has leaked out or not. Does anybody have any experience or tips on how to replace the condenser?

Cheers :tea:
 
Register to hide this ad
I have done this already as most of the body parts were damaged in the crash. I am most concerned about how to recharge the A/C system once I get the new parts in.
 
If your A/C still works, it's unlikely that you lost any refridgerant. There's a sight glass behind the grill you can look at and assess whether or not it has the right amount of refridgerant in the system. You can google regarding what the bubbles should look like in the sight glass. If you change the condenser, you'll need to evacuate the system with a vacuum pump before recharging it. You might need to replace any lost oil and you might need to replace the dryer as well.
 
The condenser is a easy replacement but remember, once you open up your sealed system, you have to re-pressurize. Be careful not to get debris (including dust) in the system when you take off the condenser. I would recommend after you do the replacement, take it to a shop to pull a vacuum on it before refilling with R134.

I did a whole DIY AC rebuild on my system (http://www.toyota-4runner.org/3rd-g...-replacement-2000-toyota-4runner-limited.html)

I purchased my Denso parts from Amazon. They had the best prices and service. The Denso part number for the condenser is: 477-0518. When I did this awhile back, I paid $62.68 for it.

When I did my rebuild on the AC, I had debated about replacing the condenser until I looked at it. Over the many years, it was falling apart.
 
If you're really hard core and it still has refridgerant in it you can recover that refridgerant. Evacuate an empty refridgerant container, connect it to your A/C and chill the empty container with dry ice. I've also successfully used a freezer to chill the container but you'll have to drill a hole in the side of the freezer to get a hose or pipe through.
 
I haven't done it on the 4Runner but I did it on my sons BMW e36 'vert after he hit a 'coon. I already had a set of gauges and I acquired a 2-stage Harbor Freight vacuum pump with a coupon for slightly over $100. Surprisingly, the 4Runner and the BMW use the same Nippon Denso compressor. I added 2.5 oz. of PAG 46 oil based on the following calculation: 1oz. each for the changed condenser and receiver/dryer, plus .5 oz. that was remaining as liquid in the old R/D. Pulled a good vacuum that held for 30 minutes, and then charged with the exact amount of R-134a shown on the . I had a great DIY off my BMW board, but unfortunately it has lost all its pictures.

I did a lot of research on how-to before I did it, and I am happy to say three years later it is still blowing cold.
 
Your first step should be to connect an R134a manifold and see if the system has any pressure. HF sells a manifold for around $60, although I would recommend a mastercool 66661 ($75 on amazon).

If no pressure in the system - then you may have punctured the condenser in the collision. If this is the case you will need a new condenser AND a new receiver drier (the drier contains desiccant, and if the system is open it will have absorbed moisture). I have had good luck with a Denso 477-0518 condenser (~$60) and Denso 478-0500 drier (~$15) on my rig. You may also need to pick up an A/C O-ring set at your local auto parts store for a few bucks, because I dont believe the drier/condenser comes with all the ones you need.

Whenever you replace a component of the A/C system, oil must be added! The service manual will tell you how much oil for which components. I believe 20cc's is required for receiver drier and 45cc's for condenser. The oil you need is PAG 46 (a bottle of Johnsen's is about $10 on amazon). Personally, I used a syringe to deliver the oil into the drier, but it can be done several ways. Installation of the replacement parts is fairly easy - I only had to remove the grill.

Now you need vacuum down the system with a vacuum pump. Again, HF sells a few in the $100 range. I have had good luck with a Robinair 15310 ($110 on amazon). I wont go into the specifics on the entire process, since you can find it on youtube, but basically you will open the valves, pull it down under vacuum for about 30 min, then close the valves and shut of the pump. Make note of the vacuum and let it sit for 30 minutes to verify the reading does not change (no leaks). The max vacuum you can attain is dependent on your elevation (you will most likely be in the 24-27 in HG range).

You will need a puncture valve for the R134a can (Mastercool 85510, $12 on amazon) and a couple cans of refrigerant (Johnsen's 6312, $10ea on amazon).

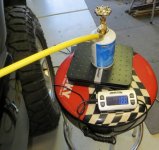
Now you basically disconnect the line to the vac pump, and connect to the puncture valve (puncture valve installed on refrigerant can). Puncture the can with the valve, and then you will want to purge that line (loosen it at the manifold for a second). I believe the spec is 21.2oz to 24.6oz of refrigerant for the system. You can keep an eye on how much you are charging by simply placing the can on a scale. From here you follow the charging process. Be sure to charge the LOW side (See youtube for process, but basically its: start engine, A/C on, fan on, outside air, and run it until the the compressor has pulled in the appropriate amount of refrigerant).

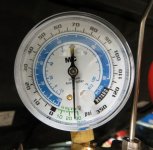
When charging is complete, you can also verify your nominal running pressures at high/low side are good (see manual for specs).

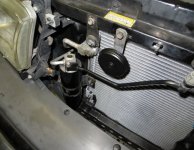
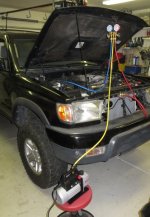
Some random pics I found in my archive:

 

Attachments

  • IMG_6580_618x480.JPG
    IMG_6580_618x480.JPG
    96.3 KB · Views: 12,470
  • IMG_6581_332x480.JPG
    IMG_6581_332x480.JPG
    52.9 KB · Views: 8,110
  • IMG_6583_487x480.JPG
    IMG_6583_487x480.JPG
    61.5 KB · Views: 6,732
  • IMG_6590_508x480.JPG
    IMG_6590_508x480.JPG
    66.2 KB · Views: 6,775
Last edited:
Good info here gentlemen. Question for you...

After Ive changed my condenser, put on a full vacuum to empty, could you not just use a 22 ounce can from the store that has the low side connections? My system (07) takes approx 22 ounces.

Like this one for example.
https://www.amazon.com/Arctic-Freeze-Synthetic-Automotive-Refrigerant/dp/B002S70MP6

Or do you have to get the smaller cans and puncture, etc?

Make sure you leave the vacuum pump running for atleast 30min to boil all the water out of the system. Did you replace your dryer? If not, run the pump longer.

Did you check to see if you need to add any PAG oil with the condensor change?

You can use what ever can size you want. If if you don't plan to use a whole can, you have to weight before and after to get the net. keep the can between 10 and 3 oclock while filling, you can get a bowl of hot water to warm the can up during filling to keep the pressure differential high.
 
I ended up using the smaller cans from Walmart because they were cheaper. I followed ChrisFix's video and it went smoothly. The rule of the old one went well except for two rusted out bolts that broke off at the head. Added 1 and 1 1/2 ounces of pag46 oil and 1/4 oz dye. I bought the Denso condenser that I already had the receiver dryer installed.

If anyone ends up needing to do this it's fairly straightforward with exception of broken bolts.
 
Last edited:

Members online

Forum statistics

Threads
278,310
Messages
3,554,080
Members
248,016
Latest member
Advally Service

Trending content

Back
Top