Kenwood DNX6960 Nav into JBL Install Thread

Asmara

New member
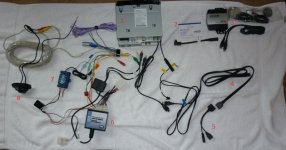
There are several threads on the Kenwood DNX series of Garmin based Nav radios but most are lacking in pictures. I took some pictures of my install into my 4th Gen that I thought would help others and figured I'd also post some links to threads that helped me prepare. I installed a DNX6960 which is the same radio as the DNX6160 but the Excelon line. I think the only benefit is the longer warranty which with a combo unit like this; is nice.

This is actually a fairly easing install in the JBL system because you have to buy the PAC Tato which has much of the wiring harness pre-done. I only had to connect the power, acc power, ground and reverse. A question that I saw over and over when doing my research was about the power antenna booster. The Tato harness has that wired into it (pin 13) so you do not need to connect the blue antenna power wire from the Kenwood harness (I verified this with a multi-meter).

To start here are some instructional links.

How to take apart your center console and dash
for the install.
[edit: That site seems to be down but here is another site that has instructions for taking apart the dash to the radio as part of a Navigation Bypass Install.]

Threads about this radio - here, and here.

Wiring connector pinouts for JBL system including the amp.

4th Gen reverse wire location

I thought the install tips in here were good even though it's not DNX specific but still forgot to take the CD out of the factory player.

What I bought:
1. DNX-6990 - about $735 from Amazon
2. CA-SR20V - Kenwood Sirius Cable - about $15
3. Sirius SCC1 - Sirius Radio Receiver - about $40
4. KCA IP3011V - Kenwood iPod adapter - about $30
5. Cable Jive - iPod to USB adapter (so I can use the iPod 30 pin connector with a thumb drive - there is only one USB port on the back of the radio)
6. PAC TATO - JBL stereo harness/interface - about $60
7. PAC SWI-JACK - Steering wheel interface - about $45
8. generic ebay rear view cam (actually for a Prado but not an exact fit)
Not pictured
*Mini-usb to USB A male cable. I plugged this into the back of the radio and left the other end hidden beneath the center console power adapter. This allows me to access the GPS for updating and other changes with a laptop. Note you can do most updates with a micro SD card but this is more versatile.
*Urban Runner Trim Ring. Yep, it's pricey but really looks good. Toyota part number:PZ365-35904 Desc: PANEL SETRADIO RECE Price: $88 [edit:it looks like this part will only fit the SR5 non RDS JBL center dash. If you have a limited with an RDS JBL unit you'll need an aftermarket kit like the one mentioned here later in the thread.]
 

Attachments

  • All Parts Sm.jpg
    All Parts Sm.jpg
    123.1 KB · Views: 6,492
Last edited:
Register to hide this ad
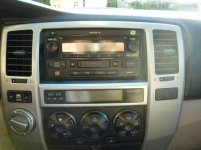
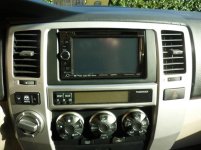
Before and After

Here are the before and after pictures.
 

Attachments

  • sm Before.jpg
    sm Before.jpg
    37.1 KB · Views: 6,145
  • sm completed.jpg
    sm completed.jpg
    46.1 KB · Views: 6,207
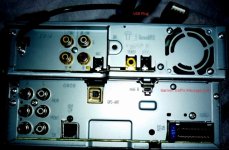
Here's the back of the radio, I messed with the contrast so you could read the labels.
 

Attachments

  • SM DNX6960-rear.jpg
    SM DNX6960-rear.jpg
    118.8 KB · Views: 6,502
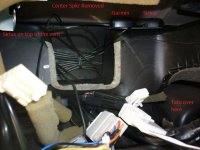
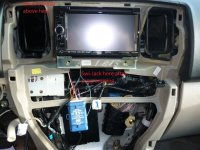
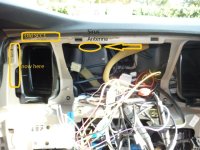
Here are some install pictures. I labeled the pictures to show where I put everything. I pulled out the center speaker since it wouldn't be used and I would get more room for stuff.

As you can see there is plenty of room for everything back there. The antenna location works great and I get a full signal for both GPS and Sirius. I know some people put the antenna on the 'shelf' between the air ducts but I wanted to keep it clear for excess wire. Although the SWI-JACK would have fit behind the radio, I decided to keep it separate so I could program it with the radio installed.
 

Attachments

  • Sm Inside.jpg
    Sm Inside.jpg
    110.1 KB · Views: 6,250
  • sm installed.jpg
    sm installed.jpg
    124.6 KB · Views: 6,285
In conclusion, I'm really happy with the install and the radio features.

Other random info:

The SWI-JACK works great. I think the lag people complain about is easily overcome. The difference is with the SWI-JACK you have to press the steering wheel buttons 'like you mean it.' With the factory setup, a glancing blow would activate the button. When you buy the TATO it comes with the right SWI-JACK harness pre-configured. You do not need to follow any of the SWI-JACK wiring instructions (resistor select, wire cutting etc).

The Bluetooth works well with my T-Mobile G1. I mounted the microphone next to the windshield in the middle of the truck on on the edge of the headliner near the map lights. Works well there and I just tucked the wire in behind the headliner and ran it down the edge of the door.

I haven't installed the backup camera yet. Hopefully this weekend and will post pictures after I'm done.
 
very nice write up. I would like to add nav to my DDX-814. I also need to replace my broken backup cam.

How long did the install take?
 
very nice write up. I would like to add nav to my DDX-814. I also need to replace my broken backup cam.

How long did the install take?

About 3 to 4 hours. Mostly because I was going slow and figured out where to put some stuff by trial and error. I also tested the GPS and Sirius antenna reception before I finalized the install.

I was originally worried about how much room there would be behind the radio because I had read some other threads indicating that it was tight so originally I had the TATO where the SWI-Jack ended up. Once I figured out I needed the SWI-JACK out for the programming (after the radio was hooked up), I swapped them. I also had my 8 year old son helping me and while lots of fun, he turns a slow ratchet :)
 
Thanks for the pics/write up. I've been staring blankly at my TATO for 3-4 months now, feeling a little overwhelmed about wiring it up. I'm sure I'll have questions for you when I finally jump into it.

Well done.
 
Thanks for the pics/write up. I've been staring blankly at my TATO for 3-4 months now, feeling a little overwhelmed about wiring it up. I'm sure I'll have questions for you when I finally jump into it.

Well done.

The only stress you should have with the TATO is wiring up the GND (black), ACC (yellow), BATT (red) and Illumination (orange) wires and that should be minimal. I used these new butt connectors I got at home depot in the electrical section. You basically just strip the ends of the wire, jam one wire in each end, and heat it up to melt the solder built into the connector. The plastic housing is actually shrinkable so in addition to being a good solder connection, the ends are sealed. I used a lighter to melt the solder because I don't have all my tools here and it worked fine. Otherwise, I didn't do a thing to the TATO. I just left the dip switches where there were and plugged in the harness. Super easy.

If you're putting in the Nav, use a quick splice connector to ground the parking wire to the ground wire so there are no restrictions on what you can use while the vehicle is in motion (plus it's just easier).
 
Last edited:
Hmm, you make it sound easy, lol.

I'll take another look at it tonight as it's been a while. Have to re-familiarize myself with it. Are the wires you soldered to the harness for the deck? If that's the case it shouldn't be bad.

My deck is a JVC, I think I have to install a switch also to trick it into thinking the parking brake is set. I put the same deck in my wife's Honda and simply grounded it to the dash. It still won't play movies, I know some Clarions need a switch to imitate the brake being set, I'm thinking my JVC is similar.
 
Hmm, you make it sound easy, lol.

I'll take another look at it tonight as it's been a while. Have to re-familiarize myself with it. Are the wires you soldered to the harness for the deck? If that's the case it shouldn't be bad.

My deck is a JVC, I think I have to install a switch also to trick it into thinking the parking brake is set. I put the same deck in my wife's Honda and simply grounded it to the dash. It still won't play movies, I know some Clarions need a switch to imitate the brake being set, I'm thinking my JVC is similar.

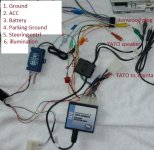
Yes. The only wires that need to be connected can be connected in the comfort of your kitchen. This is a good time to set the Dip Switches on the TATO (1-3 on, 4-8 off) so you don't forget later like I did. Then just take the aftermarket harness and connect it to the TATO harness. Here's a picture of that portion of the wiring. I grounded the parking brake to the ground wire. I also just noticed that I forgot to mention the illumination wire.
 

Attachments

  • sm super small.jpg
    sm super small.jpg
    64 KB · Views: 5,905
  • sm Tato Wiring.jpg
    sm Tato Wiring.jpg
    110.1 KB · Views: 6,519
Last edited:
Man, that's awesome. Thanks for the great pics.

You just turned this job from procrastination to full speed ahead! Again, I'm at work and the stereo is in the closet at the moment but I'm going to head home shortly and put the image to work in front of me.

Appreciate the help.
 
In conclusion, I'm really happy with the install and the radio features.

Other random info:

... The Bluetooth works well with my T-Mobile G1 ...

This reply doesn't have to do with your Install (which is nicely done, BTW!), but since it is an electronics thread and you mention having a G1, I will make an unsolicited suggestion:

You are upgrading your T4R electronics very nicely, so my humble suggestion would be to consider upgrading your smartphone. I had a G1 from Day One when it came out, and really enjoyed it, and I am still a fan of and daily user of an Android OS phone, but Android phone processors, tech, onboard storage, and features, are evolving at breakneck speed. Myself, I went from a G1, to a Droid, and now an HTC Incredible (both the latter on Verizon).

If you are staying with T-Mobile as your carrier, might I suggest that you have a look at the following top of the line up to date Android phones: The G2 (if you like the slide-out keyboard), the MyTouch 4G, or the Samsung Vibrant. I think my wife wants to buy the recently released LG Optimus, which is a more compact, mid-range Android phone, but which has decent performance, and sells for only 29.99 on a 2-year contract. Anyway, just some thoughts on smartphones, since the topic was brought up.

Congrats again on a nice install! I want to tackle an upgrade like that on my T4R, but it still looks a bit daunting. Thanks for posting all the pics, details and instructions! Who knows, maybe I will be inspired to attempt it myself now.
 
This reply doesn't have to do with your Install (which is nicely done, BTW!), but since it is an electronics thread and you mention having a G1, I will make an unsolicited suggestion:

You are upgrading your T4R electronics very nicely, so my humble suggestion would be to consider upgrading your smartphone. I had a G1 from Day One when it came out, and really enjoyed it, and I am still a fan of and daily user of an Android OS phone, but Android phone processors, tech, onboard storage, and features, are evolving at breakneck speed. Myself, I went from a G1, to a Droid, and now an HTC Incredible (both the latter on Verizon).

If you are staying with T-Mobile as your carrier, might I suggest that you have a look at the following top of the line up to date Android phones: The G2 (if you like the slide-out keyboard), the MyTouch 4G, or the Samsung Vibrant. I think my wife wants to buy the recently released LG Optimus, which is a more compact, mid-range Android phone, but which has decent performance, and sells for only 29.99 on a 2-year contract. Anyway, just some thoughts on smartphones, since the topic was brought up.

I'd love to upgrade my phone but my problem is I don't normally live in the US (work for the Gov) so a 2 year contract is out. Once I go back overseas, I'll get issued a work phone so even if I ponied up the $600 for a more recent model, the phone would sit in a drawer for 3 years of non-use becoming even more obsolete. I thought about signing a contract and then breaking it but I've heard horror stories of people wasting time doing it and sometimes not being successful - most have clauses for the military but not Foreign Service.

Now the Nav is good because I'm taking the 4Runner and I already verified that I can put maps of Turkey on it.
 
I'd love to upgrade my phone but my problem is I don't normally live in the US (work for the Gov) so a 2 year contract is out. Once I go back overseas, I'll get issued a work phone so even if I ponied up the $600 for a more recent model, the phone would sit in a drawer for 3 years of non-use becoming even more obsolete. I thought about signing a contract and then breaking it but I've heard horror stories of people wasting time doing it and sometimes not being successful - most have clauses for the military but not Foreign Service.

Now the Nav is good because I'm taking the 4Runner and I already verified that I can put maps of Turkey on it.

Ahh ... well now I understand why you haven't upgraded phones! Thanks for the explanation. If I were in your situation, I imagine I would do the same thing.
 
Great thread. I've got a question trying to install an Pioneer Avic x920BT.
I've got X920BT
Pac TATO
Pac SWI PS

The wire labeled #4 (Parking ground)
What is the best way to set that up?
Currently, I've got the ground from the Head unit, and the ground from the TATO coiled together and then set into the splice that is attached to the green Parking ground wire.
Is this the correct way to setup the system?
 
Great thread. I've got a question trying to install an Pioneer Avic x920BT.
I've got X920BT
Pac TATO
Pac SWI PS

The wire labeled #4 (Parking ground)
What is the best way to set that up?
Currently, I've got the ground from the Head unit, and the ground from the TATO coiled together and then set into the splice that is attached to the green Parking ground wire.
Is this the correct way to setup the system?
That's basically what I did. If you look at post 11 above the bottom picture shows how I made did the connection. I cut the parking brake wire short and then grounded it to the HU ground wire. In the photo #4 is the parking switch wire attached to the ground wire with a quick splice. #1 is the HU ground wire which is connected to the TATO ground with a solder splice.

One caveat is that I don't know how the bypass works for your radio. I did a quick internet search and it looks like for the X920BT you need to ground a second empty slot in the wire harness which most people do by moving the frequently unused mute wire. On the Kenwood you only need to ground the parking wire. At least according to my research. I haven't actually tested this.
 
TATO Reminder

Also wanted to remind people to check the dip switches on the TATO before installation. I normally listen to talk radio so I've never had any volume issues but last night the wife wanted to crank up some music. Full volume was loud but not LOUD. That's when I realized that I never checked the dip setting on the TATO to make sure they were set to the factory recommended- 1-3 ON 4-8 OFF.

I pulled the radio, set the TATO dip switches to the right settings and now the wife can rock out. I also connected the factory radio up temporarily and got that forgotten CD out of it.
:happens:
 
Also wanted to remind people to check the dip switches on the TATO before installation. I normally listen to talk radio so I've never had any volume issues but last night the wife wanted to crank up some music. Full volume was loud but not LOUD. That's when I realized that I never checked the dip setting on the TATO to make sure they were set to the factory recommended- 1-3 ON 4-8 OFF.

I pulled the radio, set the TATO dip switches to the right settings and now the wife can rock out. I also connected the factory radio up temporarily and got that forgotten CD out of it.
:happens:

Thanks for the reply
I hooked it up and grounded the wires including the mute wire.lets hope it works everything is just shoved into the back. Left a cf in the factory unit too.
 
Sirius SCC1 placement

In my original install I placed the SCC1 unit on top of the vent to the left of the radio.

Recently, my Sirius kept cutting out and displaying an acquiring signal message. It would turn right back on after a second. Pretty annoying. I figured it was either the antenna or my install location must have blocked too many of the vent holes which wasn't a problem during late summer and spring with the AC running but now that we've switch to hot air, the unit was overheating.

I moved the antenna to the same spot but on the left side. I just used some clear silicone to glue down a small steel plate. I also move the SCC1 to the left side of the same vent it was on top of but exposing all of the vent holes. In order to do this, I remove the instrument cluster surround (it just pops off) and inserted the SCC1 and then reattached the antenna and cable.

I'm not sure which one of these fixed the problem but after driving around for a while, I haven't been able to recreate the problem. My money is on overheating.
 

Attachments

  • sm Moved SCC1.jpg
    sm Moved SCC1.jpg
    125.4 KB · Views: 1,431

Members online

No members online now.

Forum statistics

Threads
278,312
Messages
3,554,083
Members
248,016
Latest member
Advally Service

Trending content

Back
Top