LED Tail Lights installed

cdoyle

Member
Some of you might have seen my thread in the Accessories forum about my idea of installing LED Truck Modules into my tail lights.

Well I finally went ahead and did it!! And I thought I would share the results.

Here is the Truck Module I purchased

c67acf9ca0cd569c1577aad3cdf1ea83.jpg

The part number of the one I used was It's a Peterson truck module, and the part number is. M417R-P

The cheapest place if found them was from hereHERE

Installing these was not as easy as I had hoped. I've been reading on these types of Retro's and many cars you can bake the tail lights in the oven til the glue softens, and you can pull the lens off the housing. Not so much with ours!! :mad: I tried several times with this method and it didn't budge.

So plan B!
I used a dremmel and cut the back of the housing to allow me to slip the module in from the back.

Before doing this, I had to basically strip the module down to just the printed circuit board. (to make it small enough to fit in there. So I cut off the red lens from the module, and then cut away the plastic case. Now with this particular module, the plug is epoxied right to the board. So it took some time and patience to get that off of there!!

PCB Front
PCBfront.JPG


PCB Back

pcbback.JPG


Now that I had the module board ready to install into the Runner
 
Register to hide this ad
Post some pictures of TailLight itself pls. Front, Side, Rear and especially wiring connections. As I wrote in your previous thread I'm wondering about wiring the hole TailLight to the original truck wiring.
 
Ya I will do that tonight, I had a picture on my camara but I accidently deleted.

so I just need to take another one.
 
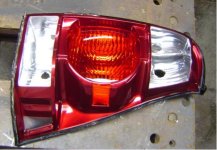
OK, got everything done and it looks really good!

As requested, here is the back of one of the tail lights.

What I did was first use that 4 minute epoxy to secure the piece I cut out in place. Then I took some of that 'goop' stuff, and put that everywhere else under that piece to help secure it. Then took some silicone to make sure it's good and sealed.

taillightreassemble.jpg


It's a little messy, but it works.

The wires I just ran out of the extra space that I cut out. Then siliconed them all in place too.

Here is a pic of where I tapped into the harness. It's the 2 green ones, I can't remember which is tail and which is brake, but if you get it wrong. Just reverse them. Or just use a meter like I did, and it will tell you right away which wires to use.

wireconnections.jpg


This last pic is of the harness back in place. Doing it this way allows you to use the factory wiring built into the tail light for the turn signal and reverse lights.

connectorinplace.jpg
 
OH almost forgot to post a pic of both installed

nighttimebrakes2.jpg


My camara don't do them justice, they have that nice circular pattern too them. Looks cool.
 
Pics are back now. We had some hosting issues, but everything is back now.

eek, spoke too soon. I need to setup my sub domain again. Give me a minute
 
I know that this thread is a little outdated, especially with the 06 LED lights now on the market. However, I figured that I would fill you in with my experience trying to convert the filament bulb to led using the standard 03-05 taillights.

I picked up a set of cheap tails (thanks rmischle), and I tried the oven method to remove the lens from the housing. I know that a few people, including cdoyle, said it couldn't be done. Well this just gave me more motivation to prove them wrong! :p

I put it into the over at 200 for about 5 minutes, took it out and the lens isn't budging. I bumped the temperature up a little and tried it again. Nothing. Bumped it up a litte more. It started to come apart, I kept repeating this getting it to come off a little more each time. About 30 minutes after I started, I thought something wasn't quite right. I put the housing on the stove and stepped back. Sure enough the whole lens was deformed.

Game over.

The whole housing started melting and deformed from me pulling on the lens. It isn't a real big deal, since I bought the lights just for experimental purposes, but it still makes me mad that I destroyed a perfectly good light. I guess I'll try to make some money back and ebay the other one. Then take the plunge and buy the 06 LED tails.

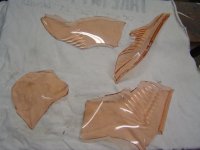
Instead of just tossing the deformed light, I decided to take it apart the easy way, a hammer. I broke the lens off the housing. The interesting thing here is that the lens is actually tinted to be pinkish. It isn't a pink spray paint or coating, the plastic was actually tinted to be pink. Part of this experiment was to see if I could clear the lenses by removing the pink tint, but that would be a no-go as well.
The housings were a nice ruby red color and it is a shame that it is hidden behing this goofy pink tinted plastic.

For those who were curious or those of you who like reading about other people's mishaps, this one was for you.

Tom
 
Tom, that's interesting info. Thanks for having the guts to share your mistake with us, so we can all learn from it.
 
loner said:
Tom, that's interesting info. Thanks for having the guts to share your mistake with us, so we can all learn from it.

I know that this oven trick was thrown around in a couple threads for the tail lights, and no one was able to separate it. I was able to use the oven to remove the bumper lenses from the housings and figured that they would have used the same silicon, but apparently not.

Life is all trial and error. Hopefully my experience will prevent someone else from melting their light. :)

Tom
 

Members online

Forum statistics

Threads
278,309
Messages
3,554,066
Members
248,016
Latest member
Advally Service

Trending content

Back
Top