Leveled her this weekend

I have my instructions at the first post of this thread, that's about as descript as I could be. If you do have questions let me know and I'll add to that post.
 
For step one it'll be obvious when you look. BY the balljoint there's 2 bolts on the bottom of the piece of metal The head is on the bottom and they're vertical bolts. Just pull those two

Doc, if you'd mentioned that was just a 1/2" spacer and not the 2" this thread was about it would have made more sense to me about the alignment.

For those that don't like the thread, PLEASE STOP BASHING IT AND START YOUR OWN, THAT'S f**** RUDE!!! If you have a basic question like the one above I can answer those, just post it.

Nobody is bashing your thread. I'm just trying to get accurate and correct information out there. Spacers vary in thickness, so not everybody will choose to install the same size spacer. My particular spacer was 1/2" thick and yours was 1" thick. I can only tell you from my own experience that a 1/2" thick spacer did not cause my alignment to go out of factory specs. Others may vary!
 
Thanks. I've read that thread, but it includes changing out the springs, which personally I won't be doing. All I will be doing is installing 1/2" spacers in the front, probably Toytec. So for myself, what I am looking for is a thread with instructions, and with pics if possible, just for installing front spacers, if there is such a thread.

Hope I don't get in trouble for posting this, but here are a great set of instructions for installing spacers on a 4Runner with XREAS. This is from another forum, so if it's not allowed, maybe a moderator can delete it.

Daystar (Spacer) installation on 4Runner with XREAS - Toyota 120 Platforms Forum
 
They are both the same as far as being easy to install. The thickness of the spacer doesn't make one easier than the other. You will have to compress the spring either way.
QUOTE]

Doc,

Thanks for the info, but now I'm confused (as usual).

I thought that with the spacer shown in the first post, (the one inch thick spacer that lifts 2-inches) a spring compressor isn't required because the OEM studs in the top plate don't need to be removed and replaced with longer studs. Instead, the original studs are used to mount the spacer to the top plate, using the three recessed holes, and then the three studs built into the spacer go into the strut tower holes.

On the other hand, with a 1/2" thick spacer that nets a 1" lift, a spring compressor is required because the OEM studs have to be removed from the top plate and replaced with longer studs.

For that reason I thought the 1" thick spacer would be easier to install than a 1/2" thick spacer.

Am I wrong? Please don't think I'm arguing. I'm just trying to understand.

Thanks,
Bill
 
They are both the same as far as being easy to install. The thickness of the spacer doesn't make one easier than the other. You will have to compress the spring either way.
QUOTE]

Doc,

Thanks for the info, but now I'm confused (as usual).

I thought that with the spacer shown in the first post, (the one inch thick spacer that lifts 2-inches) a spring compressor isn't required because the OEM studs in the top plate don't need to be removed and replaced with longer studs. Instead, the original studs are used to mount the spacer to the top plate, using the three recessed holes, and then the three studs built into the spacer go into the strut tower holes.

On the other hand, with a 1/2" thick spacer that nets a 1" lift, a spring compressor is required because the OEM studs have to be removed from the top plate and replaced with longer studs.

For that reason I thought the 1" thick spacer would be easier to install than a 1/2" thick spacer.

Am I wrong? Please don't think I'm arguing. I'm just trying to understand.

Thanks,
Bill

Both spacers will require you to compress the spring. In fact, you have to compress the spring just to remove it. Look at the instructions that I liked above and you can get a better idea what you're getting into. Keep in mind that some spacer kits use two spacers--a top-out spacer and a pre-load spacer. And some kits use just a single spacer. Either way, trust me that you're compressing the spring if you want to install the spacers.
 
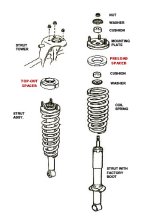
This might help you visualize it better:
 

Attachments

  • spacerplacement1.jpg
    spacerplacement1.jpg
    34.4 KB · Views: 1,300
And here's a set of text instructions that's also pretty good:

1. Jack up front end of truck and securely fasten with jackstands. I recommend lifting the whole front end, both sides of the truck off the ground, since otherwise the sway bar may make parts of the install more difficult.
2. Remove wheels
3. Remove lower shock mount nut
4. Have a 2nd person apply downward pressure to the upper a-arm and use a hammer and punch to push lower shock mount bolt out of mount
5. Caution: once the upper coil assembly mounting bolts are loosed coil assembly may fall out of mounting, so hold assembly while loosening these bolts Carefully remove upper coil assembly mounting bolts (3)
6. Caution: when working with coil compressor ensure that compressors are securely in place and will not slip as coil could slip and spring out with considerable force. Install the coil compressor assembly onto coils and compress until coils are free to move between the upper shock plate and the shock itself.
7. On the top portion of the shock is the nut that holds the whole assembly together. It may be necessary to hold the shock shaft so that it doesn’t turn as you loosen the nut.
8. Once the whole assembly is disassembled take the top plate and carefully pull the rubber coil-centering piece off of the top plate.
9. Install the rubber coil-centering piece from the stock top plate onto the spacer, and install the spacer into coilpack.
10. Compress the coils tighter, to the point that you can fit the entire new assembly onto the shock.(this will either require a lot of patience with a ratchet or and impact wrench…recommend the impact if one is available)
11. Once coils are tight enough to install complete the assembly, place all components back together, re-install upper shock mount bushings, and fasten the upper portion of the shock to the Spacer.
12. Align two of the top mounting bolts parallel to the lower mounting centerline for alignment of assembly during re-installation.
14. Re-install assembly, fastening top 3 mounting bolts first and securely fasten.
15. Have a 2nd person hold pressure on the upper a-arm and re-install the lower shockmount bolt and securely fasten.
16. Remount wheels and securely fasten and enjoy your new higher ride height Toyota Truck!

(Note: step 13 omitted to avoid bad luck for the superstitious. But seriously, it was just a numbering error. No step is missing)
 
They are both the same as far as being easy to install. The thickness of the spacer doesn't make one easier than the other. You will have to compress the spring either way.
QUOTE]

Doc,

Thanks for the info, but now I'm confused (as usual).

I thought that with the spacer shown in the first post, (the one inch thick spacer that lifts 2-inches) a spring compressor isn't required because the OEM studs in the top plate don't need to be removed and replaced with longer studs. Instead, the original studs are used to mount the spacer to the top plate, using the three recessed holes, and then the three studs built into the spacer go into the strut tower holes.

On the other hand, with a 1/2" thick spacer that nets a 1" lift, a spring compressor is required because the OEM studs have to be removed from the top plate and replaced with longer studs.

For that reason I thought the 1" thick spacer would be easier to install than a 1/2" thick spacer.

Am I wrong? Please don't think I'm arguing. I'm just trying to understand.

Thanks,
Bill
With XREAS, from what I hear the spring compressor is necessary no matter what cause of the lines for the shocks (correct me if I'm wrong there).

I think where your'e confused is the type of spacer. There's a type that goes above the strut assemly, the top out spacer (what I used or the EZlift shown on the left side above in the illustration) and on that goes into the spring in the assembly (shown on the right side in the illustration above). The ones like I used above the assebly require no removal of the spring. The 3 bolts up top mount to the spacer, which mounts to the strut tower. The EZ lift has "extenders" that extend the strut bolts through the other side of the spacer. With one of these systems, you do not have to compress the spring, just pull the whole assembly out, bolt the spacer on top and bolt it all back in.

Docs instructions are for pulling the spring assembly apart like you would for XREAS or a coil spacer that goes in the spring assembly.
 
Last edited:
I haven't put spacers in my T4R yet so I could be wrong on this, but I have been reading a lot of different threads on the subject. From what I have read, for installing top-out spacers, particularly the smaller 1/2" ones, you can get by without spring compressors. But someone please correct me if I am wrong on this.
 
Thanks. I've read that thread, but it includes changing out the springs, which personally I won't be doing. All I will be doing is installing 1/2" spacers in the front, probably Toytec. So for myself, what I am looking for is a thread with instructions, and with pics if possible, just for installing front spacers, if there is such a thread.

FYI.. If you are using the Toytec 1/2" spacer, you will have to dis-assemble the front strut assembly anyways since you have to install longer studs into the upper shock mounts.
 
go with the one I did or the EZlift spcers and you'll be fine and not have to disassemble the strut assembly. They're much easier.
 
With XREAS, from what I hear the spring compressor is necessary no matter what cause of the lines for the shocks (correct me if I'm wrong there).

I think where your'e confused is the type of spacer. There's a type that goes above the strut assemly, the top out spacer (what I used or the EZlift shown on the left side above in the illustration) and on that goes into the spring in the assembly (shown on the right side in the illustration above). The ones like I used above the assebly require no removal of the spring. The 3 bolts up top mount to the spacer, which mounts to the strut tower. The EZ lift has "extenders" that extend the strut bolts through the other side of the spacer. With one of these systems, you do not have to compress the spring, just pull the whole assembly out, bolt the spacer on top and bolt it all back in.

Docs instructions are for pulling the spring assembly apart like you would for XREAS or a coil spacer that goes in the spring assembly.


The spring compressor is needed because the spring has to be compressed, which really has nothing to do with XREAS. Webby says he'll be installing a 1/2" spacer, which is a preload spacer, just like the one I installed. There is no way possible to install such a spacer without a spring compressor unless you are Superman and can compress the coil spring with your hand!
 
I haven't put spacers in my T4R yet so I could be wrong on this, but I have been reading a lot of different threads on the subject. From what I have read, for installing top-out spacers, particularly the smaller 1/2" ones, you can get by without spring compressors. But someone please correct me if I am wrong on this.

The small 1/2" spacers are pre-load, not top-out. Where did you see top-out spacers that are only 1/2"? Or are you confusing the two? Most kits come with a small preload (usually 1/2") and a larger top-out spacer that are designed to work together. If you're just looking for 1" of front lift, you can just do the 1/2" pre-load spacer by itself.
 
go with the one I did or the EZlift spcers and you'll be fine and not have to disassemble the strut assembly. They're much easier.

Thanks. I googled EZ-Lift Spacers, and this is what I found: Ez-Lift Unless there is a different source for the EZ-Lift spacers that has more options, I see a couple of problems with these for my application:
1) they show the products for 2003-2007 T4R's, and my runner is a 2009;
2) the least lift they show are 2" Lift Spacers (which I presume is 1" of material), but I am looking for a 1/2" spacer for just 1" of lift.

Are there any 1/2" spacers available that don't require disassembling the strut assembly for ease of installation, and preferably don't cost as much as the EZ-Lift spacers -- those are priced at $130, while Toytec 1/2" spacers are $60 (yes, I understand I'm not quite comparing apples to apples, since the EZ-Lift spacers are thicker).

Bottom line for me, ease of assembly is definitely a factor, but so is the price of the spacers.
 
The small 1/2" spacers are pre-load, not top-out. Where did you see top-out spacers that are only 1/2"? Or are you confusing the two? Most kits come with a small preload (usually 1/2") and a larger top-out spacer that are designed to work together. If you're just looking for 1" of front lift, you can just do the 1/2" pre-load spacer by itself.

I've read so many threads here on this subject, and also info elsewhere, sorry, I just don't recall where I might have read about 1/2" top-out spacers. Correct, I am just looking for 1" of front end lift. So are you saying that there is no such thing available as a 1/2" top-out spacer for 4Runners?
 
I've read so many threads here on this subject, and also info elsewhere, sorry, I just don't recall where I might have read about 1/2" top-out spacers. Correct, I am just looking for 1" of front end lift. So are you saying that there is no such thing available as a 1/2" top-out spacer for 4Runners?

If there is, I've never seen it. All of the 1/2" spacers I know of are pre-loads. You're better off with a pre-load spacer anyway. I've had mine for a few years now and there was no difference at all in the way the vehicle rides or handles. It's completely transparent.

BTW, anything you see advertised for 2003-2007 will also fit the 2008 and 2009 4Runner. They are all the same.
 
Toytec has a 1/2" top-out spacer and comes with longer studs. It's listed as providing 3/4" of lift, but it's 1/2" thick and yields 1" of lift. This would not be considered an EZ spacer because you have to R & R the top studs, but it is "top-out".

~Doozi
 

Members online

Forum statistics

Threads
278,307
Messages
3,554,050
Members
248,016
Latest member
Advally Service

Trending content

Back
Top