mesooohoppy's build thread (99 limited)

Your '99 should already have a trans temp gauge. I know I've got one in my SR5 and am able to pull it up in TorquePro to monitor during drives.

i dont know what torque pro is, but i can tell you for certain that i do not have an actual dial gauge that shows trans temps. i have RPM, speed, water temp, and fuel level on my cluster.
 
i dont know what torque pro is, but i can tell you for certain that i do not have an actual dial gauge that shows trans temps. i have RPM, speed, water temp, and fuel level on my cluster.

What he meant was the 99-02 has a sensor that can sense trans temp and in an event it gets too hot, it throws a trans temp light on your cluster.

You can purchase a Scangauge II that can be set up to read both Water temp and Trans temp.
 
i dont know what torque pro is, but i can tell you for certain that i do not have an actual dial gauge that shows trans temps. i have RPM, speed, water temp, and fuel level on my cluster.

I see what you're wanting now. Torque Pro is an app for your phone (iPhone and Android) that can read from your OBDII port via bluetooth. I've got a cheapo bluetooth OBDII readed that I plug in and then it's all setup to read everything I like, including trans temp.
 
What he meant was the 99-02 has a sensor that can sense trans temp and in an event it gets too hot, it throws a trans temp light on your cluster.

You can purchase a Scangauge II that can be set up to read both Water temp and Trans temp.

i think i have seen it on start up (when all the lights on the cluster come on). i believe it says 'a/t oil temp'.

IIRC, i think i tried to look up that scangauge thing. i am an absolute idiot when it comes to wiring and i do not possess the skill to wire one of those things in. its going to be challenging enough for me to wire in a sender/temp unit and gage. i may just not install if i cant figure it out. i dont understand almost every single aspect of wiring. i cant even do a head unit without help.
 
i think i have seen it on start up (when all the lights on the cluster come on). i believe it says 'a/t oil temp'.

IIRC, i think i tried to look up that scangauge thing. i am an absolute idiot when it comes to wiring and i do not possess the skill to wire one of those things in. its going to be challenging enough for me to wire in a sender/temp unit and gage. i may just not install if i cant figure it out. i dont understand almost every single aspect of wiring. i cant even do a head unit without help.

That's the beauty of the scanguage and/or TorquePro, you just plug it into your OBDII port and your done!
 
I see what you're wanting now. Torque Pro is an app for your phone (iPhone and Android) that can read from your OBDII port via bluetooth. I've got a cheapo bluetooth OBDII readed that I plug in and then it's all setup to read everything I like, including trans temp.
thanks for the info. i dont want that info on my phone, because then that means i have to check my phone while im driving (which i already do, but i dont need one more excuse while im driving). that also means i have to have my phone anytime im in the car to check it. i want something i can check in a matter of half a second and continue on.

i want something like this:
5957_39.jpg


so that i can print a holder/trim piece to put to the left where my two cig lighters are by the shifter. that little piece of 'cubby' is useless to me, so i figure ill put that there. again, assuming i can figure out how to wire it in.
 
That's the beauty of the scanguage and/or TorquePro, you just plug it into your OBDII port and your done!

surely there is some sort of wiring involved to power the unit, no? either way, ill have to look into it. thank you for your help!

edit: i remember why i stopped looking at it. i put in that i have a 99 4runner and got this insane list:
>> X-Gauge Categories >> ISO – VPW

That doesnt seem like just plugging into an OBD port to me..? i dont even know what i am looking at??

edit 2: i also dont know what 'TXD', 'RXF', 'RXD', and 'MTH' are on that link. now its all coming back to me why i never looked into this more... it also says nothing about monitoring trans temps?
 
Last edited:
surely there is some sort of wiring involved to power the unit, no? either way, ill have to look into it. thank you for your help!

edit: i remember why i stopped looking at it. i put in that i have a 99 4runner and got this insane list:
>> X-Gauge Categories >> ISO – VPW

That doesnt seem like just plugging into an OBD port to me..? i dont even know what i am looking at??

edit 2: i also dont know what 'TXD', 'RXF', 'RXD', and 'MTH' are on that link. now its all coming back to me why i never looked into this more... it also says nothing about monitoring trans temps?

I don't have one, but from my understanding they really are plug and play. You get power right from the OBDII port under the dash (above the gas pedal) and you don't have to worry about programming any of those PIDs.
 
I don't have one, but from my understanding they really are plug and play. You get power right from the OBDII port under the dash (above the gas pedal) and you don't have to worry about programming any of those PIDs.

thanks, if it really is that easy id rather go that way. im just not sure what all of the acronyms mean on the scangage page. i am also not sure why it doesnt display a trans temp feature on their web page when i have read multiple threads on here that say trans temp work on scan gauges that are 99 and up.
 
thanks, if it really is that easy id rather go that way. im just not sure what all of the acronyms mean on the scangage page. i am also not sure why it doesnt display a trans temp feature on their web page when i have read multiple threads on here that say trans temp work on scan gauges that are 99 and up.
The data is available in the ECU, you just have to 'tell' the Scangauge how to read it. The specific letters/numbers in the "X-Gauge" description are data addresses, etc. and the math to interpret and display the data on the Scangauge screen.

*All* 3rd gen 4Runners have the trans temp sensor, but only the '99+ ones can report it out via the OBD-II port.

-Charlie
 
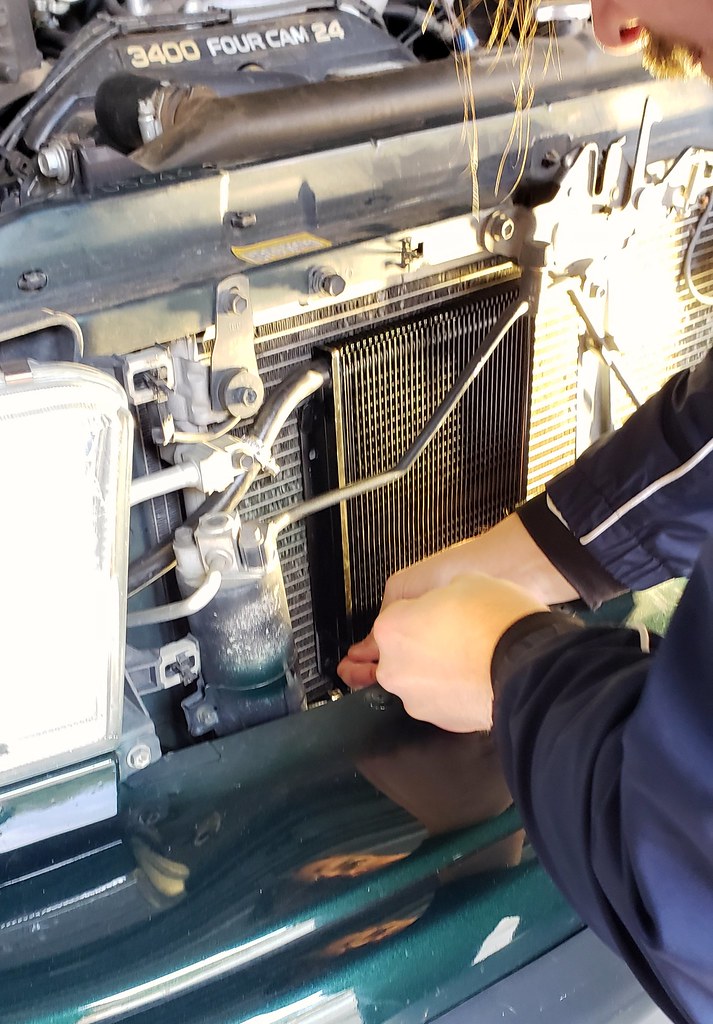
small little update. managed to get the 70268 B&M cooler kit installed:

49416534568_5df4789e06_b.jpg


i was using this how to guide as a good piece of info for what to expect:
B&M 70268 SuperCooler Transmission Cooler Install on a 3rd Gen

Its a great guide, but here are a couple of tips on where i deviated from it:
-i can get goodyear 250 psi hose at cost so that is what i went with. i bought 5 feet of 3/8" ID hose, but you need 6' to do the feed and the return line. i ended up using the good year stuff for the feed line, and what came in the kit as the return line. the good year hose is MUCH nicer than whatever is in the kit. i will keep an eye on the return line, but as soon as it gives me any issue, its coming out and being replaced with the better good year stuff.

-the soft hoses that go to the hardline on top of the front subframe are an absolute PITA to get off. heat cycling through out the years make this stuff damn near impossible to get off; you arent going to pull it off. it being in such a cramped place doesnt help either when you are trying to cut the hose off. i ended up finding a razor blade with a hook on it and that eventually cut off the soft line. im not sure what this type of razor blade is used for, but if you google 'razor blade with hook', you will see what i am talking about.

-the zipties that come in the kit are super aggressive. you only want to be running this through your radiator one time. we were originally going to feed it through the front to use as a 'guide' so i could feed it back through in the same way the guide linked above does. the problem is once you feed it through the front, we noticed it was chewing up the rad fins pretty good. so we just installed the zip ties this way.

-i recommend you mount the cooler FIRST and get your lines all setup. it was abundantly clear that once i had everything in front of me and the grill off, the cooler needed to go in first and then route the lines. we chose this way of install because it allowed us to ensure the cooler would fit with the lines on, and we got all of the hose routing done once the cooler was installed. this basically made it so once it was time to unplug the hard lines and pop the new ones in, the hardlines would only be exposed for a minute or two, minimizing the potential ATF spillage and keeping the mess down to a minimum.

-the good year hose and the hose in the kit i used would not go on for the hardlines. it would get right past the nipple and stop. i had to use a heat gun to persuade it to go on all the way. if you use this hose, you will need a heat gun to get the hose real hot and expand. once its hot, wrap it in a rag and get it pushed onto the hardline ASAP. the hose cools down fairly quickly and even when its warm, its not hot enough to get it on the hard line all the way.

-i didnt replace my radiator because it looked fine although i have no idea how old it is. at 240k, i want zero chance of pink milkshake, so i just capped the radiator trans cooler lines all together. im surprised people install these and still loop through the radiator; which IMO is the main reason to do this swap and eliminate the possibility of pink milkshake all together.

also went up to the snow yesterday:
49417016976_af1d6450f7_b.jpg


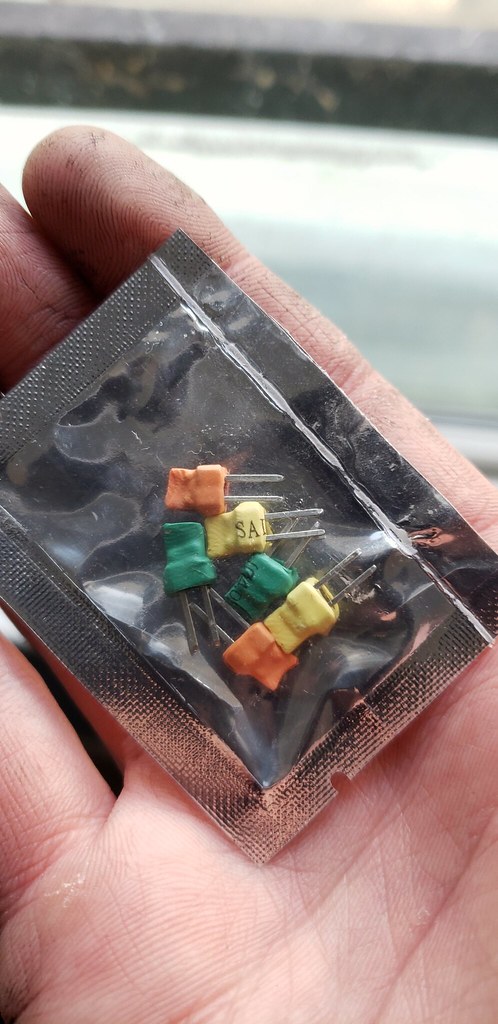
my resistors from euro land came in last week. although there is just one problem. they are way too small. there is no way i am going to be plugging this into the airbag clip. so much for not cutting off that clip. i dont think we are going to want to try to soldier this in the car, so i will likely have to make a harness with a resistor on it and connect with spade connectors or something. i have 2 1 ohm resistors and im not sure if they will fit in the slots together, much less stay in there. i might try that before committing to cut off the clip.


49420225673_2eddd30175_b.jpg
 
Last edited:
-the soft hoses that go to the hardline on top of the front subframe are an absolute PITA to get off. heat cycling through out the years make this stuff damn near impossible to get off; you arent going to pull it off. it being in such a cramped place doesnt help either when you are trying to cut the hose off. i ended up finding a razor blade with a hook on it and that eventually cut off the soft line. im not sure what this type of razor blade is used for, but if you google 'razor blade with hook', you will see what i am talking about.

my resistors from euro land came in last week. although there is just one problem. they are way too small. there is no way i am going to be plugging this into the airbag clip. so much for not cutting off that clip. i dont think we are going to want to try to soldier this in the car, so i will likely have to make a harness with a resistor on it and connect with spade connectors or something. i have 2 1 ohm resistors and im not sure if they will fit in the slots together, much less stay in there. i might try that before committing to cut off the clip. [/img]
You are describing a carpet blade for a utility knife...

As for the resistors - as long as they are the correct ohms and they fit, you are fine. In normal usage, they do not get full battery voltage applied (that would otherwise burn them up). The only time the do get full battery voltage is when the squib would be ignited (an accident) - at which point you don't care if the resistor burns up!

-Charlie
 
You are describing a carpet blade for a utility knife...

As for the resistors - as long as they are the correct ohms and they fit, you are fine. In normal usage, they do not get full battery voltage applied (that would otherwise burn them up). The only time the do get full battery voltage is when the squib would be ignited (an accident) - at which point you don't care if the resistor burns up!

-Charlie
thank you. i can never remember what type of blade that is.


the issue with the resistors is i need one two ohm resistor to bridge the two holes on the plug together. you see it in this video at 6:45 in:
YouTube

you see the guy bridge the clip with a single resistor. the clips you see in my hand will not bridge between the two clips. they are super small. id have to put each of one in the female clip for the super small resistors. the smallest resistor i have is a 2.2 ohm. so if i put both in, id already be over double the limit needed for ohms. i cant find normal sized 2 ohm resistors locally and im not ordering 500+ on amazon to use one (especially when i have what i need already). i also have 2 regular sized 1 ohm resistors. i essentially have two options:

-attempt to push both normal sized resistors in and see how they fit (i will likely do this first). although i am not sold on this and i think they may come loose over time. if this works it will be awesome and means i dont need to cut the clip off

-create a harness for the super small resistors and cut the clip off on the harness and join with spade clips. this is what i will probably end up doing if the first option does not work.

im all ears if you have any other suggestions.
 
Last edited:
I came up with this setup for the gauges. I used electrical conduit and cut them at 10° angles to act as bezels to angle the gauges toward the driver slightly and got a piece of plastic from a stereo install shop for the backer plate. The rest is just small fabbed up brackets from aluminum stock.

IMG_9398.jpg


4runner_wm_injection_web_09.jpg
 
Internal Error or Mouser Electronics - Electronic Components Distributor and find what you need. Should be ~$10 with shipping for what you need. I believe I used 5W sized resistors on my WRX when I removed the side airbags. The recommended resistance on that one was 3.3ohm. Not sure what the Toyota system expects for resistance.

-Charlie
can you post a different link? what you posted says the link isnt good and takes me to the main page. i dont even know what im looking for, so i dont know what to search.
I came up with this setup for the gauges. I used electrical conduit and cut them at 10° angles to act as bezels to angle the gauges toward the driver slightly and got a piece of plastic from a stereo install shop for the backer plate. The rest is just small fabbed up brackets from aluminum stock.
i am fairly certain you posted this in the wrong thread...?
 
can you post a different link? what you posted says the link isnt good and takes me to the main page. i dont even know what im looking for, so i dont know what to search.
What airbags are you eliminating? Do you know the resistances required? I can link to specific parts if you need - I just linked to the two major electronics suppliers in the US that also sell to consumers (main pages, like you said).

-Charlie
 
Weren't you looking for a place to mount a trans temp gauge a few posts back? Maybe I misread.
ah, i see now. thank you. i am likley going to just buy a scangage as i have a 99, so the scangage can tap into the ecu and tell me ATF temps. i am basically sold on this thing due to how easy it is to install. plus i get three other slots on the scan gauge.

your design would be great 3d printed in ABS.
What airbags are you eliminating? Do you know the resistances required? I can link to specific parts if you need - I just linked to the two major electronics suppliers in the US that also sell to consumers (main pages, like you said).

-Charlie
just the drivers. i was told i need a 2 ohm resistor to turn the light off. im trying to avoid cutting off the plug if at all possible.
 

Members online

No members online now.

Forum statistics

Threads
278,312
Messages
3,554,083
Members
248,016
Latest member
Advally Service

Trending content

Back
Top