tS_kStin
Member
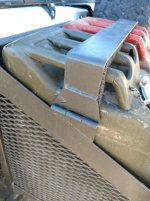
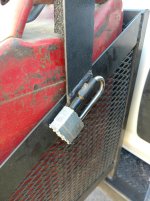
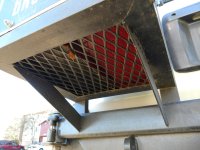
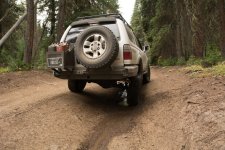
This is my super long over due over view of my modified Bandit rear bumper. I posted a picture of the tire singout awhile ago in another thread and promised I would post some more in-depth pictures so here they are, only slightly late. Overall I am very happy with my build of this. There isn't really any noise from it so that is very nice. I was a bit nervous that there would be noise from it all moving around. I wanted to do a double swing for a few reasons. 1. Less space needed to actually swing the swing outs out. 2. Less weight on the hinges when they are open. 3. Allows for having 2 separate tables so both can be down for my wife and I and if one of us doesn't need the table or needs to move it for some reason then the other person doesn't have to move anything. 4. Cause being different dang it! All these land cruisers get dual swingouts but no 4runner?!
Still planned:
Replace some of the foam with rubber, detailed later in pictures.
Make some form of either fold down or an attaching table for camping (one from each side)
What I used:
(2x) 4xinnovations hing kits (one for each side) Swing Out Tire Carrier Hinge Assembly
(1x) Standard Toggle Latch: Toggle Clamps, Latch Type Toggle Clamps, 40341 - The Toggle Clamp Store
(1x) 2"x3" Rectangular bar. Not sure the guage because we found it in the shop and it just happened to be long enough. It is VERY stout though. Its proabably about .125 or 1/8" thick but don't quote me on that, could be thicker than that.
(1x) mini bungie cord - Had this already
(1x) Cotter Pin - Had in the garage
(2x) Military Jerry Cans - Already had one, got one from father in law
(2x) padlocks - Got from my local Ace
(1x) Bed frame for angle iron - I work for a bed company so I get old frames for free
(1x) A bit of 3" flat strap - Also found this
(1x) A bit of light gauge smooth expanded metal. - Had leftover from roofrack
(3x) Studs with the correct threads from a mechanic friend. - Yay connections
(1x) Some foam. Same material that is used for roll bar padding commonly. - Not sure where this came from. My dad just had it randomly.
(1x) Matching rim, got it from a local Toyota guy that parts out a bunch of runners and has way to many of these rims sitting around.
*Soon to have some rubber to replace the foam due to the foam not holding its shape*
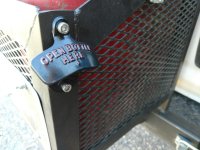
(1x) Bottle Opener!! :cheers: Black Powder Coated Star-x Bottle Opener
Here is the finished Product
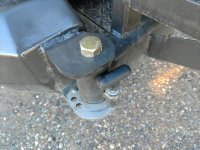
The Hinge, Drivers side, cut into the bumper a bit to mount the hinge a bit closer to the bumper and so that it can be flat due to the different angle of the bumper as seen in pic. They are VERY well built and have a stainless wear plate for the spring loaded drop pin to slide on. Two Lock positions for pin to drop into.
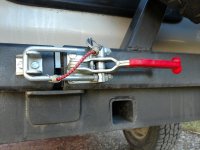
The Latch w/ hole drilled through it for the pin to go into so that the latch has no chance of opening by itself as a safety measure.
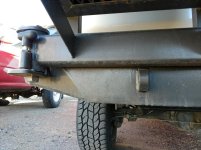
Main beams sits just above the Shackle mounts
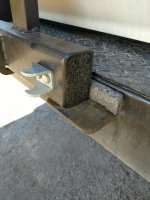
Main beams meet and sit on this angle iron. I made it so I have to lift each arm into the rest to take the load off the bearings in the hinges. Also that chunk of foam will be replaced by rubber once I find a chunk that will work there.
Back side of the tire mount
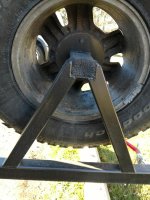
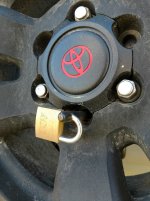
Front of the Tire w/rod welded to the mounting plate for a padlock. 3 studs pressed into the plate.
Next post is the Jerry can side.
Still planned:
Replace some of the foam with rubber, detailed later in pictures.
Make some form of either fold down or an attaching table for camping (one from each side)
What I used:
(2x) 4xinnovations hing kits (one for each side) Swing Out Tire Carrier Hinge Assembly
(1x) Standard Toggle Latch: Toggle Clamps, Latch Type Toggle Clamps, 40341 - The Toggle Clamp Store
(1x) 2"x3" Rectangular bar. Not sure the guage because we found it in the shop and it just happened to be long enough. It is VERY stout though. Its proabably about .125 or 1/8" thick but don't quote me on that, could be thicker than that.
(1x) mini bungie cord - Had this already
(1x) Cotter Pin - Had in the garage
(2x) Military Jerry Cans - Already had one, got one from father in law
(2x) padlocks - Got from my local Ace
(1x) Bed frame for angle iron - I work for a bed company so I get old frames for free
(1x) A bit of 3" flat strap - Also found this
(1x) A bit of light gauge smooth expanded metal. - Had leftover from roofrack
(3x) Studs with the correct threads from a mechanic friend. - Yay connections
(1x) Some foam. Same material that is used for roll bar padding commonly. - Not sure where this came from. My dad just had it randomly.
(1x) Matching rim, got it from a local Toyota guy that parts out a bunch of runners and has way to many of these rims sitting around.
*Soon to have some rubber to replace the foam due to the foam not holding its shape*
(1x) Bottle Opener!! :cheers: Black Powder Coated Star-x Bottle Opener
Here is the finished Product
The Hinge, Drivers side, cut into the bumper a bit to mount the hinge a bit closer to the bumper and so that it can be flat due to the different angle of the bumper as seen in pic. They are VERY well built and have a stainless wear plate for the spring loaded drop pin to slide on. Two Lock positions for pin to drop into.
The Latch w/ hole drilled through it for the pin to go into so that the latch has no chance of opening by itself as a safety measure.
Main beams sits just above the Shackle mounts
Main beams meet and sit on this angle iron. I made it so I have to lift each arm into the rest to take the load off the bearings in the hinges. Also that chunk of foam will be replaced by rubber once I find a chunk that will work there.
Back side of the tire mount
Front of the Tire w/rod welded to the mounting plate for a padlock. 3 studs pressed into the plate.
Next post is the Jerry can side.
Attachments
-
 IMG_20161122_113710053.jpg131.1 KB · Views: 2,080
 -
 IMG_20161122_113746257.jpg133.4 KB · Views: 664
 -
 IMG_20161122_113722798.jpg134.5 KB · Views: 867
 -
 IMG_20161122_132956694.jpg137 KB · Views: 757
 -
 IMG_20161122_133003568.jpg132.3 KB · Views: 635
 -
 4runner scaled.jpg137.2 KB · Views: 812
 -
 IMG_20161122_132919671.jpg135.9 KB · Views: 633