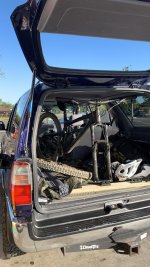
Mtn bike inside

Register to hide this ad
No pic, but it's pretty simple. remove front wheel, grab bike: One hand on head tube area, one hand on seat tube near the crank. Pick it up and roll it, rear wheel first, into the back hatch. Lay it down, put loose front wheel on top of bike.
 
I made my own version of that rack for about 30 bucks including the mounts. Bought the mounts and a 2x6. I added some "grips" - plastic with hooks for carpet on the bottom. Mine doesn't move but can be stored outside the truck
 
1) Dropper post - unless you're really short, there's no way the back end of the bike is going to fit in with the seat sticking up. As a side bonus, a dropper post is a small game changer when it comes to descending technical trails. So get a dropper post, and slam the seat down.

2) Take the front wheel off.

3) Install a fork mount (that matches your bike, lol, long gone are the days of all bikes being very similar. QR, skraxle, thru axle, boost, etc, etc) on the back cargo floor. On mine, I used the two tie down hook bolts to put in a 1X6 board that I trimmed to fit - so it fits inside the hatch. Then i played around with placement of the fork mount on that, and attached it. The positioning will depend on how wide your bars are.

Voila, bike stands up along the side of the cargo area with one half of the back seat flipped down. I put the bike on the driver side, so it's not in the way of visibility out the back. Just ride up, drop the seat, open the hatch, undo the front wheel, back the bike in, attach the fork, and stick the wheel in (DON'T FORGET THE WHEEL, lol).

I think I'm into it for about $30, not counting the dropper post (which is a bike part!). I had the board laying around in the basement, just bought a cheap boost fork mount.
 
Last edited:
1) Dropper post - unless you're really short, there's no way the back end of the bike is going to fit in with the seat sticking up. As a side bonus, a dropper post is a small game changer when it comes to descending technical trails. So get a dropper post, and slam the seat down.

2) Take the front wheel off.

3) Install a fork mount (that matches your bike, lol, long gone are the days of all bikes being very similar. QR, skraxle, thru axle, boost, etc, etc) on the back cargo floor. On mine, I used the two tie down hook bolts to put in a 1X6 board that I trimmed to fit - so it fits inside the hatch. Then i played around with placement of the fork mount on that, and attached it. The positioning will depend on how wide your bars are.

Voila, bike stands up along the side of the cargo area with one half of the back seat flipped down. I put the bike on the driver side, so it's not in the way of visibility out the back. Just ride up, drop the seat, open the hatch, undo the front wheel, back the bike in, attach the fork, and stick the wheel in (DON'T FORGET THE WHEEL, lol).

I think I'm into it for about $30, not counting the dropper post (which is a bike part!). I had the board laying around in the basement, just bought a cheap boost fork mount.


I open-carry my MTB (outside hitch rack), but yes, the dropper post is up there with disc brakes as one of the 2 most important bike game-changers in the last 25 years. Semi-concealed MTB-carry is probably a good idea in many places these days.....even weight weenie XC racers are all using droppers.
 
I also have a external rack I bought from ISI: iSi Advanced 4x4 Bicycle Carrier Products | Cars and 4WD | Caravans and Camper Trailers

On our Colorado/Utah trips when I hauled more than one bike, I used a hitch rack. And we've tried various kinds, very few of them worked well if you were wheeling it pretty hard between rides. And they'd beat up the bikes in addition to dragging them here and there. So a few years ago I started looking around for a rack that would work better, and after searching for a long time, I found the ISI racks in Australia. Very sturdy, simple, and they hold the bikes very securely and simply (wheels trays) so they don't scrape against the rack or each other, and way up in the air so you can wheel it pretty hard and not put the bikes in danger.
 
If the rear seats are folded down, the bike should fit in the back with the front wheel turned 90º. No need to remove the wheel.
 
I have a piece of plywood with a 15mm thru bolt fork attachment bolted to it. So i just drop the post and remove the front wheel, back the bike in rear wheel first and then secure the fork/thru axle to the attachment. Its ides around a tad but it wont fall over and wreck the interior bits .
 
Cheap Delta mount that works with my fork, perched on a scrap off a Volvo we had laying around to lift the fork mount high enough.
ECL8B1k.jpg


And underneath the floor, to provide stability. More scraps. Don't want the bike- or floor- to wiggle.
FQ8pz07.jpg


Had trouble finding a pic of the bike mounted in there, so pay no attention to the woman putting the broken sway bar back in the bracket after Pearl Pass- or all the vacation-related junk inside.
Fits next to the large dog crate that's in there most of the time. I bungee the front wheel next to it, leaning against the wheel lump with an old blanket where it contacts the window.
A dropper post is convenient- I ride a medium 2016 Niner Rip9, it's somewhat tall.
EltaBrf.jpg


When I pull the front wheel I always put it on the bumper in front of the dog box, then in its place after the bike goes in. Can't close the hatch until I move it, hard to leave it behind that way.
 
Last edited:
1) Dropper post - unless you're really short, there's no way the back end of the bike is going to fit in with the seat sticking up. As a side bonus, a dropper post is a small game changer when it comes to descending technical trails. So get a dropper post, and slam the seat down.

2) Take the front wheel off.

3) Install a fork mount (that matches your bike, lol, long gone are the days of all bikes being very similar. QR, skraxle, thru axle, boost, etc, etc) on the back cargo floor. On mine, I used the two tie down hook bolts to put in a 1X6 board that I trimmed to fit - so it fits inside the hatch. Then i played around with placement of the fork mount on that, and attached it. The positioning will depend on how wide your bars are.

Voila, bike stands up along the side of the cargo area with one half of the back seat flipped down. I put the bike on the driver side, so it's not in the way of visibility out the back. Just ride up, drop the seat, open the hatch, undo the front wheel, back the bike in, attach the fork, and stick the wheel in (DON'T FORGET THE WHEEL, lol).

I think I'm into it for about $30, not counting the dropper post (which is a bike part!). I had the board laying around in the basement, just bought a cheap boost fork mount.


Well that is almost exactly what I did and described. You also added some nice details like having the quick disconnect to remove the seat.
 
Size large Santa Cruz frame, dropper seat all the way down, 3D printed front fork mount from eBay
 

Attachments

  • B204B6E4-875E-4EF5-83AB-0BEEB0CAB906.jpg
    B204B6E4-875E-4EF5-83AB-0BEEB0CAB906.jpg
    142.7 KB · Views: 531

Members online

No members online now.

Forum statistics

Threads
278,306
Messages
3,554,045
Members
248,016
Latest member
Advally Service

Trending content

Back
Top