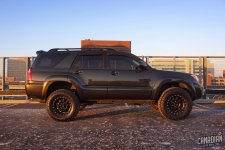
My 2007 Limited V8 Ownership Journal

Sorry I haven't been around here much lately. I didn't dyno it because I only did the headers to fix the cracked manifold, not for power. I'm sure the stock exhaust and cats are going to hinder any hp gains in my case anyways. I noticed very little difference on the butt dyno with just the headers and K&N filter, but with the addition of the HC filter delete it feels like it has more mid range now. I think the ecu is starting to adjust to the new airflow because it feels a bit faster lately too.

Bottom line, if you want the headers for performance but you're keeping the stock exhaust, don't bother. If you're using them to fix cracked manifolds, they're great! If you want to make power, you need to pair the headers with a proper exhaust and possibly delete the cats to make it worthwhile in my opinion.

I have the cracked manifolds and can deal with the ticking for now. Its a expensive fix that I am not sure is worth fixing. Which leads me to ask, Will the cracked manifolds eventually get worse? SHOULD I replace them? I don't mind the ticking if I means saving $1500.
 
Very glad! If a V6 was the only option for the 4th gen, I wouldn't own one. Sure, on paper they're somewhat similar but I've driven both and in the real world a V6 in this type of vehicle just doesn't cut it. The V8 is better in every way aside from MPG.

+1
Did you notice any mpg improvement though?
I know my mileage is related to the weight of my right foot. But an additional .5-1 mpg daily, and 1-2 mpg on road trips/straight highway would be awesome.

Did you keep the cat's that are in the manifolds?
 
I have the cracked manifolds and can deal with the ticking for now. Its a expensive fix that I am not sure is worth fixing. Which leads me to ask, Will the cracked manifolds eventually get worse? SHOULD I replace them? I don't mind the ticking if I means saving $1500.

I suppose there could be some long term effects but I don't think you need to rush to fix it if you don't mind the ticking. Windows up + loud music is much cheaper than $1500!

+1
Did you notice any mpg improvement though?
I know my mileage is related to the weight of my right foot. But an additional .5-1 mpg daily, and 1-2 mpg on road trips/straight highway would be awesome.

Did you keep the cat's that are in the manifolds?

I saw a 1 mpg improvement with just the header upgrade (calculated manually with 90% city driving). I bet there's even more improvement on the highway. I haven't tested the headers with the HCF delete yet but if driveability is any indicator then mpg likely improved some more. I had the original cats from the manifolds welded to the headers in the stock location. The only thing on the entire system that has changed is the headers themselves (stock y-pipe, muffler, even resonator).
 
Hey guys and gals, time for an update.

Lighting:


I had a big, exposed, sort of bullbar-looking light bar on my Jeep. I liked it, but this time around I wanted to do something more low key. I ended up following the 2 "stealth lightbar" threads that are already on here. Up first, a 32" curved Philips led bar. It's worth noting that those of us with Canadian 4runners can't mount our brackets to existing holes in the back of the rebar because well, they don't exist. My guess is that it has something to do with our different 5mph crash test standards. I ended up building brackets off the rad support but I'm not entirely happy. There's still some vibration so I'm going to need to add a brace to tighten things up. Looks clean though!


Next up is the 40" single row Cree led bar. I followed the thread pretty much directly on this one. Even scored a great deal on the Totron bar that everyone seems to love. I've gotta say, the quality on it is great. Even compared to my other light in the bumper. Before mounting both lights I made sure to re-torque all of the bolts holding the lenses on. This is an important step when dealing with lower end lights in my opinion. I did this with the one on my Jeep as well and never had any condensation issues with it.


Now for the finishing touch. I decided to take the stealth theme one step further. I didn't want any noticeable switches or exposed wiring in the cabin. I managed to find these oem size and style switches on amazon (mic tuning I think?). These are push button on/off switches that I've wired so that they only illuminate when the leds are on. They fit perfectly in our existing switch holes with no filing or trimming whatsoever. Now that I've deleted the air suspension system, it just so happens that I've got 2 switches in the console that no longer control anything. This is a perfect place to be able to reach them easily and quickly if an oncoming car pops up.


Overall I'm very happy with the end result. I know it's a bit of a sensitive subject at times, but I was able to save a ton of money by using cheaper lights. My entire setup (both lights, harnesses, building materials and switches) cost less than a single Rigid 20" light. Nothing wrong with buying the fancy lights, but I'm not running across the desert or hitting the Rubicon trail at night so I just can't justify the cost.

Coming up: The Runner gets dirty, and then very, very clean.
 
Went to a nearby Mudfest event this spring with my Runner, the TRD Pro Tundra and a couple Jeeps and had a blast. This was my first time off road with this rig and I'm very pleased with how it handled itself. We stayed out of the mud pits but hot lapped the trails in the forest all afternoon. The Runner laughed at everything I took it through, then cruised an hour back home on the highway smooth and quiet like a Lexus. I didn't get any pics on the trails because I was too busy driving, but I figured I should at least get some poser shots of the aftermath.


The Cleanup:

This is where things get a bit obsessive. There were a few things I'd been meaning to address ever since I bought the Runner so I decided to take a week and knock them all out at once. Let me start by saying - I wouldn't expect the average 4runner owner to go this far or even understand why I did. There were a few products and techniques that I wanted to test out and although it's not a Ferrari or a Lambo, I felt that this rig would be a great vehicle to try them out on. Some people won't get it, some people will. The important thing that we can all appreciate is that nearly every surface on this thing is now protected for the future. And yes, I'll be going back to mudfest in the fall.

So, here's what I did to bring some new life to my 200,000+ km 4runner:

- Deep cleaned the interior (it had been detailed at some point before I got it so it wasn't too bad)
- Applied protective coatings on interior (Gtechniq C6 Matte Dash on plastics, L1 Leather Guard on leather, and I1 fabric guard on carpet)

- Detailed engine bay (again, this wasn't in very bad shape)
- Deep cleaned tires, wheel wells and suspension. Also touched up some rusty areas with paint
- Thorough exterior wash (pressure washed mud, stripped old wax, foam bath, fallout remover, 2 bucket hand wash, towel and blown dry)

- Restored driver's side headlight (passenger one had already been replaced due to failed UV coating / yellowing)
- Claybarred all paintwork, glass, headlights and taillights
- 2 (in some areas 3) step paint correction - machine compound/polish to remove scratches, swirl marks, sanding marks, and water marks etched into clear coat
- Same 2 step correction done to taillights

- Paintwork, headlights and taillights ceramic coated with Gtechniq Crystal Serum Light followed by Exo topcoat
- Wheels (inner and outer), lug nuts, Fox suspension and lightbar housings ceramic coated with Gtechniq C5 Wheel Armour
- Windows and sunroof coated with Gtechniq G1 Smart Glass
- Black plastic exterior trim and inner fender liners coated with Gtechniq C4 Permanent Trim Restorer
- Tires dressed with Poorboys Bold n Bright tire gel


^ A rough idea of the overall condition of the paint


^ Front door after compounding, rear door untouched

 
Last edited:
Damn the haters and mud cakers, nothing beats a freshly waxed & detailed 4x4. I applaud your efforts, it looks outstanding!

Tell me more about this ceramic coat, will it help me deter the inevitable pinstriping? How about the leather conditioner, how often do you apply it going forward? Where do you buy your detail products here in Canada? Sorry for all the Q's, I need to follow suite.

Again, props for a job well done.
 
Damn the haters and mud cakers, nothing beats a freshly waxed & detailed 4x4. I applaud your efforts, it looks outstanding!

Tell me more about this ceramic coat, will it help me deter the inevitable pinstriping? How about the leather conditioner, how often do you apply it going forward? Where do you buy your detail products here in Canada? Sorry for all the Q's, I need to follow suite.

Again, props for a job well done.

While the ceramic coating registers at 9H on the pencil hardness scale, I'm not too confident that it would protect against something as harsh as a branch dragging along the vehicle. Some of the coating manufacturers will promise you the world - like how they protect against keying, stone chips, dents, last the life of the vehicle etc. I don't buy any of that.

I see it as a sacrificial barrier that will hopefully last 3-5 years. It will protect against swirl marks, wash marring and even light scratches. Dirt, mud, road salt, overspray, bugs etc are less likely to stick to the surface and if they do, it's much easier to clean them off. The top coat is extremely hydrophobic - more so than any wax or synthetic sealant out there by a long shot. This coating is their consumer grade version of their pro-only one, but I would still make sure you're experienced in paint correction and detailing in general before tackling it yourself. To pay a pro to apply this coating you'd be looking at a $1000+ job (usually includes only the 2nd step of refinement polishing that I did here, if your paint isn't in near-new shape the price goes up). At that price point I don't think I'd want to take the gamble of having trees scratch up the coating and having to re-polish and re-coat afterwards. If you're just talking about a few light swipes from some brushes sometimes, you'd probably be safe. But if you're going to be grinding down tight trails I would either save your money or go the opposite direction and look into a self-healing protection film like Xpel ($$$$).

I'll likely reapply the leather and plastic coatings twice a year to be safe. Routine cleaning with a damp towel should be all that's required in between. I wouldn't use a traditional leather conditioner on a rig that gets dirty if you don't want your seats to get cracked. Most of those products will do more harm than good. I could go on and on about that but this post is already getting long!

I buy a lot of supplies from a couple sites based here in Ontario to try to save on shipping. Believe it or not, Amazon has quite a few products. For you guys out west I'd check out Auto Obsessed. I think they're in Calgary? They seem to carry a ton of great product lines although I haven't dealt with them personally. In this case I ordered the Gtechniq products directly from the manufacturer in the UK (and proceeded to get hammered by duties and taxes... I'll never learn my lesson).

Any more questions, by all means fire away! The whole purpose of this thread was to share info that might not be available here otherwise.
 
Hey guys, sorry for anyone looking for updates to this thread. I doubt I'll be doing much more with it thanks to the whole Photobucket thing. You can feel free to follow along on my website, Canadian Gear Head - The life of a car guy in Canada. There's plenty of 4runner content on there!
 

Attachments

  • mar1972x.jpg
    mar1972x.jpg
    141.8 KB · Views: 448
Last edited:
great looking rig man. I will definitely have to follow on the website, I can only dream of having a detail job that nice
 

Members online

Forum statistics

Threads
278,316
Messages
3,554,120
Members
248,016
Latest member
Advally Service

Trending content

Back
Top