Mytoy4 Satoshi Grille Mod

Mytoy4

New member
Before:
tsvPUoa.jpg


alBMgBV.jpg


After:
qrbzfH3.jpg


zgDeoQI.jpg


dXCIf6E.jpg


Raptor stlye done on my black 4Runner
Before:
011zDV3.jpg


After:

bgyonCe.jpg


jD3fybX.jpg


yjWAgEs.jpg


+++++++++++++++++++++++++++++++++++++++++++++++++++++++++++++++++++++++++++++++++++++


I've gotten quite a few questions on the process steps I took to build my Satoshi grille. I decided it may be best to build a separate thread with more detail since my build thread has bits and pieces scattered throughout.

It took me about 4-5 hours, start to finish to complete this. Total cost was just over $100 (I used my stock grille).


Materials Needed:
Aluminum Mesh Grill Section 12" x 48" Silver
#2 Phillips Screwdriver
10mm Socket Wrench
Particle Board
Jigsaw
Pneumatic Saw
Tin Snips
Rubber Mallet
Masking Tape
Etch Primer
Enamel Primer
Enamel Paint
Sandpaper (180 and 320 grit)Hot glue/gun
vise-grips
Hot Glue/Gun
 
Last edited:
Register to hide this ad
Order the mesh; Aluminum Mesh Grill Section 12" x 48" Silver. It was purchased on Amazon, through VMS http://www.vms-racing.com/productsinfo.php?CateID=51&ID=443 - Which is no longer available. I now order through Custom Car Grills
http://www.customcargrills.com/Custom-Grill-Mesh.asp


Remove the grille. On the backside of the grille there are about eight 10mm nuts to remove. Disconnect the linkage rod by pivoting the clip on the end so that it pops out. Once these two steps are done the grille pops right off.
Remove steel support tubing on the bottom backside of the grille, with a Phillips screwdriver. Remove the lever that’s attached to the grill that works the linkage rod. It’s held on by two 10mm bolts.
pXpWKwZ.jpg


VT0aQnh.jpg


Cut the inside of the plastic grille mesh away from the frame of the grille using a pneumatic saw (a small hacksaw should work if you don't have a pneumatic saw)
Sand off the uneven nubs where the plastic mesh was cut so that the inside of the frame is smooth. I used a pneumatic sander/grinder (die grinder should work if you don't have a pneumatic sander). Sand completely smooth with 180 grit or finer sand paper with a 3" d.a. sander.

NfVFhWn.jpg


LCocgTA.jpg


MeKpwpP.jpg


exWNiUb.jpg


DQMRhCh.jpg
 
Last edited:
Lay the grille upside down on a piece of 3/4 inch particle board and trace the inside of the grille opening, about 1/4 of an inch in to accommodate for the bend of the mesh.
ei43Ak2.jpg


L04aUbb.jpg


Cut the wood with a jigsaw to form the shape of the grille opening.
7L8Nxfu.jpg


Cut the mesh at least 2" greater than the overall size of the shaped wood.

Lay the mesh on a flat surface and place the wood on top. Carefully bend the mesh upwards around the sides of the formed wood. Use a rubber mallet to gently form the creases around the outside edge. Corners may need to be cut so that the mesh has room to fold over itself without kinking. This completes the mesh forming, tweak as needed.
1HBnrTT.jpg


0Wo0WIw.jpg


SlcMwMU.jpg


x3di97K.jpg


PvyDzPq.jpg
 
Last edited:
Prepping for for paint

Grille frame - Lightly sand or scuff the areas that need to be painted. 320 grit or finer will work. Spray 2 light to medium coats of an aerosol enamel primer (enough to cover all sand scratches).
KFGBuRv.jpg


Mask off the color match grille frame. Leaving the inside of the sanded area exposed.
xd7GBii.jpg


6nCMkRT.jpg


Mesh - Spray 1-2 coats of good quality primer that is designed to adhere to bare metal. Preferably and acid etch primer (sold at automotive paint supply stores or hardware type store). Let dry. Then apply 2 light to medium coats of an aerosol enamel primer.
c9ru40n.jpg


5SiL6oN.jpg


Spray 2 light to medium coats of aerosol enamel matte black over mesh and inside of grille frame. Let dry between coats.
Mf9Vyqk.jpg
 
Last edited:
Assembly
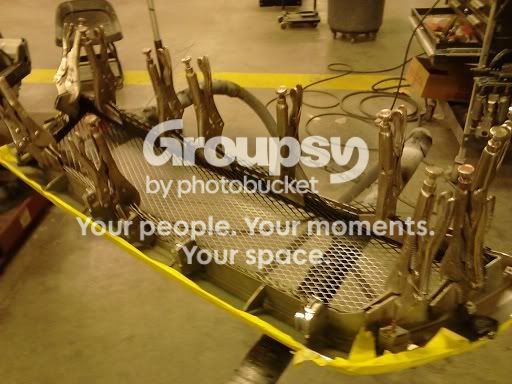
Slide mesh inside grille frame from the backside. Using vise-grips clamp in different areas while you position the mesh to fit flush with the outside of the grille frame. Once you have enough vise-grips securing it start folding the areas between the vise-grips so that it begins to hold its place, keeping in mind to leave space for the steel support tubing to be put back in place.
Begin removing one vise-grip at a time and folding the mesh around the inside of the grille frame. Place a few dabs of the hot glue on the folded mesh to secure. Once all vise-grips are removed and the mesh is completely folded around the inside of the grille frame and glued in place, trim off any excess mesh. Let dry completely.

0XV1bvh.jpg


DSYH9i7.jpg


irPUWvB.jpg


XjUJNCi.jpg


WeJCTIs.jpg


2E6oCni.jpg


FrSDr4Z.jpg


GLl42qk.jpg
 
Last edited:
Reconnect the steel support tubing, the lever for the linkage rod and attach grille.
Attach emblem of your choice.

Here is the emblem that I used, which I know you can get a bit cheaper than this
http://www.cruisercorps.com/emblem-...MI2u28ltXL1QIVRrbACh1vxAu0EAkYDSABEgJRn_D_BwE


My emblem came in a pale yellow color. I chose to paint it white. I used a tiny scuffer and then painted it white with a nail polish brush and white automotive paint.

uFdGjCX.jpg


yjQswpb.jpg
 
Last edited:
Assembly
Slide mesh inside grille frame from the backside. Using vise-grips clamp in different areas while you position the mesh to fit flush with the outside of the grille frame. Once you have enough vise-grips securing it start folding the areas between the vise-grips so that it begins to hold its place, keeping in mind to leave space for the steel support tubing to be put back in place.
Begin removing one vise-grip at a time and folding the mesh around the inside of the grille frame. Place a few dabs of the hot glue on the folded mesh to secure. Once all vise-grips are removed and the mesh is completely folded around the inside of the grille frame and glued in place, trim off any excess mesh. Let dry completely.

Grilleh.jpg~original

That is one impressive vise grip pliers collection.:thumb3::thumb3:
Great job.
 
Thanks! :)

I painted it by hand. I used a tiny scuffer and then painted it with a nail polish brush with white automotive paint. Took about an hour from start to finish (dry).

If my spray paint turns out bad i will be doing that! Awesome idea! thanks!
 

Members online

Forum statistics

Threads
278,311
Messages
3,554,082
Members
248,016
Latest member
Advally Service

Trending content

Back
Top