Need Help: Auto-Dimming Mirror Install

4Runnerguy

New member
I recently received a Gentex Auto-Dimming Mirror as a very nice Christmas gift for my 2003 SR5 V8 4x4 4Runner. Although I believe I have read all of the posts on this site regarding installation, and have even downloaded a copy of the official Toyota Installation instructions for the mirror, I am still unclear as to the final hook-up. (The Toyota Installation Instuctions have such a small scale illustration that you would probably need a powerful electron microscope to be able to see the connector locations).

I do not really want my local dealer to handle this installation since they have previously scratched the INTERIOR of my 4Runner while just performing a routine oil change!

I actually feel quite comfortable with every aspect of the mirror installation except with respect to the attachment sites for the mirror ground wire, and the 12 volt mirror power wire (the most important items). I have repeatedly read the verbal descriptions from several members of where to connect, and although these are very helpful, it is still not enough for me. What I really need is for someone to post a photograph with the two connector locations clearly identified.

I would be very grateful if someone could please pull off their driver's side cowl cover, snap a photo for me clearly labeling the two locations where the wires attach, and then post it on this thread. I am thanking you in advance, and I will let you know how it turns out.
 
Register to hide this ad
Yah, those instructions definitely aren't the clearest. Just the same, if you follow them you should have no problem. Pop off the kick panel cover and take a look at the connectors down there. IIRC, there are two connectors down there that appear similar to the ones shown in the instructions. Only one of those will has a wire in the same position and color indicated in the instructions. I too struggled to find it but trust me it's there.

For the ground, it's not too important really which one you grab. If you look behind the bundles, back towards the body (not the firewall), you should see a group of ground wires (white with black stripe) attached to the body. They may come together at a connector and then plug into a bus that's attached to the body. Attach your ground wire ring connector there.

Sorry I don't have any pics to show you.
 
Last edited:
Thanks Rando, your description IS very helpful, and I will definitely use it when I perform this installation. It would still help greatly though if I also had a photo of the two connection points. If there is anyone else out there that has already performed this modification, and could simply take a quick picture and post it, I'd sure appreciate it.

Let me give you all some added info on this accessory, as some may want to add it to their vehicle. It is the Gentex Auto-Dimming Rearview Mirror with digital Compass. It is an option that I originally wanted on my SR5 truck, but I could not find one with it at the time of purchase.
The mirror was purchased brand new through Deland Toyota, a dealer in Florida (I am in southern California). The price was only $140.00, which is quite a bargain for this particular item (I believe this was their Internet price).

Here's the interesting thing. it is a completely different design than the ones that have been offered in the past. The shape is different (more oval), as well as the control buttons (there is only one- on-off) I was so surprised by this that I immediately called Gentex (and Miticorp, their distributor), to verify that it was legitimate. Yes, they said, this is the new Gentex Mirror design for future vehicles. Actually, I like it quite a bit. Now if I can only install it.
 
I just installed this last week and it was pretty easy...took less time the the Scion radio I put in...remember to disconnect the battery 1st and take your time getting that stupid plastic cover off the old mirror.

If you take a picture of the wires behind the kick panel...I'll tell you where that wire you need to tap into is...if I have time over the weekend I will take a pic of mine.
 
That would be great RichP if you could take that picture. I just don't want to screw this up, and there are a lot of wires down there! Thanks for the help. If anyone else has any further advice on this hook-up, I'm all eyes.

For those that are interested in this product, I checked the Deland Toyota website, and I was unable to find the Auto-Dimming Mirror. It is also not listed on their E-Bay Website right now. I'm sure that they can get them, so if you want one, I recommend calling them, and maybe they will give you the Internet price via a phone order.

Remember, that in many areas of the country, such as California and the west, you cannot order an auto-dimming mirror from your local dealer. (At least, not cheaply!) You must go Online to a Southeast Toyota Dealer. If Deland doesn't work out for you, then another source is toyotaparts4u.com in North Carolina. They have had their Auto-Dimming Mirror at the same price-$169.96 for a long time.
 
Lee,

Nice write-up. A couple questions if you don't mind...

Did you have any issues with clearance between the mirror and sunvisors?

Does the mirror not come with some sort of plastic clip/cover to cover the wires running from the mirror to the overhead?

Any issues with brightness of the display and it being within the mirror's surface?

Thanks!

-- Lew
 
No clearance problems for me.

Brightness of the display has not been a distraction for me, even at night.

If you order a new kit it will come with the wiring cover. You can also order the cover for $2.50 from a parts dealer.

I got my mirror on Ebay. If you're patient, they can be had for ~$100 new.

@4RunnerGuy: I think RichP was offering to help if YOU take the picture. You're not likely to mess things up just taking a picture, are you? :D
 
Thanks for the info, Rando.

I measured at lunch and the autodim-only would definitely fit, but the wider ones with compass (~10.5") may be a bit tight; it looks like it'd depend a lot on how far from the windshield the mirror sits, which depends on placement of the mount.

This is for a 3rd gen where I'd have to mount a button on the windshield, so I do gain some flexibility in placement.

Will watch eBay; always has been a great source if I'm able to be patient and wait for the right deal. Thanks.
 
Rando: No, actually I am more than capable of taking the picture. In fact, I minored in photography in college many years ago. However, I am embarrassed to say that I don't own a digital camera. I guess I must be spending too much money on accessories for my $30,000 truck.

Lee: Yes! Actually I had already located and earmarked your write-up as one that might be "somewhat" helpful. The problem is that the procedure and especially the electrical connection points for the auto-dimming mirror are very different between the 3rd and 4th generation. But your write-up is fantastic! Just what I'm looking for. What we need is for someone to do the exact type of write-up for their 4th generation on the mirror install. Come on someone, this is a wonderful opportunity to really help out your fellow members!

Lew and others: Yes, I agree Ebay is a good source for this accessory and should be added to my previous list of possible vendors for the 4th generation mirror as well.
 
Have you removed the kick panel and looked at what's down there? Did you look at the wires leading into the two huge wire bundles and search for the wire in question?

I'm not trying to be an ass here but it truly is a trivial procedure and there's not much chance of you mucking something up. Give it a try and you'll be watching your new compass mirror shine in no time! :D
 
Lew said:
Lee,

Nice write-up. A couple questions if you don't mind...

Did you have any issues with clearance between the mirror and sunvisors?

Does the mirror not come with some sort of plastic clip/cover to cover the wires running from the mirror to the overhead?

Any issues with brightness of the display and it being within the mirror's surface?

Thanks!

-- Lew

the thing about these mirrors is they have a really awesome arm between the base and the mirror that goes in almost every which way. so if you hadn't thought to check mirror clearance with regard to the sunvisors while installing, you can pretty much just twist it so its not a problem.

i have no issues with it at all.

mine did not come with a cover, but i didnt really need one thanks to my toll booth thing. you can buy the cover at the stealership.

there is no issue with the brightness of the display. if you mean, is it distracting? at first, yea, but after 1 day, you get used to it. you can also shut it off if it bugs you.
 
rando is also right, im a real newbie when it comes to this stuff, and i did it.

its not as hard as it seems, i promise! :p
 
Rando: Yes, I have looked down there, and that's what got me worried to begin with.

O.K. I've given up trying to get my precious photograph. I am going to trust you guys that I can handle this with the existing info that I have already, although I will have to wait now for an available weekend day. Thanks again for all the tips.

But, don't be suprised if I come running back to the forum, begging for more help with this install. Wish me luck.
 
4Runnerguy said:
Rando: Yes, I have looked down there, and that's what got me worried to begin with.

O.K. I've given up trying to get my precious photograph. I am going to trust you guys that I can handle this with the existing info that I have already, although I will have to wait now for an available weekend day. Thanks again for all the tips.

But, don't be suprised if I come running back to the forum, begging for more help with this install. Wish me luck.

Hey, I just noticed that the installation instructions don't actually show you where #A9 is located on that big connector. Is that the same instructions you have? I assume that's the source of your confusion. Search the forums for the 2003 wiring manual ... somebody posted a link sometime back. Then chase down that connector (was ie IE1? .. whatever it says in the instructions) and you can look up the position of #A9 on the connector. That should be all you need to find it.
 
no problem.. ill check in here periodically and answer any other q's you may have.


good luck.
 
rando said:
Hey, I just noticed that the installation instructions don't actually show you where #A9 is located on that big connector. Is that the same instructions you have? I assume that's the source of your confusion. Search the forums for the 2003 wiring manual ... somebody posted a link sometime back. Then chase down that connector (was ie IE1? .. whatever it says in the instructions) and you can look up the position of #A9 on the connector. That should be all you need to find it.

Rando, yes this is right. Now we're on the same webpage! My instructions do not show the exact location of pin #A9, connector IE1. That is the whole problem. I will perform a search for the wiring manual. Maybe that will work just as good as a photo.

Thanks buddy.
 
I just (as in literally about 20 mins ago) finished installing my Gentex mirror. The installation went extremely well but I did have a problem with the wiring. None of the brown/red wires on my 2005 SE v8 were carrying power. After some testlight work I found a nice little yellow/red wire on the lower of the two bolted harness blocks and attached there. Couldn't find anything on the upper bolted block that was only accessory power.

The kit was amazing and directions worked well. Had just enough wire to tuck everything out of the way and wire tie. I'm actually just going back out to make sure I put the trim panel back on right so I'll see if I can get a pic.
 
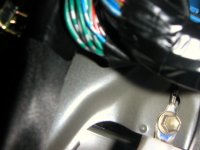
ok, here are the pics. The ground bolt I used was the one directly above and to the left of the bottom wire block. The pic isn't very good. The power wire is shown and is a decent pic. This is the very bottom block and I used the yellow/red wire which only gets accessory power.
 

Attachments

  • ground.jpg
    ground.jpg
    68.9 KB · Views: 2,027

Members online

Forum statistics

Threads
278,306
Messages
3,554,045
Members
248,016
Latest member
Advally Service

Trending content

Back
Top