Need Input On Adding Internal Tie Downs

DreamsOfDirt

New member
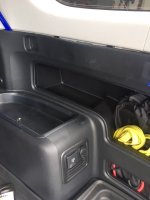
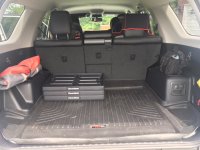
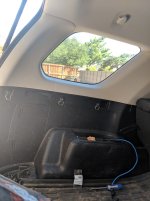
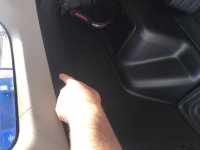
I'd like to add some tie downs to the rear cargo area (one on each side - see pic below) and am debating the best way to secure them.

In my search of the threads here, I've seen people use everything from self tapping screws to bolts to toggle bolts -- but no consensus. I'm sure no thread ever gets consensus given different uses and opinions, but I'd like your thoughts on this specific application.

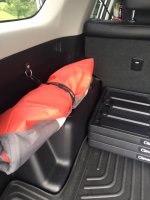
I want anchor / tie down points located right below the rear windows toward the top of the black plastic (See pic below). I don't plan on heavy duty usage, just general securing of gear - likely with bungee or rope.

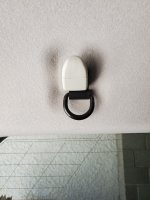
My first inclination was to use half inch stainless steel anchors with two screws each, however, I'm open to other options. I feel like a loop or D ring will be more useful than an open ended hook.

My biggest question is what is the best method for securing the anchor points. I could use toggle bolts, but I'd be putting a pretty big hole in the plastic and metal frame in that location. I could use self tapping metal screws, but I am concerned about their strength/hold. I could use a bolt with lock washer/nut on the left side, accessing through the jack access, but would be out of luck on the right side.

Opinions welcome. Experience and facts preferred. Build threads ideal!
 

Attachments

  • IMG_2402.JPG
    IMG_2402.JPG
    60.3 KB · Views: 4,418
  • IMG_2378.jpg
    IMG_2378.jpg
    110.9 KB · Views: 4,455
Register to hide this ad
Couple of fender washers might do it.

The anchor point base plate actually covers the hole from toggle bolt (I tested it with wood). You're right though, a fender washer would give a bit of insurance/extra coverage.

I'm actually more concerned about what a large hole without material filling it entirely (e.g. a screw) will do to the structural integrity if there was a crash, etc. Maybe I've over thinking it, but a 1/4 toggle bolt requires a 5/8 hole. That's a big gap.
 
I was saying use a regular bolt and nut with fender washers instead of toggle bolts. You’ll need to remove the panel to install but that’s nbd.
 
I also wonder how much rattling will be generated by those hooks. Something I would consider and would probably drive me nuts but that's just me
 
I also wonder how much rattling will be generated by those hooks. Something I would consider and would probably drive me nuts but that's just me


I am concerned about that too. I thought about coating them in plastidip, but I’m not a huge fan for interior use. Still undecided.


Sent from my iPhone using Tapatalk
 
I installed similar tie down loops in similar areas in the cargo bay. I originally thought of using toggle bolts but they were too long and hit metal under the plastic panels. Plus, the toggle bolts required a pretty big hole. So, I used small/short bolts with a fender washer and nut. Works perfectly. Don’t have a photo at the moment but can get one tomorrow.
 
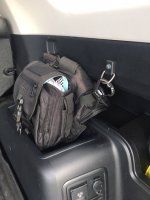
Here’s a photo. I installed 4 of these. Got them on amazon. https://www.amazon.com/gp/product/B072XBTGD5/ref=oh_aui_search_detailpage?ie=UTF8&psc=1

Use them to hold a cargo net and tie down an ice chest so it doesn’t slide around. The hooks don’t rattle at all.

9f17afadd763cbe0dd122a61aa02998e.jpg


Sent from my iPad using Tapatalk

GearJunkie88 - Great Pic and detail. A couple of related questions:

1. So did you just pull the plastic panel to attach?
2. Is there a gap between the plastic panel and the metal structure underneath or did the bolt go through both the plastic and metal?

Thanks again for the link and pics
 
GearJunkie88 - Great Pic and detail. A couple of related questions:

1. So did you just pull the plastic panel to attach?
2. Is there a gap between the plastic panel and the metal structure underneath or did the bolt go through both the plastic and metal?

Thanks again for the link and pics

Yes, just pulled the plastic panel a bit to see what’s behind it. Then drilled a hole and installed the tie down loop. Just used a plastic panel removal tool and pulled. I looked around this forum and found a picture that showed where the plastic push clips that hold he panel to the metal were located.

There is a gap between the plastic and metal structure in some spots. In other spots the plastic is up against the metal. I had no idea what was behind the metal so I didn’t drill into it. I didn’t want to accidentally drill into something like a gas tank or anything. I’m not using these hooks to holds hundreds of pounds so i didn’t need to secure the tie down into metal. Two of my tie downs are used to hold a cargo net that has dividers... I put groceries in it so they don’t slide around. Milk and other things aren’t too heavy and don’t threaten to pull the tie down loop from the plastic panel.
 
GearJunkie88 - I FINALLY got around to the install. Your solution was a great one! Thanks for all the detail.

Mscot - you were right. Fender washer did the trick.

Many thanks to both of you.
 
Adding tie downs - My take

As I stated earlier - many thanks to all who helped me see the error of my ways. Below is a recap of what I learned and my install.

1. Don't use toggle bolts. You'll need to make a very large hole in the side panel and the backside of those panels have a variety of things behind them - from metal frame to ridges of plastic to fasteners, etc. Thankfully other uses guided me away from toggle bolts.

2. Do buy a trim removal tool kit - It's very good use of $10.

3. What's behind panels and their backside structure varies from one side of the vehicle to the other. Pull both before you determine where you want your holes so you can have even/symmetrical placement.

So - here's what I ended up with - and am very happy:

I utilized this trim kit:
https://www.amazon.com/gp/product/B01L8GHB7O/ref=oh_aui_detailpage_o04_s00?ie=UTF8&psc=1

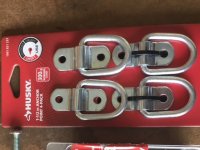
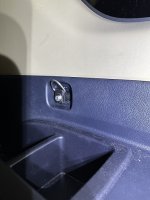
I utilized these tie downs - The D-ring area is about an inch, they are solid, and importantly - the D-Ring doesn't rattle.

https://www.amazon.com/gp/product/B072XBTGD5/ref=oh_aui_detailpage_o00_s00?ie=UTF8&psc=1

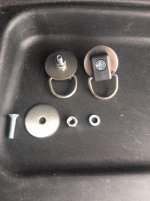
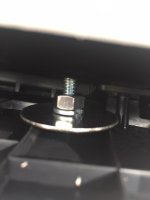
While the kit comes with screws, I wanted something a bit longer since I needed a fender washer, and a lock washer, in addition to the nut. I picked up some 1/4" diameter machine screws in both 1" and .75" lengths. I ended up using the 1" length due to the structure on the back side of the panel - you'll see that below in one of the pics.

This was my first time taking off panels but it's pretty simple. Insert tool, make a gap, and wiggle your tool until you hear a clip pop open. I should state, I didn't TECHNICALLY take off any panels, i just unfastened enough clips and screws to get the access I needed. I unscrewed the screw inside of the cargo cover indentation. Just pop off the cover and it's a phillips. I unfastened the 3-4 clips on the top of the panel and then I removed the plastic "T" tie down right near the tailgate. Just a quarter turn and it pops out. Again, there is a phillips screw underneath.

Once I had the top of the panel loose I pulled it back to see what was behind it (a small Maglite comes in handy here). I had three considerations for where to place the tie downs/drill the hole:

1. Where would the tie down be convenient. For me, I wanted it somewhat it in the middle of the cargo area (front to back), and ideally wanted something to be able to sit in the wheel well tray and also be tied down.
2. What is behind the panel in that location. The fender washer I chose was big to maximize surface area and thus strength of the tie down. This, however, makes install in a couple spots tricky given where metal or clips are located.
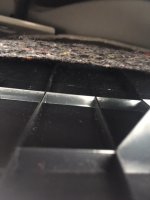
3. I wanted to leverage the structure on the back of the panel for strength -- although I didn't originally anticipate this being a need. You'll see from the pics I chose a spot where the fender washer would spread over three "ridges" (left, right, and bottom).

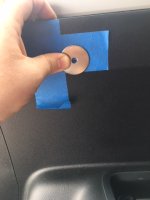
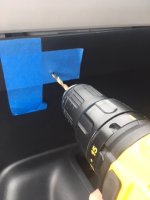
Once i picked a spot, the question was how to replicate the location on both sides so it was symmetrical. I knew I wanted to use masking tape over the drilling area so I didn't damage the finish of the panel, so I just used a couple pieces as my measuring guide. The vertical piece of tape in the pic is aligned with the ridge on the back of the panel. I then placed the fender washer over the tape so one side hit the edge of the masking tape (and the ridge), and the bottom edge of the tape (and the bottom ridge). This ensured I hit all three ridges and had maximum support. I did use a measuring tape just to validate.

Note: Drilling into a panel for the first time will raise your heart rate and make you sweat!

Once I had the hole drilled I added the washer, the lock washer and the nut. On the side with the jack, the panel comes out further and you can easily use your fingers to tighten. On the side with the cubbie, I had to use a needle nose pliers to hold the nut. Be careful not to drop the needle nose or you'll be taking out a LOT more clips to go find it.

With the nut tightened and being satisfied with everything I reassembled. I started with the two screws on either end and worked my way to the middle. The clips pop back in easily.

I hope this write up helps you with your mods. Feel free to reach out with questions.
 

Attachments

  • IMG_2546.jpg
    IMG_2546.jpg
    56.8 KB · Views: 3,883
  • IMG_2549.JPG
    IMG_2549.JPG
    83.9 KB · Views: 3,909
  • IMG_2555.JPG
    IMG_2555.JPG
    77.4 KB · Views: 3,839
  • IMG_2559.JPG
    IMG_2559.JPG
    99.9 KB · Views: 3,840
  • IMG_2562.JPG
    IMG_2562.JPG
    66.8 KB · Views: 3,897
  • IMG_2564.JPG
    IMG_2564.JPG
    50.3 KB · Views: 3,828
  • IMG_2576.JPG
    IMG_2576.JPG
    95.7 KB · Views: 3,990
  • IMG_2577.JPG
    IMG_2577.JPG
    100 KB · Views: 3,888
Just added 6 more to mine (in addition to converting the original two hooks). Thanks for the detailed write up! It was easy to do between coats on my valances!

:thanks:
 

Attachments

  • IMG_20180915_150027.jpg
    IMG_20180915_150027.jpg
    100.8 KB · Views: 3,645
another option if you don't want to drill holes is to use the m6 nuts that are behind the plastic cover piece for the privacy cover. the m6 nut/bolt combo is plenty strong and will not want to pull out the plastic trim clips if pressure is applied (which might happen if you drilled into the plastic and used a nut/fender washer)

In the limited versions of the 4runner there are also 2 more of these covered points lower in the cargo area. if you've removed the third row they will be exposed and you can mount more tie down points or even a quick fist etc to hold items
 

Attachments

  • anchors - Copy.jpg
    anchors - Copy.jpg
    80.1 KB · Views: 222
Added these to above hooks. Got the idea from another thread but can't find it at the moment.
 

Attachments

  • tiedown1.jpg
    tiedown1.jpg
    135.4 KB · Views: 200
  • tiedown2.jpg
    tiedown2.jpg
    138.6 KB · Views: 202
Just for future reference, another option would be to use a rivet nut backed by a fender washer. It would have been easier and cleaner. You could then remove the bolt afterwards without taking the panel off to access the nut on the back, and you'd also be able to use shorter bolts. The tool and rivet nuts are pretty cheap on Amazon.
 

Members online

Forum statistics

Threads
278,305
Messages
3,554,042
Members
248,016
Latest member
Advally Service

Trending content

Back
Top