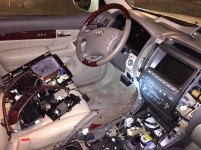
New (2me) GX Build Underway

TOY2G

New member
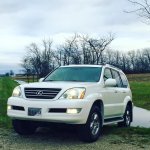
Day two and neck deep. We just picked this GX up 2 days ago. Long story short, we adopted a kid. I already have 3 sons so the new RX we bought last year was not going to cut it. So we dumped the RX, and got this with 3rd row.

Many parts already on order, but don't forget I'm in the middle of our 2015 TE build at the moment also.


Build list so far
-TOYTEC BOSS 2.0 Lift Kit (Ordered)
-Timberland AT Tires 285-70-17 (WIP)
-Direct Wired Garmin NuviCam (Installed)
-Lexus DVD Entertainment system (for the road trip) (Installed)
-Rocktek Link Armor (Ordered)
-PRG 9000lbs Winch W/SYN Line (In hand)
-Baja Designs Driving Lights (In hand)
-Under Cover Hidden Winch Mount (WIP)
-PRG Prado Snorkel (In hand)
-Flex Mount Trailer Brakes (Ordered)
-Hefty Fabworks Sliders (TBA)
-ARB Roof Rack (In hand)
-ARB Twin Compressor (In hand)
-LED interior Bulb Conversion......because the SUN is awesome installed)

Everything but the sliders are in the works. Got talk to Chris to see what we have for options. This will not be a fast build like my wife's 2013, I will likely wait for everything to show up before I do any of the "real" modding. This will be ready for Jambo and Summit this year and likely will be at just as many events as the new TE.
 

Attachments
  • image.jpg
    image.jpg
    131.6 KB · Views: 5,632
Last edited:
Register to hide this ad
So I'm getting a slow start to the build. I cannot muster the nerve to cut the fender yet and I'm still working out the details for some larger components. I did spool the synthetic line on the winch and the Factor55 thimble made it in, but I still have not nailed down how I am doing the winch mount. Not sure if I should order a 4th gen 4Runner mount and modify it to fit, or just build my own.

What I have gotten done is the LED interior/exterior lighting.

One of the most important bulbs for me is the Backup bulbs (Part Number 7440). Not an easy sway in the GX, so let me make a suggestion or three.

1) you do want to replace these often because they are hard to get to.
2) don't buy the cheapest bulb you can find just because it says it has a million lumen.
3) Cree and Epistar are both good options, but make sure they are legit (not knockoffs) and make sure they are the ones with the built in aluminum heat sinks.

this is what I am using.


The running board lights, rear dome, cargo area and courtesy lights are all 194 bulbs. As a personal preference I use CAN Bus bulbs because there is more contact other than just a little wire on each pole. IMHO, the CAN Bus bulbs are a more reliable bulb and not as finicky.

Here are the bulbs I used.


Lastly are the map light bulbs (part number BA9S) these bulbs are a throw back to the old chrome Phillips 2C flashlights. they are a push and twist mini globe bulb. There are not a lot of option for this style bulb. So just pick a true Cree or Epistar bulb and hope for the best.


In future post we will get to the Baja Designs from Flush Mount bumper lights. But for now, movement on the build is rather slow. over the next 5 weeks or so the larger mods will progress...

Oh, I nearly forgot. Since we are going to be working closely with Timberland Tire Company (Timberland Boot Company) and their "green" approach to tire sales. We added a little brandign to the GX.


WARNING: long winded story below.

I wont waste your time with the details, but I had a climbing accident back in the early 2000s and fell over 40 feet (bouncing of out-croppings a couple times on the way down) I landed flat footed facing the rock wall. I happened to land upright, however I landed in loose shale rock. The landing blew out the back of my left boot and broke my ankle. BUT the boot kept me in good enough shape to climb back out of the Crooked River Canyon and walk the nearly one mile to my truck. According to the doctor, my hand me down boots saved my ankle and perhaps my life (given the fact I had let nobody know where I was going and there is ZERO access to the bottom of the canyon). as I'm sure you have guessed by now the old boots were Timberland Boots. and thus starting my obsession with the brand.

Fast forward 20 years and you will fine me with a timberland collection that surpasses most timberland retail locations. Not the Timberland you see in hip-hop videos, more the Timberland you wear to go camping or our to a nice dinner. I have been into timberland store so often in our common stomping grounds (Connecticut, Austin and Pennsylvanian) that store manager have literally given me store fixtures bearing the Timberland logo or namesake.

Two years ago I was at the SEMA show in Vegas and happen to be present for the press release where Timberland announced they are getting into the tire business. I made some friends, shared some stories and by chance and luck found myself in a position to promote the brand.

So... I have a "Timberland Room" at my house. Honestly it's the den, but still by most standards, it is in fact a room.


Things just got real.

We decided to delete the rear air suspension with the kit from MetalTech, avail from our friends at ToyTec Lifts. The kit includes rear lower spring perch mounts and spring isolators. It also comes with a set of OEM Toyota rear internal spring bump stops.

The kit we are using is the ToyTec BOSS 2.0 Kit. We have it on 4 of our other vehicles and I have literally never had a complaint.

So you what to know what it takes to lift a GX....... Here is my pile of parts sitting in my office.

 
That should work :)

Where on the Toytec site do you find parts for the GX? I know most of it is just 4Runner stuff - but how did you find the Metal Tech conversion stuff there?
 
That should work :)

Where on the Toytec site do you find parts for the GX? I know most of it is just 4Runner stuff - but how did you find the Metal Tech conversion stuff there?

Its just a 4th gen kit. If you are doing a GX you have to call them or me and let us know so we can get you the correct parts to delete the OEM Air spring.

Converting the cassette deck to an 8-track?

If you look real close you can see an extra 12v plug on a 6" pigtail hanging off of the center console insert.
 
I spent some time this weekend to get a few things knocked out on the GX build. The full install with pics will be avail on the Toytec site soon, so I will not waste space here with a full install write up. I do have a rough draft in Powerpoint for if someone needs it.

A few things worth mention:
-You must remove the two Air suspension fuses before you begin.
-The sensors on the front and rear shock cannot be used after the conversion
-Your “off” light will flash on the air ride dash indicator
-You do not have to remove the compressor and or wiring

We started the install around 11:00

We chase to go with the New Timberland Tires 285-70-17, we used the Pmetric this time as apposed to the LT. I chose this route simply to save rotating mass and perhaps retain a little MPG.


With OEM wheels and upper control arms, the 285s did fit with about ¼ inch of space at the closest point in travel. It’s enough space for sure, but I will however still install a set of the total chaos upper control arms in the coming weeks.


Lastly, here is a before and after, a very mild build for sure. I have not adjusted the ride height yet. I will not crank the front past 2” if I do not need to, but I must wait for the rear spring to settle first.


A couple more pics just because…


Snorkel

Toady went pretty smooth. I finally got the courage to install the Prado 120 snorkel on the GX.

I did not take many pictures because it was all about time today. The template fit perfect, the holes only had to be drilled to 1/2 not 9/16 like normal and the snorkel fit the body lines.

I did not install the A-Pillar bracket because I did not want holes (a new home for rust) in the truck. I will build an extended bracket and use automotive grade adhesive to secure the bracket.


...

A few things worth mention:
-You must remove the two Air suspension fuses before you begin.
-The sensors on the front and rear shock cannot be used after the conversion
-Your “off” light will flash on the air ride dash indicator
-You do not have to remove the compressor and or wiring
...
To get that "off" light to stop blinking you can pull the "tems" fuse in the interior fuse panel under the dash, just a little FYI.
 
Turns out removing the "TEMS" fuse from the dash fuse panel takes care of the flashing "off" light. Problem solved.

I redecorated the lift bay to help make our sponsors feel happy and then proceeded with the build.


(Disclaimer) We were sent a set of these upper control arms for evaluation. I cannot in good conscious recommend these arms to the average builder. There are too many issues that must be addressed. For instance, the sleeves are too short inside the bushings, The washer for the joint are too small, and the quality of the bushings and hardware are still to be determined. Also worth note, the grease zerks works to pump grease in, however they also let the grease right back out.
I replaced the sleeves and washers, ordered new zerks and am keeping a close eye on the bushings. Time will be the deciding factor in this component. The only thing that I cannot fix is the LOUD color they use. YUK


All installed and coil overs cranked up an additional 1/4 inch to get the truck closer to level.


Sat her down, tightened the main bolt and ready for a test drive. (this is where I learned the zerks blow all the grease out.
 

Forum statistics

Threads
278,316
Messages
3,554,109
Members
248,016
Latest member
Advally Service

Trending content

Back
Top