New head unit

46runner

Member
My next project
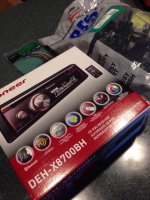
Pioneer with Bluetooth and HD radio:
ImageUploadedByTapatalk1428148081.039087.jpg
 

Attachments

  • ImageUploadedByTapatalk1428148081.039087.jpg
    ImageUploadedByTapatalk1428148081.039087.jpg
    53.6 KB · Views: 804
Register to hide this ad
I just finished this project.

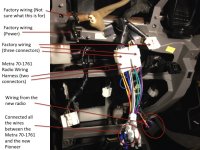
Everything connected up pretty straight forward.
radio1.jpg

Updated: The plug I have labeled as Power is actually an antenna. And the other one next to it is a secondary antenna which did not have a place in the new radio. The other unused connector was a white connector (dangling alone in the pic). I didn't do anything with these two and radio seems to be working fine.

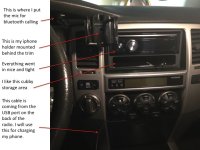
Here is the finished project.
radio2.jpg

Parts:
Pioneer DEH-X8700BH
AMERICAN INTERNATIONAL TOYK975 Radio Install Kit
Metra 70-1761 Radio Wiring Harness For Toyota
And a handful of wire nuts
 

Attachments

  • radio1.jpg
    radio1.jpg
    112.5 KB · Views: 1,587
  • radio2.jpg
    radio2.jpg
    87.7 KB · Views: 890
Last edited:
I'd have to see the faces of the connectors to really get a better idea of what they are for. Do you have steering wheel controls? The white one may possibly be for that. But without seeing the number of pins in the connector, wire colors, connector layout, etc, it's just guessing.

Also, not to rain on your parade... wire nuts definitely aren't meant for the mobile environment. Since you have it all back together, I wouldn't worry TOO much about it just yet, but at your earliest opportunity, consider changing those out with crimp splices, or even solder splices. Much less chance for the wires to come out, short out, and you won't have that huge mound of wirenuts!:bravo:

Other than that, how did the phone mount attach behind the trim piece? How's the sound difference? Looks good installed.

 
I'd have to see the faces of the connectors to really get a better idea of what they are for. Do you have steering wheel controls? The white one may possibly be for that. But without seeing the number of pins in the connector, wire colors, connector layout, etc, it's just guessing.

Also, not to rain on your parade... wire nuts definitely aren't meant for the mobile environment. Since you have it all back together, I wouldn't worry TOO much about it just yet, but at your earliest opportunity, consider changing those out with crimp splices, or even solder splices. Much less chance for the wires to come out, short out, and you won't have that huge mound of wirenuts!:bravo:

Other than that, how did the phone mount attach behind the trim piece? How's the sound difference? Looks good installed.

thanks for the advice. will crimp them later. no steering wheel controls. the new radio sounds much louder than the factory radio. might decide to swap out the speakers later. the phone holder I wrote up here: http://www.toyota-4runner.org/4th-gen-t4rs/177085-diy-smartphone-holder.html
 
Use the iso bracket mount instead of the din cage, it's a better install, and use the kit's trim ring, I have the same kit and you will like the finish look.
 
thanks for the advice. will crimp them later. no steering wheel controls. the new radio sounds much louder than the factory radio. might decide to swap out the speakers later. the phone holder I wrote up here: http://www.toyota-4runner.org/4th-gen-t4rs/177085-diy-smartphone-holder.html

You should definitely hear a big difference also when you change out the speaks. Your current ones are over 10 years old already, and are pretty much cheap paper cone speakers (as most OEM speakers are). Some people run new wiring the whole length, but it's really not necessary in your case, unless you want to use oxygen free copper wire. But that doesn't really benefit until you are running high power amps, etc.
Just remember, using the factory wiring, you will need to either use an adapter to connect to after market speaks, or cut off the ends, and crimp or splice whatever the speaker requires.

I like how you mounted your phone where it is. Quite innovative. Is it stable? or does it tend to vibrate some? Does it block the vent any? Mine is mounted over by the glove box (the phone sits just to the right of the radio), and I like it, but I have to reach over to do anything. I like your mount because it's right there in your face. You don't have to really take your eyes off the road too much to look at it. I might just have to try that...

I have pictures of my phone mount here:
http://www.toyota-4runner.org/4th-gen-t4rs/190970-vent-mounted-cell-phone-holder-recommendation.html
 
There were two factory connectors that didn't have a use for the new radio. One was a plug that was next to the power plug. Not sure what it's for.

What you have labeled as the power plug is actually the antenna. The smaller one that you didn't have use for is a secondary antenna. Some owners have purchased an adapter kit that joins the two into a single connector for aftermarket head units, but many (me included) decided to just leave the secondary antenna disconnected with no effect on reception.

FWIW, your power comes from one of the wires in the harness - it is connected to a 12v acc. power feed.

Good call on swapping out the wire nuts at some point. I would recommend you get yourself an inexpensive soldering iron,some decent solder (made for electrical work), and some heat shrink tubing.
 
I like how you mounted your phone where it is. Quite innovative. Is it stable? or does it tend to vibrate some? Does it block the vent any? Mine is mounted over by the glove box (the phone sits just to the right of the radio), and I like it, but I have to reach over to do anything. I like your mount because it's right there in your face. You don't have to really take your eyes off the road too much to look at it. I might just have to try that...


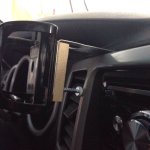
It blocks a corner of the vent a little bit. You could make it a bit higher but that starts to obstruct a bit of the windshield. But not as bad as the windshield suction phone holders. You could also extend it out forward a bit. Mine sits about 2" away from dash/vent. It's very stable. Does not jiggle. At first it vibrated a bit but not after I braced it against the dash. In the pic, you'll see I used a screw as a brace with a white rubber cap to protect the dash. ImageUploadedByTapatalk1428316412.023591.jpg
 

Attachments

  • ImageUploadedByTapatalk1428316412.023591.jpg
    ImageUploadedByTapatalk1428316412.023591.jpg
    39.1 KB · Views: 564
What you have labeled as the power plug is actually the antenna. The smaller one that you didn't have use for is a secondary antenna. Some owners have purchased an adapter kit that joins the two into a single connector for aftermarket head units, but many (me included) decided to just leave the secondary antenna disconnected with no effect on reception.

FWIW, your power comes from one of the wires in the harness - it is connected to a 12v acc. power feed.

Good call on swapping out the wire nuts at some point. I would recommend you get yourself an inexpensive soldering iron,some decent solder (made for electrical work), and some heat shrink tubing.

Ahh! Thanks man! I updated my original post with this info.
Alright guys - now I want to upgrade my speakers. No sub. Just the fronts. Nothing extreme. Was reading riceandpho's comment elsewhere about sound deadening the door. Can you elaborate or point me to a thread? Thx!
 
U should watch soundman car audio YouTube, u learn some cool stuff. Just clean the area first and then apply the sound deadening material.
 
To properly connect the harness to your harness to your radio wiring, you just need regular barrel splices; non-shrinkable. Just ensure you have the right tool, and no stray strands of wire are protruding from the splice.

splice non-shrink.jpg

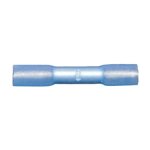
You really only need the splices with the heat shrinkable ends in areas where they are exposed to the elements (moisture; ie rain, snow, etc). Obviously it won't hurt to use these in other locations, but they are generally a bit more costly, so why? They do look nearly the same in the picture, but, here's an example.

splice shrink tube.jpg

In either case, again make sure you use the right tool. This is important so you don't damage the insulation around the splice. If it gets damaged, you could very well have a short circuit.
 

Attachments

  • splice non-shrink.jpg
    splice non-shrink.jpg
    22.6 KB · Views: 456
  • splice shrink tube.jpg
    splice shrink tube.jpg
    14.5 KB · Views: 427

Members online

Forum statistics

Threads
278,307
Messages
3,554,056
Members
248,016
Latest member
Advally Service

Trending content

Back
Top